Windows 7 includes several features that are
particularly useful for laptop computers. For example, through Power
Options in Control Panel, you can select a power plan and enable
power-management features. Enabling a power plan gives the user a chance
to conserve battery life and get the most out of mobility.
NOTE
To see many of the power
options, you must be using Windows 7 on a laptop computer. If you are
running Windows 7 on a desktop, you will see many but not all of the
features covered in the following sections.
1. Recognizing the Improvements to Power Management
Windows 7 builds upon the power-management features that were introduced with Windows XP with some the following enhancements:
Battery meter, which provides a notification icon in the system tray that details the computer's battery power
Power plans, which are collections of hardware and software settings optimized for a specific function
Sleep power state, which combines the speed of standby with the features of hibernate mode
ReadyDrive, which provides faster booting and resume times when used in conjunction with ReadyDrive-capable hard drives
NOTE
These power
enhancements were present with Windows Vista but I listed them here
because I understand that many users and administrators did not switch
to Windows Vista.
After looking at some of the features of Windows 7 Power Management, let's take a look at managing the different power options.
2. Managing Power States
In Windows 7, the Advanced Configuration Power Interface (ACPI) specifies different levels of power states:
Fully active PC
Sleep
Hibernation
Complete shutdown of PC
The sleep power state is a new
power state introduced with Windows 7 that combines the features of
hibernate and standby. When a computer enters the sleep power state,
data including window locations and running applications is saved to the
hard disk, and that session is available within seconds when the
computer wakes. The computer can thus be put into a power-saving state
when not in use but allows quick access to the in-process user session,
so the user can begin working more quickly than if the computer were
shut down or put into hibernation.
Hibernation falls short of a
complete shutdown of the computer. With hibernation, the computer saves
your Desktop state as well as any open files. To use the computer again,
you need to press the power button. The computer should start more
quickly than from a complete shutdown because it does not have to go
through the complete startup process. You will have to again log on to
the computer. Similar to when the computer is put into sleep mode, all
the documents that were open when the computer went into hibernation are
still available. With hibernation you can easily resume work where you
left off. You can configure your computer to hibernate through Power
Options or by choosing Start, then clicking the arrow and selecting
Hibernate from the drop-down menu. This option will appear only if
hibernation has been enabled through Power Options.
NOTE
Unless you want to
completely shut down the computer, configuring the computer to enter
Sleep mode is typically the best power-saving option. You may need to
upgrade your computer's BIOS in order to use advanced power modes such
as sleep
The Hibernation mode may not be
available on your Windows 7 laptop machine by default. You must make
sure your firmware can support Hibernation. If it does not appear by
default and your system can support Hibernation, complete the following
steps to enable the Hibernate function.
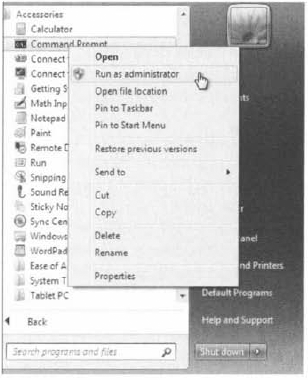
Open an elevated command prompt (right-click on the command prompt and choose Run As Administrator).
Click Yes at the dialog box. At
the prompt, type powercfg -h on and press Enter. Entering the same
command and using the Off switch would disable Hibernation on the
machine. Close the command prompt.
|
Now let's take a look at the different types of power options that you can configure.
3. Managing Power Options
You configure power options through the Power Options Properties dialog box. To access this dialog box, access Control Panel =>
Power Options. The Power Options dialog box provides the ability to
manage power plans and to control power options, such as when the
display is turned off, when the computer sleeps, and what the power
button does.
3.1. Configuring Power Plans
Windows 7 includes three
configurable power plans: Balanced, Power Saver, and High Performance.
Power plans control the trade-off between quick access to an existing
computer session and energy savings. In Windows 7, each power plan
contains default options that can be customized to meet the needs of
various scenarios.
The Balanced power plan, as its
name suggests, provides a balance between power savings and performance.
By default, this plan is configured to turn off the display after 20
minutes and to put the computer to sleep after 1 hour of idle time.
These times can be modified as needed. Other power options that can be
modified include Wireless Adapter settings and Multimedia settings.
Wireless adapters can be configured for maximum power savings or maximum
performance. By default, the Balanced power plan configures wireless
adapters for maximum performance. The Multimedia settings can be
configured so that the computer will not be put into Sleep mode when
sharing media. For example, if the computer is acting as a Media Center
device, then you can configure the computer to remain on by setting the
Prevent Idling To Sleep option so that other computers can connect to it
and stream media from it even when the computer is not being used for
other purposes.
The Power Saver power plan
is optimized for power savings. By default, the display is configured to
be turned off after 20 minutes of inactivity, and the computer will be
put into sleep mode after 1 hour of inactivity. Additionally, this power
plan configures hard disks to be turned off after 20 minutes of
inactivity.
The High Performance power plan
is configured to provide the maximum performance for portable
computers. By default, the computer will never enter Sleep mode, but the
display will be turned off after 20 minutes. When this setting is
configured, by default the Multimedia settings are configured with the
Allow The Computer To Enter Away Mode option, which allows the computer
to enter into a new power state called Away mode. Away mode configures
the computer to look like it's off to users but remain accessible for
media sharing. For example, the computer can record television shows
when in Away mode.
You can modify the
existing power plans to suit your needs by clicking Change Plan Settings
or you can use the preconfigured power plans listed in Table 1.
Table 1. Windows 7 power plans
| Power Plan | Turn Off Display | Put Computer to Sleep |
|---|
| Balanced | After 20 minutes | 1 hour |
| Power Saver | After 20 minutes | 1 hour |
| High Performance | After 20 minutes | Never |
Other Desktop options you can use are the Shutdown button and switching users. Let's take a look at these features.
4. Configuring the Power Button
Unless you decide to run your
computer 24 hours a day, you will eventually want to shut it down. By
default on the Start menu, you have a Shut Down button (this is called
the power button). When you click this button, your machine will power
off. But the power button does not have to be set to the Shut Down
option. You can configure this button to Switch User, Logoff, Lock,
Restart, or Shut Down.
You may have a machine that
is shared by multiple users and it may be better for you to have the
Switch User button on the Start menu instead of the Shut Down button.
Configuring the Switch User option would make it easier on your users.
