4. Understanding the System Icon
The System icon in Control Panel is a
very useful ser of utilities and tasks that can allow you to set Remote
Access, System Devices, System Protection, and the computer name, just
to name a few.
Let's take a look at the different utilities and tasks that can be configured in Control Panel.
Windows Edition
The Windows Edition section shows you which edition of Windows the
machine is currently using. The Windows Edition section also shows if
service packs are installed.
System The System section shows information about the system hardware. The System sections shows the following information:
Rating
Processor
Installed Memory (RAM)
System Type
Pen and Touch
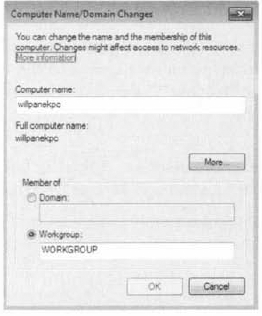
Computer Name, Domain, and Workgroup Settings
In the Computer Name, Domain, And Workgroup settings section, you can
change the name of the computer system and also change the workgroup or
domain (see Figure 21).
Windows Activation
The Windows Activation section allows you to activate your Windows 7
operating system. The Windows Activation section also allows you to
change your Product key before activating.
Remote Settings
In the Remote Settings section, you can set the Remote Assistance and
Remote Desktop settings for the Windows 7 system, as shown in Figure 22.
Windows Remote Assistance allows an administrator to connect to a
machine and control the mouse and keyboard while the user is on with the
administrator. This option can be enabled or disabled.

Remote Desktop allows you to
have your own session on the Windows 7 operating system. While you are
logged on to the Windows 7 operating system through Remote Desktop, the
user of the machine can't view the session. There are three Remote
Desktop options from which you can choose:
Don't allow connections from this machine Choosing this option denies anyone the ability to connect to this machine through Remote Desktop.
Allow connections from computers running any version of Remote Desktop (less secure) This setting allows any computer running Remote Desktop to connect to this
Windows
7 machine. These machines do not need to use Network Level
Authentication, and that's what makes this connection type less secure.
Allow connections only from computers running Remote Desktop with Network Level Authentication (more secure)
Network Level Authentication is a new authentication method used for
Remote Desktop (Windows Vista and higher). It allows Remote Desktop
users to connect to the Windows 7 operating system securely.
You also have the ability in
Remote Desktop to specify which users have access to the Windows 7
machine through the use of Remote Desktop.
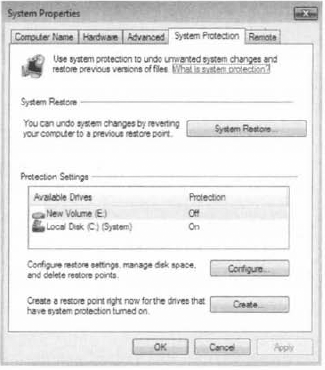
System Protection The System Protection section is for configuring restore points and recoverability for the Windows 7 operating system (see Figure 23). You can also manage disk space and manage all of your restore points from the System Protection section.
Advanced System Settings
The Advanced System Settings section allows you to set up such items as
visual effects, processor scheduling, memory usage, virtual memory,
Desktop settings, system startup, and recoverability (see Figure 24).
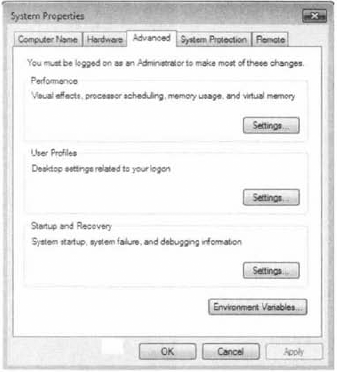
There are three main sections within the Advanced System Settings section:
Performance
The Performance section allows you to configure the visual effects, the
virtual memory, processor scheduling, and the Data Execution Prevention
for the Windows 7 operating system.
The virtual memory is a section of the hard drive that is used by the system and RAM.
Think of RAM as a pitcher of water. As the water fills up the pitcher,
the pitcher becomes full. Once it's full, more water would cause it to
overflow. The virtual memory is the overflow for RAM. When RAM fills up,
the oldest data in RAM gets put into the virtual memory. This way the
system does not need to look at an entire hard drive for that data. It
finds it in the virtual memory.
The Data Execution Prevention section helps protect against damage from viruses and other security threats.
User Profiles
The User Profiles section allows you to copy, delete, or move a user's
Desktop profile to another location or user account.
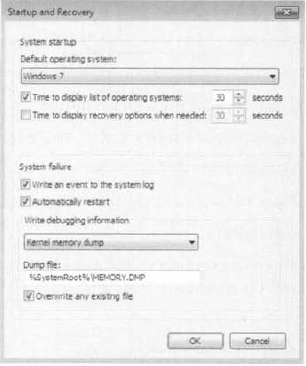
Startup and Recovery The Startup and Recovery section (see Figure 25)
allows you to configure which operating system will be booted by
default (important for dual-booting machines) and what should happen
when the system gets a startup error.
You can also configure the Device Manager from the System icon.
Let's now take a look at how to configure some of the options using the System icon. Complete Exercise 4 to change the computer name.
Open the System tool by clicking Start => Control Panel => System. Under the Computer Name, Domain, And Workgroup settings section, click the Change Settings link. Click the Change button in the To Rename This Computer section. In the Computer Name field, rename your computer. Click OK. A dialog box asking you to reboot the machine will appear. Click the OK button. Click the Close button. Click the Restart Now button.
|
Now that you have renamed the computer, let's take a look at how to configure performance options. Complete Exercise 5 to manipulate your system's virtual memory.
Open the System tool by clicking Start => Control Panel => System. In the left-hand side, click the Advanced System Settings link. Under the Performance section, click the Settings button. When the Performance option screen appears, click the Advanced center tab. In the Virtual Memory section, click the Change button. Uncheck the check box that states Automatically Manage Paging File Size For All Drives. Click the Custom Size radio button. Set
the Minimum and Maximum settings to one and a half times RAM. For
example, if your RAM is 1,024 MB, set the settings to 1,536 MB. Click OK. Click OK at the Performance Options screen. Close the System Properties screen.
|
NOTE
Microsoft Windows 7
handles the virtual memory requirements by default, but I recommend
increasing the virtual memory on your machine if hard drive space is
available. I use the rule of thumb of one and a half to two times the
size of RAM. You want to make sure that the virtual memory is at least
the same size as your RAM at a minimum.
Now let's take a look at how to set up some recoverability options for your operating system. Complete Exercise 6 to create a restore point.
Open the System tool by clicking Start => Control Panel => System. In the left side, click the System Protection link. When the System Protection screen appears, click the Create button in the Create A Restore Point Right Now section. A
dialog box asks you to type in a description to help identify which
restore point it is. Type in today's date and click the Create button. Next, a dialog box stating that the restore was created successfully appears. Click the Close button. Now click the System Restore button. At the System Restore box, click Next. At
the "Restore your computer to the state it was in before the selected
event" screen, you should see the restore point that you just created. If the restore that you created is there, click Cancel. If the restore is not there, repeat steps 2 through 5.
|
Another way to
configure options within the Windows 7 operating system is to configure
the settings directly in the Registry. To do this, you use a Registry
editor. In the next section we will discuss using the Registry editor.
5. Using the Registry Editor
You use the Registry
Editor program to edit the Registry. This utility is designed for
advanced configuration of the system. Usually, when you make changes to
your configuration, you use other utilities, such as Control Panel,
which was discussed in the previous section.
|
Only experienced administrators
should use the Registry Editor. It is intended for making configuration
changes that can be made only directly through the Registry. For
example, you might edit the Registry to specify an alternate location
for a print spool folder. Improper changes to the Registry can cause the
computer to fail to boot. Use the Registry Editor with extreme caution.
|
|
Windows 7 uses the REGEDIT or
REGEDT32 programs as the primary utility for Registry editing in
Windows 7. These programs support full editing of the Registry. To use
REGEDIT, select Start and type REGEDIT in the Search dialog box. To use
REGEDT32, type REGEDT32 into the Search dialog box.
The Registry is organized in a
hierarchical tree format of keys and subkeys that represent logical
areas of computer configuration. By default, when you open the Registry
Editor, you see five Registry key listings, as shown in Figure 26 and described in Table 1.
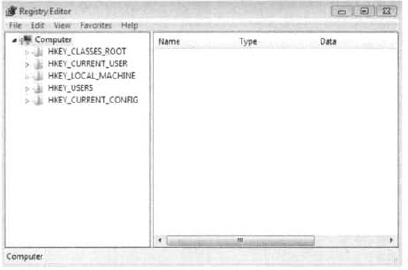
Table 1. Registry Keys
| Registry Key | Description |
|---|
| HKEY_CURRENT_USER | Configuration information for the user who is currently logged on to the computer. This key is a subkey of the HKEYJJSERS key. |
| HKEY_USERS | Configuration information for all users of the computer. |
| HKEY_LOCAL_MACHINE | Computer hardware configuration information. This computer configuration is used regardless of the user who is logged in. |
| HKEY_CLASSES_ROOT | Configuration information used by Windows Explorer to properly associate file types with applications. |
| HKEY_CURRENT_CONFIG | Configuration of the hardware profile that is used during system startup. |
