5. Using Windows Deployment Services (WDS)
Another way that many IT
departments deploy operating systems has been through the use of Remote
Installation Services (RIS). RIS was a utility that allowed an
administrator to deploy an operating system remotely. On the client
machine that was receiving the operating system, you would use a set of
disks (RIS client disks) that would automatically initiate a network
card, connect to the RIS server, and download the operating system.
For Windows 7 and Windows
Server 2008, a new version of RIS has been developed, and it's called
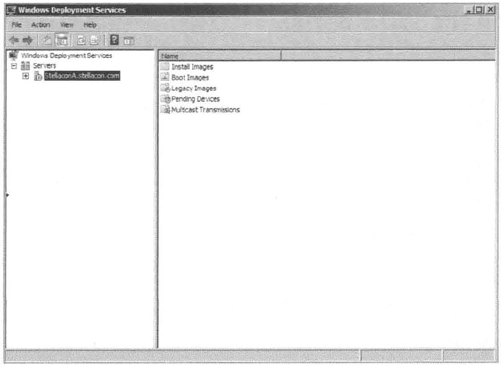
Windows Deployment Services (WDS). WDS (see Figure 1)
allows an IT administrator to install a Windows operating system
without using a CD or DVD installation disk. Using WDS allows you to
deploy the operating system through a network installation. WDS can
deploy Windows XP, Windows Server 2003, Windows Vista, Windows 7, and
Microsoft Windows Server 2008.
The following are some of the advantages of using WDS for automated installation:
You can remotely install Windows 7.
The
procedure simplifies management of the server image by allowing you to
access Windows 7 distribution files from a distribution server.
You
can quickly recover the operating system in the event of a computer
failure. Here are the basic steps of the WDS process from a PXE-enabled
WDS client:
The
WDS client initiates a special boot process through the PXE network
adapter (and the computer's BIOS configured for a network boot). On a
PXE client, the client presses F12 to start the PXE boot process and to
indicate that they want to perform a WDS installation.
A
list of available Windows Reinstallation Environment (PE) boot images
is displayed. The client should select the appropriate Windows PE boot
image from the boot menu.
The Windows Welcome screen is displayed. The client should click the Next button.
The WDS client is prompted to enter credentials for accessing and installing images from the WDS server.
A list of available operating system images is displayed. The client should select the appropriate image file to install.
The WDS client is prompted to enter the product key for the selected image.
The
Partition And Configure The Disk screen is displayed. This screen
provides the ability to install a mass storage device driver, if needed,
by pressing F6.
The image copy process is initiated, and the selected image is copied to the WDS client computer.
The following sections describe how to set up the WDS server and the WDS clients and how to install Windows 7 through WDS.
6. Preparing the WDS Server
With the WDS server,
you can manage and distribute Windows 7 operating system images to WDS
client computers. The WDS server contains any files necessary for PXE
booting, Windows PE boot images, and the Windows 7 images to be
deployed.
The following steps for preparing the WDS server are discussed in the upcoming sections:
Make sure the server meets the requirements for running WDS.
Configure the WDS server to respond to client computers (if this was not configured when WDS was installed).
For WDS to work, the server
on which you will install WDS must meet the requirements for WDS and be
able to access the required network services.
7. WDS Server Requirements
The WDS server must meet these requirements:
The computer must be a domain controller or a member of an Active Directory domain.
At least one partition on the server must be formatted as NTFS.
WDS must be installed on the server.
The operating system must be Windows Server 2003 or Windows Server 2008.
A network adapter must be installed.
8. Network Services
The following network services must be running on the WDS server or be accessible to the WDS server from another network server:
TCP/IP installed and configured.
A
DHCP server, which is used to assign DHCP addresses to WDS clients.
(Ensure that your DHCP scope has enough addresses to accommodate all the
WDS clients that will need IP addresses.)
A DNS server, which is used to locate the Active Directory controller.
Active
Directory, which is used to locate WDS servers and WDS clients as well
as authorize WDS clients and manage WDS configuration settings and
client installation options.
9. Installing the WDS Server Components
You can configure WDS on a Windows
Server 2003 or Windows Server 2008 computer by using the Windows
Deployment Services Configuration Wizard or by using the WDSUTIL
command-line utility. Table 3 describes the WDSUTIL command-line options.
Table 3. WDSUTIL command-line options
| WDSUTIL Option | Description |
|---|
| /initialize-server | Initializes the configuration of the WDS server |
| /uninitialized –server | Undoes any changes made during the initialization of the WDS server |
| /add | Adds images and devices to the WDS server |
| /convert-ripimage | Converts Remote Installation Preparation (RIPrep) images to WIM images |
| /remove | Removes images from the server |
| /set | Sets information in images, image groups, WDS servers, and WDS devices |
| /get | Gets information from images, image groups, WDS servers, and WDS devices |
| /new | Copies images from the image store |
| /export-image | Exports to WIM files images contained within the image store |
| /start | Starts WDS services |
| /stop | Stops WDS services |
| /disable | Disables WDS services |
| /enable | Enables WDS services |
| /approve-autoadddevices | Approves Auto-Add devices |
| /reject-autoadddevices | Rejects Auto-Add devices |
| /delete-autoadddevices | Deletes records from the Auto-Add database |
| /update | Uses a known good resource to update a server resource |
The first step in setting up
WDS to deploy operating systems to the clients is to install the WDS
role. You do this by using Server Manager. You must make sure that DNS,
DHCP, and Active Directory are installed before doing this exercise. Exercise 6 will take you through the install of WDS.
NOTE
DNS and DHCP are discussed in detail in MCTS: Windows Server 2008 Network Infrastructure Configuration Study Guide by William Panek, Tylor Wentworth, and James Chellis (Sybex, 2008).
Start Server Manager by choosing Start => Administrative Tools => Server Manager. On the left side, click Roles. In the right window pane, click the Add Roles link. At the Add Roles Wizard, click Next at the Before You Begin screen. Click the Windows Deployment Services check box. Click Next. At the Overview Screen, click Next. On
the Select Role Services screen, make sure both check boxes (Deployment
Server and Transport Server) are checked and click Next. At the Confirmation screen, verify the installation selections and click Install. At the Installation Results screen, click close. Close the Server Manager MMC.
|
9.1. Configuring the WDS Server to Respond to Client Requests
Now that you have installed the Windows Deployment Services role, you need to configure the server. In Exercise 7, you will configure the WDS server.
|
Follow these steps to configure the WDS server:
Start the WDS MMC by choosing Start => Administrative Tools => Windows Deployment Services. In the left window pane, expand the Servers link. Click the name of your server and then right-click. Choose Configure Server. The
Welcome Page appears, explaining that you need DHCP, DNS, Active
Directory, and an NTFS partition. If you meet these minimum
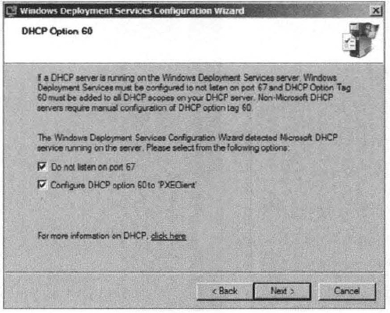
requirements, click Next. The Remote Installation Folder Location screen appears; accept the defaults by clicking Next. A System Volume Warning dialog box appears; click Yes. The DHCP Option GO screen will be next. Check both boxes and click Next.
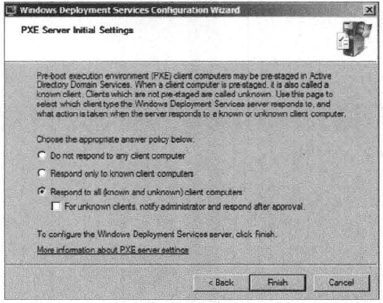
On
the PXE Server Initial Settings screen, choose how PXE will respond to
clients. Choose the Respond To All (Known And Unknown) Client Computers
radio button. Click Finish.
At
the Configuration Complete screen, make sure the check box Add Image To
The Windows Deployment Server Now is unchecked. Click Finish.
|
One of the advantages of using the Windows deployment server is that WDS can work with Windows image (.wim) files. As stated in the previous section, Windows image files can be created through the use of the Windows Sysprep utility.
One component that you need to
pay attention to when using the Windows deployment server is Reboot
Execution Environment (PXE) network devices. PXE boot devices are
network interface cards (NICs) that can talk to a network without the
need for an operating system, PXE boot NIC adapters are network adapters
that have a set of reboot commands within the boot firmware.
This is important when
using WDS because PXE Boot adapters connect to a WDS server and requests
the data needed to load the operating system remotely. Remember, most
of these machines that you are using WDS for do not have an operating
system on the computer. You need NIC adapters that can connect to a
network without the need for an operating system for WDS to work
properly.
For the same reason, you must
set up DHCP to accept PXE machines. Those machines need a valid TCP/IP
address so that they can connect to the WDS server.
9.2. Preparing the WDS Client
The WDS client is the computer
on which Windows 7 will be installed. WDS clients rely on a technology
called PXE, which allows the client computer to remotely boot and
connect to a WDS server.
To act as a WDS client, the computer must meet all the hardware requirements for Windows 7
and have a PXE-capable network adapter installed, and a WDS server must
be present on the network. Additionally, the user account used to
install the image must be a member of the Domain Users group in Active
Directory.
After the WDS server has been
installed and configured, you can install Windows 7 on a WDS client
that uses a PXE-compliant network card.
To install Windows 7 on the WDS client, follow these steps:
Start the computer. When prompted, press F12 for a network service boot. The Windows PE appears.
The Windows Welcome screen appears. Click the Next button to start the installation process.
Enter the username and password of an account that has permissions to access and install images from the WDS server.
A list of available operating system images stored on the WDS server appears. Select the image to install, and click Next.
Enter the product key for the selected Windows 7 image, and click Next.
The
Partition And Configure The Disk screen appears. Select the desired
disk partitioning options, or click OK to use the default options.
Click
Next to initiate the image copying process. The Windows Setup process
will begin after the image is copied to the WDS client computer.
