4. Creating a Multiple Document Interface
You may have used a Windows
application where all the application windows are contained within a
parent window. An application in which all child windows are contained
within a parent window is a Multiple Document Interface (MDI).
Creating an MDI application involves these high-level steps:
Create the parent container form.
Write code that opens the child forms in the container.
To create the parent MDI form, follow these steps:
Create a new Windows application in Visual Basic.
Visual Studio creates a new Windows project with an empty Windows Form named Form1.
Set the Form1 IsMdiContainer property to True.
Add a MenuStrip control to the form.
Add the menu items Select and Window.
Add the menu items Open Form 2 and Open Form 3 to the Select menu.
After you have the parent form, create these child forms to open in the parent MDI form:
Add a new form named Form2.
Add a label and a text box to the form.
Add a new form named Form3.
Add a MonthCalendar control to the form.
In the parent MDI container Form1, follow these steps:
Double-click the form to access the form's Load event.
Above the Load event, type this line:
Dim frmChild As Form
In the Load event, type this line:
VB
MenuStrip1.MdiWindowListItem = WindowToolStripMenuItem
C#
MenuStrip1.MdiWindowListItem = WindowToolStripMenuItem;
This line sets the Windows menu item as the MdiWindowListItem
control for the menu strip. As child windows are opened, the Windows
menu displays the windows, along with a check mark, next to the active
window.
Below the Load event, type these lines:
VB
Private Sub GetChild(ByRef frmChild As Form)
   frmChild.MdiParent = Me
   frmChild.Show()
End Sub
C#
private void GetChild(ref Form frmChild)
{
     frmChild.MdiParent = this;
     frmChild.Show();
}
This code sample creates a procedure named GetChild that accepts a child form as a parameter. When the child form is passed to GetChild, the procedure sets the child form's MDI parent container as the displayed form and displays the child form in the container.
In the Windows Forms Designer, double-click the Open Form 2 menu item.
The Click event is created.
Type this line in the Click event:
GetChild(New Form2)
This line passes Form2 to the GetChild procedure.
Repeat Steps 4 and 5 for the Form 3 menu item and substitute Form3 for Form2 in the code.
The entire code sample (minus the hidden code that Visual Studio creates) for Form1 is shown in Listing 1.
Listing 1. Code That Services the Multiple Document Interface
Public Class Form1

    Private Sub Form1_Load(ByVal sender As System.Object, ByVal e As System.
    EventArgs) Handles MyBase.Load
        MenuStrip1.MdiWindowListItem = WindowToolStripMenuItem
    End Sub
Private Sub GetChild(ByRef frmChild As Form)
        frmChild.MdiParent = Me
        frmChild.Show()
    End Sub

    Private Sub OpenForm2ToolStripMenuItem_Click(ByVal sender As System.Object,
    ByVal e As System.EventArgs) Handles OpenForm2ToolStripMenuItem.Click
        GetChild(New Form2)
    End Sub

    Private Sub OpenFormToolStripMenuItem_Click(ByVal sender As System.Object,
    ByVal e As System.EventArgs) Handles OpenFormToolStripMenuItem.Click
        GetChild(New Form3)
    End Sub
End Class
|
To test the MDI application, follow these steps:
Press Ctrl+F5 to run the application.
Choose the Select menu item.
Choose Open Form 2 from the Select menu.
Form2 opens and is contained within the parent form.
Repeat Steps 1-3 to open Form3.
Click the Windows menu.
The Windows menu displays the open windows. A check mark appears next to the active window, as shown in Figure 10.

4.1. Taking advantage of visual inheritance
Sometimes, you want to
reuse forms. You can inherit from an existing form rather than create
forms from scratch. You need two forms: the base form and one to inherit
from the base form.
To create the base form, follow these steps:
Open the Add New Item window and add a new Windows Form to the project.
You can press Ctrl+Shift+A to open the Add New Item window.
Add a label and a text box to the form.
Choose Build Build Solution.
|
You must build the base form in order to inherit from it.
|
|
To inherit from the base form, follow these steps:
Choose Project=>Add New Item.
The Add New Item window appears.
Click the Inherited Form template.
Enter a name for the form.
Click Add.
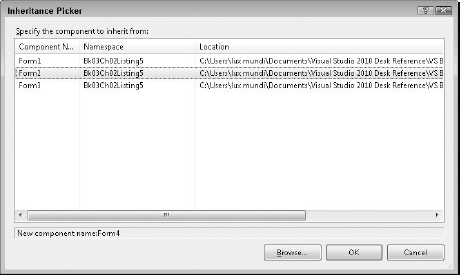
The Inheritance Picker appears.
Click the base form in the Inheritance Picker.
Click OK.
The inherited form displays the base form's controls.
NOTE
You must build your solution whenever you make changes to the base form in order to make changes appear in the inherited form.