When applying attributes to your own types or members, you enclose the attribute name between angle brackets, as in the following example:
<Serializable()>
Public Class Person

End Class
In this case the Serializable attribute is parameterless (and in this case you can omit round parenthesis).
When you apply an attribute, your object is decorated with that attribute. Another common description utilized when applying attributes is that an object is marked. Referring to the previous example, you can say that the Person class is decorated with the Serializable attribute or that it is marked as Serializable as well. Attributes can receive arguments. The following example shows how to pass arguments to the CLSCompliant attribute:
<CLSCompliant(True)>
Public Class Person

End Class
Attributes arguments are
separated by commas according to the number of arguments required. As
explained when discussing custom attributes, optional parameters are
also allowed. You apply multiple attributes separating them with commas
or writing each attribute after the other one. Both the following modes
are perfectly legal:
<Serializable()>
<CLSCompliant(True)>
Public Class Person

End Class

<Serializable(), CLSCompliant(True)>
Public Class Person

End Class
|
In the first code
snippet notice how attributes no longer require the underscore character
when written on multiple lines. This is one of the allowed scenarios
for the implicitline continuation features in Visual Basic 2010.
|
Attributes can be applied to the following programming elements:
Attributes are information that is stored in the assembly metadata. Figure 1 represents how such information is stored within the assembly, including type information and member information.
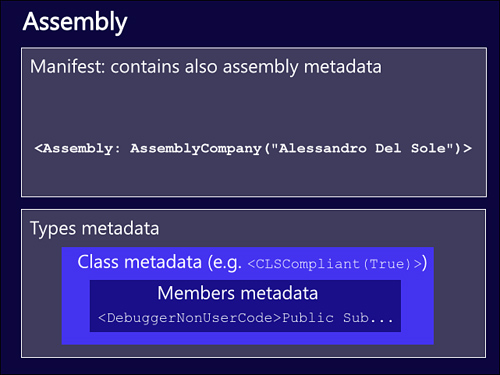
Considering the representation shown in Figure 1, you may notice the description about assembly metadata. You can apply attributes at the assembly level, in the AssemblyInformation.vb file. Generally assembly level attributes are set at design time with the My Project window’s tabs . This means that each application
property has a related assembly-level attribute. There is just one
attribute named Assembly that requires the specification of nested
attributes setting particular properties. For example, the following
attributes’ specifications set the title, description, and company name
properties for the application:
<Assembly: AssemblyTitle("CodingAttribute")>
<Assembly: AssemblyDescription("Demo for Chapter 48")>
<Assembly: AssemblyCompany("Alessandro Del Sole")>
In the preceding code, Assembly is the main attribute, whereas AssemblyTitle, AssemblyDescription, and AssemblyCompany are other attributes that are nested into the Assembly
declaration. Examining AssemblyInfo.vb you can see available
assembly-level attributes, and you discover how each attribute is
related to an application property settable in My Project. Until now you
saw how to apply existing attributes, but these special objects provide
great flexibility over your object development and provide the ability
to deeply enhance your types, especially if you create custom
attributes, as you will better understand in next section.
