You can install Windows 7 either from the bootable
DVD or through a network installation using files that have been copied
to a network share point. You can also launch the setup. exe file from
within the Windows 7 operating system to upgrade your operating system.
The Windows 7 DVD is
bootable. To start the installation, you simply restart your computer
and boot to the DVD. The installation process will begin automatically.
You will walk through the steps of installing Windows 7 from the DVD in Exercise 1.
If you are
installing Windows 7 from the network, you need a distribution server
and a computer with a network connection. A distribution server is a
server that has the Windows 7 distribution files copied to a shared
folder. The following steps are used to install Windows 7 over the
network:
Boot the target computer.
Attach to the distribution server and access the share that has the files copied to it.
Complete
the Windows 7 installation using either the clean install method or the
upgrade method. These methods are discussed in detail in the following
sections.
1. Performing a Clean Install of Windows 7
On any installation of Windows 7, there are three stages to the installation.
Collecting Information
During the collection phase of the installation, Windows 7 gathers the
information necessary to complete the installation. This is where
Windows 7 gathers your local time, location, keyboard, license
agreement, installation type, and installation disk partition.
Installing Windows
This section of the installation is where your Windows 7 files are
copied to the hard disk and the installation is completed. This phase
takes the longest as the files are installed.
Set Up Windows
In this phase, you set up a username, computer name, password, product
key, and security settings and review the date and time. After this is
finished, your installation will be complete.
As explained earlier, you can
run the installation from the optical media or over a network. The only
difference in the installation procedure is your starting point: from
your optical drive or from a network share. The steps in the following
exercise assume you are using the Windows 7 DVD to install Windows 7.
When you boot to the Windows 7 installation media, the Setup program will automatically start the Windows 7 installation. In Exercise 1,
you will perform a clean install of Windows 7. This exercise assumes
that you have access to Windows 7 Ultimate; other editions may vary
slightly. You can also download an evaluation version of Windows 7 from
Microsoft's website.
Insert the Windows 7 DVD into the machine and start the computer.
If you are asked to Hit Any Key to start the DVD, press Enter.
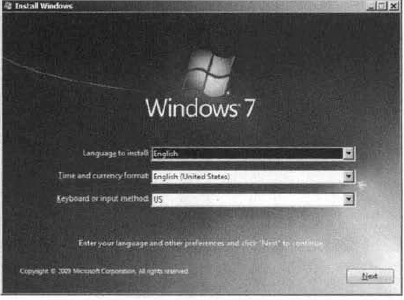
The first screen will ask you to enter your language, local time, and keyboard. After filling in these fields, click Next.
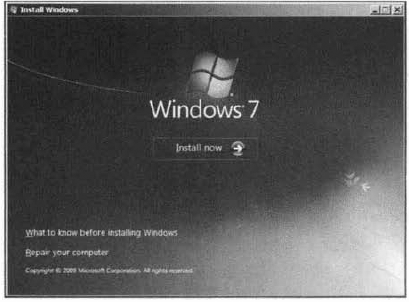
At the next screen, click the Install Now button.
A
message appears to tell you that the setup is starting. The licensing
screen will be first. Read the license agreement and then check the I
Accept The License Terms check box. Click Next.
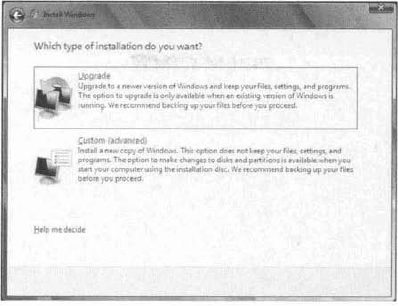
When asked which type of installation you want, click Custom (Advanced).
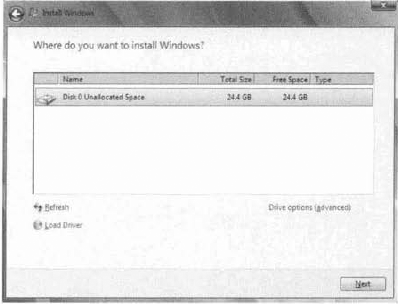
The
next screen asks you to identify the disk to which you would like to
install Windows 7. Choose an unformatted free space or a partition
(partition will be erased) with at least 20 GB available. You can also
click the Drive Options (Advanced) link to create your own partition.
After you choose your partition, click Next.
When
your partition is set, the installation will start. You will see the
progress of the installation during the entire process. When the
installation is complete, the machine will reboot.
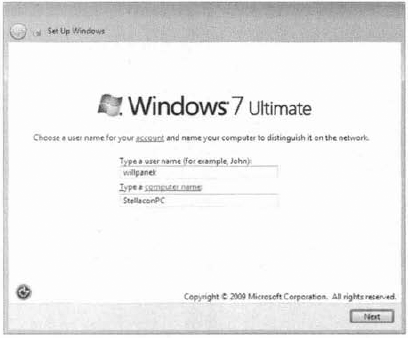
After
the installation is complete, the Username And Computer Name screen
will appear. Type in your username and computer name and click Next.
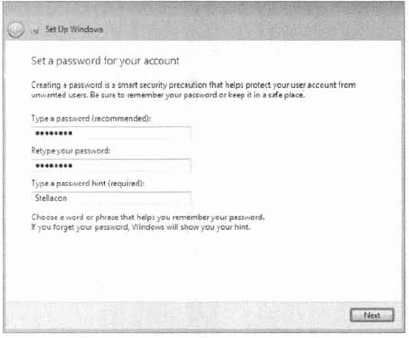
Set your password on the next screen. Enter your password twice and enter your hint. Click Next.
The
next screen asks you to enter your 25-digit product key. Enter your
product key and make sure the check box—to automatically register your
machine when you're online—is checked. Click Next.
Settings
related to Windows Update and security will appear next. You can use
the recommended settings, install important updates for Windows only, or
have the computer ask you later. If you select the option to use the
recommended settings, the following settings will be configured:
Windows Update will be enabled and updates will automatically install.
Windows Defender will be installed and any collected information will be sent to Microsoft.
Errors will automatically be sent to Microsoft.
The latest drivers for your hardware will automatically be downloaded from Windows Update.
You will now be able to verify your time and date settings. Configure your time, time zone, and date. Click Next.
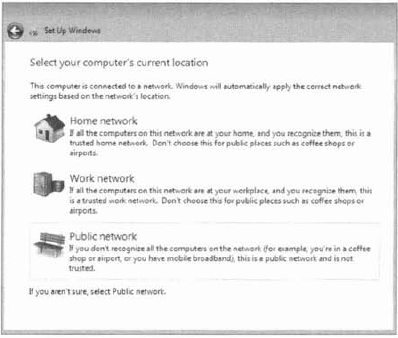
The
next step is to set your computer's current location. You have the
ability to choose from a home, work, or public location. Choose the
location where your computer is located.
Windows will finalize your setup and the installation will be complete.
