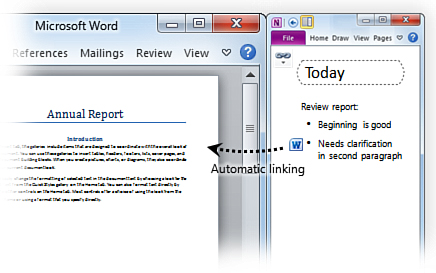
Linked notes are a convenient new feature in OneNote 2010 that allows
you to dock the OneNote 2010 program window to the side of your desktop
so that you can take notes on anything that you’re reading and
researching in other programs or in your Web browser. When you take
notes in this side-by-side fashion, they are automatically linked to
their source material in the programs in which they originated (see Figure 1).
Whenever you’re in a linked notes session and you
take notes on things you’re looking at in Internet Explorer, in Word,
or in PowerPoint, each paragraph in those notes will display a link
icon when you hover your mouse pointer over any paragraph of the notes
text. You can click these link icons to quickly return to the source
material and the associated program that the notes relate to.
Linked notes in OneNote are a revolutionary way for
your computerized notes to retain the full context of your thought
process by capturing and saving the relationship between your thoughts
and ideas that originated at the time when you looked at the source
materials that sparked those thoughts and ideas.
In addition to the automatic, clickable link icons
that appear next to linked notes text, OneNote also indicates the
program that the source material is linked with (for example, Internet
Explorer), and it stores a small thumbnail image and a text excerpt of
the page, so you can easily recognize the correct web page, document,
or presentation slide again later on.
Because the linked notes feature is new to OneNote
2010, it can be used only while working in a notebook that’s been
created or saved in the OneNote 2010 format. If you’re working in
older, shared OneNote 2007 notebooks that have not yet been upgraded,
you won’t be able to use the linked notes feature.
Beginning a Linked Notes Session
The linked notes feature in OneNote is available
when viewing a web page in Internet Explorer 8 or later, a Word 2010
document, a PowerPoint 2010 presentation, or any OneNote 2010 notes
pages.
To start a linked notes session, do the following:
1. | If
you want to take linked notes on web pages that you’ll be viewing in
Internet Explorer, click the Tools button on the Internet Explorer
toolbar, and then click OneNote Linked Notes (see Figure 2).
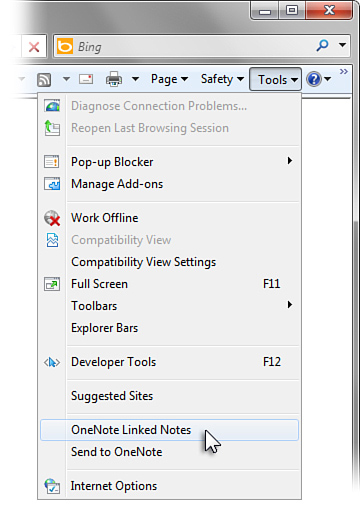
|
2. | If
you want to take linked notes on files you’ll be viewing in Word 2010,
PowerPoint 2010, or OneNote 2010, go to the ribbon in the program you
want, click the Review tab, and then, in the Notes group, click Linked
Notes (see Figure 3).
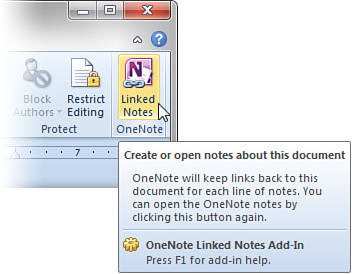
|
3. | In
the Select Location in OneNote dialog box that appears, select the
notebook section or page where you want to create your linked notes,
and then click OK. If you select a section, a new page will be created
in it. If you select an existing page, your linked notes will be added
to that page. |
4. | OneNote
opens a docked window on the right side of your screen and opens the
page you selected on which to take your linked notes. If you selected a
new page, type a descriptive title into the Page Title field at the top
of the page, above the date and time stamp for the page, and then press
Enter to move the cursor to a new notes container.
|
5. | In
the upper-left corner of the docked OneNote window, look for the
chain-link icon. When you move the mouse pointer over it, a ToolTip
will confirm that you’re currently working in a linked notes session
(see Figure 4).
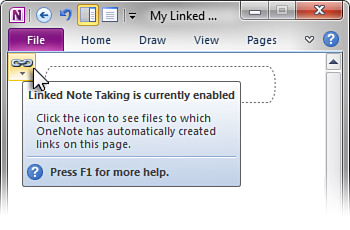
|
6. | Now,
take notes the way you normally would. For example, switch to Internet
Explorer and bring up a web page. When you return to the docked OneNote
window and start typing notes, each paragraph of notes that you create
while Internet Explorer is active in docked mode will be linked to the
current web page that it displays. If you switch to another page and
take more notes, those paragraphs will then be linked to the new page,
and so on. Similarly, if you bring up any Word documents or PowerPoint
presentations during your linked notes session, they will also be
linked to any notes you take in the docked OneNote window. |
|
Regarding the choice you have in step 3, I recommend
that you create each linked notes session on a fresh page in one of
your notebook sections, at least until you become a bit more familiar
with linked note-taking. After you’ve had a chance to really try out
this feature with your real notes and it makes sense to you, you can
mix and match future linked notes with your existing notes.
|
