Ending a Linked Notes Session
If you want OneNote to stop keeping links between
the things you type in OneNote and the programs you’re looking at, you
can end a linked notes session that you’ve started.
To turn off linked notes, do either one of the following:
In the upper-left corner of the docked OneNote window, click the link icon and then click Stop Taking Linked Notes.
In the docked OneNote window, on the View tab, click the Normal View button.
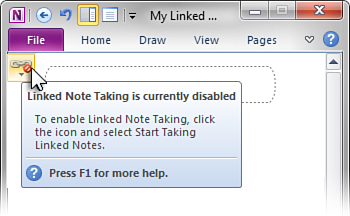
When a linked notes session has been ended, the
chain-link icon in the upper-left corner of the page will show a red
circle with a slash through it (see Figure 5)
to indicate that no further links will be created. Any notes that were
linked to other programs up until that point are retained.
|
You
can also end a linked notes session by clicking the selected Dock to
Desktop button on the Quick Access Toolbar, which undocks the OneNote
window and turns off your linked notes session. The same thing can be
achieved by pressing the Ctrl+Alt+D keyboard shortcut.
|
Viewing Linked Notes
You can return to the notes you took and the
information you looked at during a linked notes session by doing any of
the following:
To view the notes you took during a linked notes session, simply open that notes page again in OneNote.
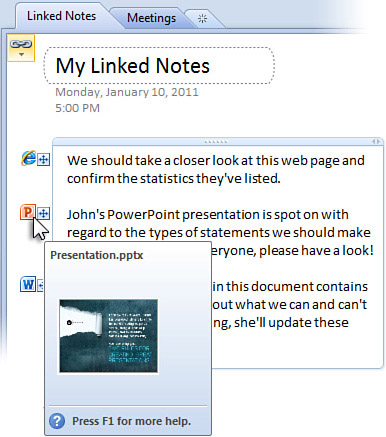
To
view the pages and documents on which your linked notes were based,
move the mouse pointer over the paragraphs of notes that you took in a
linked notes session. Just to the left of each paragraph, you should
see a small icon representing the program that your notes are linked to
(see Figure 6).
When you move the mouse pointer over any of these program icons, you’ll
see a ToolTip with details about the linked document or page, including
a visual preview to help you recognize the page again (see Figure 7).

To return to any of the original
information that you looked at during a linked notes session, click any
of the small program icons to the left of your linked notes paragraphs
to open the source pages or documents on which your linked notes were
based.
Disabling or Reenabling Linked Notes
If you want to occasionally use the Dock to Desktop
feature in OneNote but you don’t want to begin a linked notes session,
you can turn it off by doing the following:
1. | In OneNote, press Ctrl+Alt+D to dock the program window to the side of your desktop.
|
2. | In the upper-left corner of the page, click the link icon, and then click Stop Taking Linked Notes.
|
If you later want to reenable linked note-taking, do the following:
1. | In a docked OneNote window, click the link icon in the upper-left corner.
|
2. | On the pop-up menu that appears, click Start Taking Linked Notes.
|
|
If, for some reason, you don’t like this feature,
you can disable linked notes for good. In a docked OneNote window,
click the link icon in the upper-left corner, and then click Linked
Notes Options. On the right side of the Options dialog box that
appears, look for the Linked Notes heading, deselect the Allow Creation
of New Linked Notes check box, and then click OK. You’ll now be able to
dock and undock the OneNote window without worrying about starting any
linked notes sessions. If you should decide at a later time that you
want to work with linked notes again, simply re-select the Allow
Creation of New Linked Notes check box in the OneNote Options dialog
box.
|
Linked notes might take a little practice
at first, but if you’re using OneNote to frequently do a lot of
research online, or you’re working with other people to pore over and
annotate lengthy documents or presentations, you might just find the
linked notes feature to be an invaluable help to you.
