After you upload your Office documents to a SkyDrive
folder and configure the folder permissions, you can start to
collaborate on an Office document. With Office Web Apps you can
simultaneously edit documents, known as co-authoring (New!).
Co-authoring allows two or more people to work on a document at the
same time in real-time without the need to save and reject or accept
changes, known as sharing. If two people edit the same thing, each
Office Web App deals with differently. Before you can co-author a
document, you need to send a link in an e-mail to those you want to
share the folder that contains the document or embed a link in a blog or
Web page, so others can access the folder. The folder permissions
provide security access to the folder.
Send a Link to Share a Folder
 Open your browser, go to www.live.com, and then sign in to Windows Live. Open your browser, go to www.live.com, and then sign in to Windows Live.
 Navigate to the Windows Live SkyDrive. Navigate to the Windows Live SkyDrive.
 Click a folder icon to navigate to the folder with the documents you want to share. Click a folder icon to navigate to the folder with the documents you want to share.
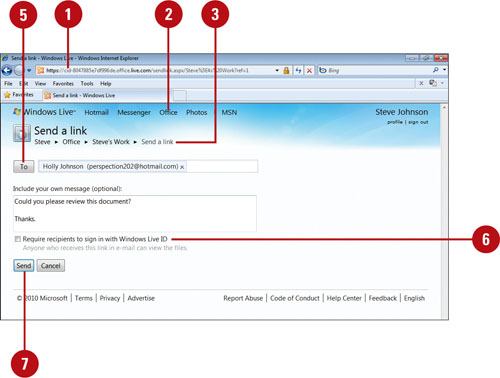
 Click the Share link, and then click Send a link. Click the Share link, and then click Send a link.
- To copy a link to share, click the Share link, click Get a link, click the Copy link, and then click Done.
 Specify the recipients to whom you want to send a link. Specify the recipients to whom you want to send a link.
 Select or clear the Require recipients to sign in with Windows Live ID check box. Select or clear the Require recipients to sign in with Windows Live ID check box.
 Click Send. Click Send.
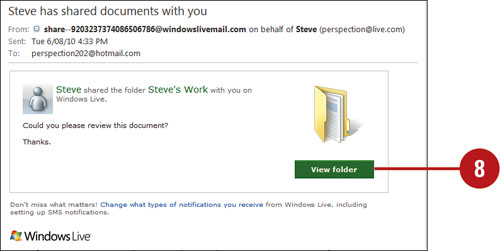
  In the e-mail message a recipient, click the View folder button. In the e-mail message a recipient, click the View folder button.
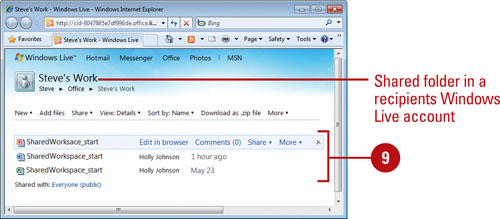
- In Windows Live for a recipient, you can also open the shared folder to access a document.
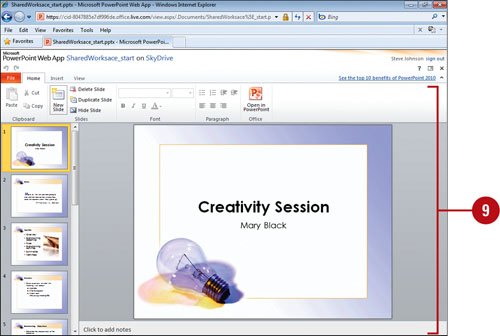
  Click a document, and then edit or co-edit it in the Office Web App. Click a document, and then edit or co-edit it in the Office Web App.
Embed a Link to Share a Folder or Document in a Blog or Web Page
 Open your browser, go to www.live.com, and then sign in to Windows Live. Open your browser, go to www.live.com, and then sign in to Windows Live.
 Navigate to the Windows Live SkyDrive. Navigate to the Windows Live SkyDrive.
 Click a folder icon to navigate to the folder with the documents you want to share. Click a folder icon to navigate to the folder with the documents you want to share.
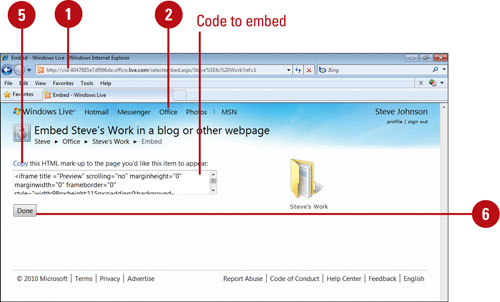
 Click the Share link, and then click Embed. Click the Share link, and then click Embed.
- To embed a document, point to it in Details view, click the Share link, and then click Embed.
 Click the Copy link, and then click Allow access. Click the Copy link, and then click Allow access.
The embed code is copied to the Clipboard.
 Click Done. Click Done.
  Paste the code into a blog post or Web page. Paste the code into a blog post or Web page.
- Blog. Create a blog post in a blogger, such as Windows Live Writer, and then paste the code.
- Web Page. Open a Web page in an HTML editor, and then paste the code.
 Open your browser, display the blog post or Web page, and then click the link to the shared folder or document on Windows Live. Open your browser, display the blog post or Web page, and then click the link to the shared folder or document on Windows Live.
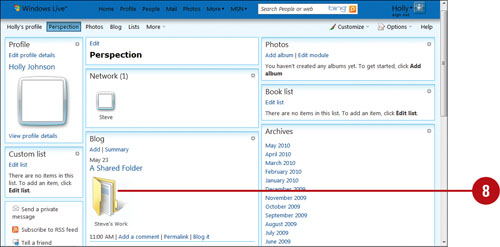  Open a document, and then edit or co-edit it in the Office Web App. Open a document, and then edit or co-edit it in the Office Web App.
|