3. Creating a VPN Connection
A VPN connection actually
requires two connections. First, you'll need to connect to the Internet,
and then you'll connect to the VPN server. It doesn't matter how you
connect to the Internet. It can be over a dial-up connection, a DSL
line, a broadband connection, or even through a wireless router.
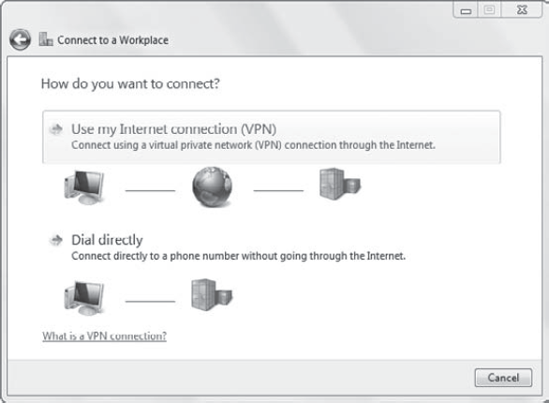
After creating the connection
to the Internet, you can create the VPN connection. You follow the first
steps just as you did when you created a dial-up connection. However,
instead of choosing Dial Directly, you choose Use My Internet Connection
(VPN), as shown in Figure 3.
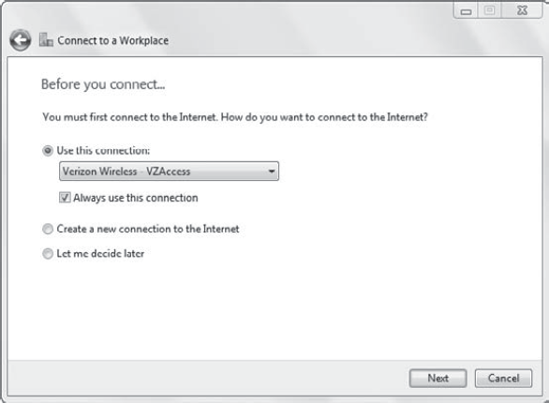
If you aren't currently connected to the Internet, you'll be prompted to identify how you want to connect to the Internet. Figure 4
shows this screen. You can choose from one of the connections in the
drop-down list. The Always Use This Connection check box is selected by
default. If you launch the VPN connection but you're not connected to
the Internet, you'll be prompted to connect using this connection.
You then enter the IP address
or the hostname of the VPN server and a name for the connection. If you
use the name of the VPN server, you'll need to ensure that it is
resolvable from an Internet DNS server. If you put in the IP address
directly, you'll bypass the DNS name-resolution step.
The wizard will then prompt
you to enter credentials for the VPN server. These include the user
name, password, and domain name if a domain is used.
Launch the Network and Sharing Center. Click Start => Control Panel => Network And Internet => Network And Sharing Center. Click Set Up A New Connection Or Network. Select Connect To A Workplace. Click Next. Ensure that No, Create A New Connection is selected. Click Next. Select Use My Internet Connection (VPN). On
the Type The Internet Address page, enter the IP address or the name of
the VPN server in the Internet Address text box. Enter a name for the
VPN connection in the Destination Name text box. Select Don't Connect Now; Just Set It Up So I Can Connect Later. Click Next. Enter your user name, password, and domain (if needed). Click Create.
|
At this point, the connection
is ready to use. While a lot of the connection activity is automatic,
you may need to troubleshoot some connections.
4. Add a Certificate
If you're using IKEv2 or SSTP, a
certificate is required for the connection. If you're using L2TP/IPSec,
a certificate is recommended. The VPN server passes the certificate to
the client during the connection process. However, the client won't
necessarily trust this certificate.
As long as the
certificate is issued from a trusted CA, the certificate is trusted.
However, if the certificate is not issued from a trusted CA, the
certificate won't be trusted and the user will see a warning.
Consider these two scenarios:
Your
company purchases a certificate from a public CA such as VeriSign. This
certificate is installed on the VPN server and sent to the clients.
Because Windows 7 clients have a certificate from VeriSign in their
Trusted Root Certification Authorities store, they trust the certificate
from the VPN server. They will not receive a warning.
Your
company chooses not to pay for the certificate. Instead, administrators
create an internal CA. This internal CA issues a certificate to the VPN
server. Because Windows 7 clients don't have a certificate from the
internal CA in their Trusted Root Certification Authorities store, they
do not trust the certificate from the VPN server. They will receive a
warning.
The second scenario is cheaper,
but the warning can be confusing to users. Users can ignore the
warning, but with security as challenging as it is already, you probably
don't want to train your users to ignore warnings. The solution is to
add the certificate from the internal CA to the Windows 7 Trusted Root
Certification Authorities store.
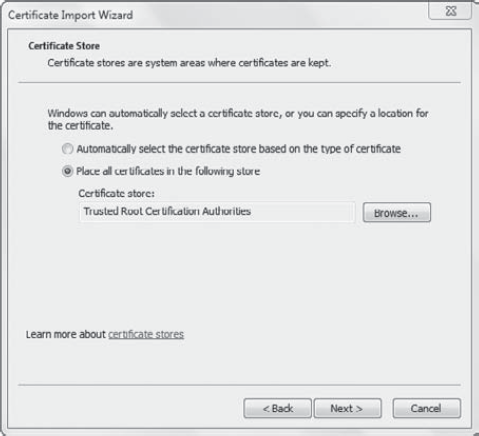
Click Start and type MMC in the Start Search box. If prompted by UAC, click Yes to continue. Select File => Add/Remove Snap-in. Select
Certificates and click Add. Select Computer Account and click Next.
Ensure Local Computer is selected and click Finish. Click OK. Expand Certificates => Trusted Root Certification Authorities => Certificates. Right-click Certificates and select Import. The Certificate Import Wizard will launch. Review the Welcome screen and click Next. Click Browse and go to the location of the certificate file. Click Open. Click Next. On
the Certificate Store page, ensure that Place All Certificates In The
Following Store is selected and the Certificate Store is listed as
Trusted Root Certification Authorities. Your display will look similar
to the following graphic. Click Next.
Review
the information on the Completion screen and click Finish. A dialog box
will appear indicating the import was successful. Click OK.
|
Once the certificate has been imported, the clients will no longer receive the warnings for certificates issues from the CA.
It's also possible
to publish these certificates to internal clients using Group Policy.
Certificates are deployed using the Computer Configuration => Policies => Windows Settings => Security Settings => Public Key Policies => Trusted Root Certification Authority Store node.
You can right-click the
Trusted Root Certification Authority node and select Import. It uses a
similar wizard to import the certificate. After the certificate is
imported, Group Policy will deploy the certificate to all computers in
the scope of the GPO.
