Modifying, Reviewing, and Removing Dependency Links
As you develop a project plan, you will inevitably
make changes in the task list, and when you do, you will have to adjust
the sequence of links you have established. You might want to modify
the type of links between tasks, insert lag or lead time, or remove a
link entirely. You can modify existing links in the following
locations
Select the successor task and modify its predecessor links in the Predecessors tab of the Task Information dialog box.
Split
the window and display the Task Form view in the bottom pane, beneath a
task view. With the predecessor and successor details displayed in the
Task Form view, select a linked task and modify its links in either the
Predecessors or Successors table.
Double-click
a linking line in the Gantt Chart view or Network Diagram view to
display the Task Dependency dialog box, where you can modify the link.
If you find that a link between tasks is no longer
necessary, or if you prefer to change a link to another task, you have
to remove the existing link. Just as you have several ways to create
links, you can use many different methods to remove links. You can use
the following techniques to remove links:
You can easily
unlink tasks in any of the task views by using the unlink button on the
Task tab. Either select the tasks you want to unlink and click the
Unlink Tasks button or press Shift+Ctrl+F2. The result depends on the
task(s) selected:
If you select a single task and then choose Unlink Tasks, Project removes all predecessors and successors for that task.
If you select multiple tasks, Project removes all links between any pair of the selected tasks.
To
remove all links from the project, display any view with a task table
and select all tasks by clicking a field name, such as a Task Name,
before using Unlink Tasks.
You
can select a successor task and remove its predecessor links by using
the Task Information dialog box. For each predecessor listed on the
Predecessors tab that you want to remove, click the row for the
predecessor and press the Delete key. Clicking OK closes the dialog box
and removes those links.
With a task
view in the top pane and the Task Form in the bottom pane, you can
display the resource and predecessor—or predecessor and
successor—details in the bottom pane. Select the task in the top pane.
For each predecessor link you want to remove, click its row in the
details area and press the Delete key. Click OK to finish the deletion.
If you display one of the detail’s choices that includes successors,
you can select the predecessor task in the top pane and delete the link
in the Successors table in the bottom pane.
In
a view that includes a task table, such as the Gantt Chart view, click
on the row for the successor task and clear the entry in its
Predecessors field by pressing Ctrl+Delete. Remember not to press the
Delete key alone because that deletes the entire task!
You
can double-click a linking line in the Gantt Chart or Network Diagram
view to display the Task Dependency dialog box and choose Delete to
remove the link.
Auditing Task Links
The project schedule is heavily influenced by the
linking relationships you establish among tasks. It is very easy to
accidentally link tasks or break task links, and if you work with
Autolink enabled, some changes you have not noticed might have been
made. Therefore, you should always review the link relationships
carefully before committing to the project schedule. Accidental links
can easily distort the finish date of the project.
The Network Diagram view concentrates on the linking
relationships by representing each task as a box or node with arrows
from predecessor to successor tasks. It is helpful to print the views
when using them to review all task links because you see so few tasks
on the screen.
The Gantt Chart view shows the task links as arrows
connecting the taskbars, with the arrow always pointing from the
predecessor to the successor task.With the predecessor and successor details in the Task
Form view in the bottom pane, provides a good review of the task links.
For the task you have active, the predecessor and successor tasks are
listed in the bottom pane, along with any lag or lead associated with
the link. Use the Previous and Next buttons in the bottom pane to
review the links.
The Relationship Diagram view is perhaps the most useful view for auditing task links (see Figure 12).
It shows the predecessors and the successors for just the selected task
as task nodes, like the Network Diagram view, and is useful for
confirming that you have defined the task relationships as you
intended. You can display the Relationship Diagram view by itself, but
it is most useful when displayed in the bottom pane, beneath another
task view in the top pane, such as the Gantt Chart or Network Diagram
view. To do this, select the View tab. In the split view group, select
the Details checkbox. In the drop-down next to it, select More Views,
Relationship Diagram.
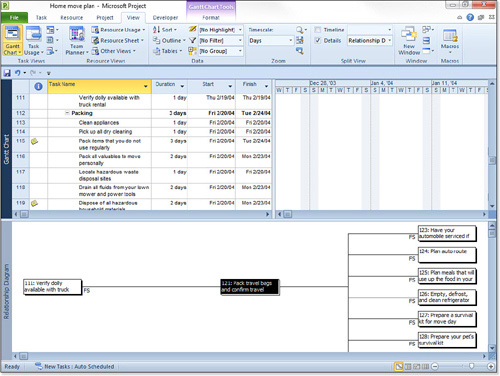
The task you have selected in the top pane is
represented by a box or node in the center of the relationship diagram
in the bottom pane, with links to nodes for its predecessors on the
left and successors on right. The type of relationship and any lag or
lead is shown next to the linked task nodes. In Figure 12,
the relationship diagram in the bottom pane makes it clear that Pack
Travel Bags and Confirm Travel has multiple successors and one
predecessor, and it defines those dependency relationship types.
Note
The Relationship Diagram view
is a display-only view. You cannot make changes in this view, nor can
you print it. You can, however, display the Task Information dialog box
for the selected task and make changes there. |
To display the Relationship Diagram view below the
Gantt Chart view, split the window (View tab, Split View, Details) and
activate the bottom pane by clicking in it. Choose More Views, and
select Relationship Diagram in the More Views box. Then click the Apply
button to display the view.
You can select tasks in the top pane to see their predecessors and successors displayed in the bottom pane.
Tip
If you select multiple tasks
in the top pane, you see only one of the selected tasks in the center
of the bottom pane at a time. You can use the horizontal scroll bar in
the Relationship Diagram pane to scroll through all the selected tasks.
Pressing the Home key displays the view for the first of the selected
tasks, and pressing the End key displays the view for the last of the
selected tasks. You can use these same techniques to scroll through the
tasks if you display the Relationship Diagram view as a full-screen
view. |
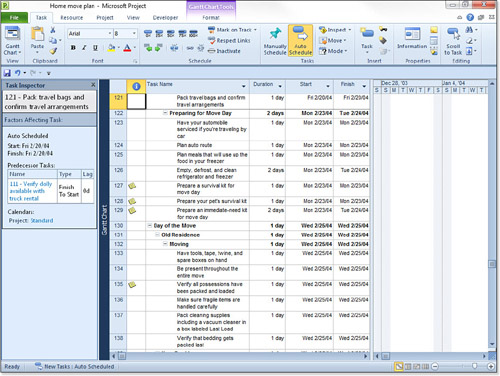
Using the Task Inspector
The Task Inspector is an enhanced version of the
Task Drivers feature added in Microsoft Office Project. It provides
detail about why a task is scheduled to start where it is, including
any specific predecessor tasks. To open the Task Inspector pane, select
the Task tab and click Inspect, Inspect Task. This displays the Task
Drivers options in a new pane on the left. The Task Inspector feature
displays tasks that are linked to the selected task, as well as their
relationship (additionally, it provides information about how the
scheduling engine might reschedule a manually scheduled task, and
options for repairing scheduling issues, if there are any). After the
Task Inspector is displayed, you can select any task, and its
attributes will be displayed in the Task Inspector pane (see Figure 13).
Tip
The
Task Inspector feature is useful when working on projects with complex
calendars or a large number of tasks. It is a quick and effective
method of reviewing a task’s links and progress. In addition, the Task
Inspector helps you determine what tasks will be affected if you make
any changes to the selected task. |
