As you planned your circus retreat, the project
sponsor made it very clear that the maximum price tag is $15,000, and
hinted that less than $12,000 would be even better. Now that you've
added tasks, resources, and any associated costs, it's time to see
whether the retreat costs $12,000, $15,000, or a value that isn't as
funny as the retreat's entertainment. Here's where you really start to
see the value of entering costs in Project.In
this section, you'll learn how to review total planned costs for all
project tasks. By extension, you get a handy forecast of your overall
project costs. You'll also learn how to review planned costs for tasks,
resources, and assignments, so you can analyze costs at the level of
granularity you need. When should I use a fixed cost instead of a cost resource? Before
Project 2007, when cost resources were but a gleam in Bill Gates's eye,
the fixed cost field was the best way to include travel costs, printing
costs, and other nonlabor or nonmaterial costs. Now cost resources are
the best way to show such costs. Really, fixed
costs are now useful only when you're working with a file created in a
previous version of Project that doesn't have cost resources. Otherwise,
convert those fixed costs to cost resources to take advantage of what
cost resources offer. Unlike
fixed costs, you can assign multiple cost resources to a single task,
making different types of costs easier to see and track. Moreover, you
can assign the same cost resource to multiple tasks, even if they have
different cost amounts. Say you have a cost resource like Lodging that
applies to several tasks. You create just the one cost resource and then
assign it to the various tasks, entering different cost amounts for
each assignment. You can see total cost information for the Lodging cost
resource so you can tell how much your team is spending on those posh
suites during business trips. Even if you do have an oddball cost on a
single task, it's a good practice to handle costs consistently
throughout a project. If you
plan to use budget resources to compare budgeted and planned costs, then
cost resources are better than fixed costs. Budget resources don't take
fixed costs into account; they summarize only costs associated with
resources assigned to tasks. |
1. Seeing Overall Project CostsWhen
you first compare your project plan's performance against the budget,
start with a quick bottom-line snapshot. A single number for your
project's planned cost tells you whether you need to delve into cost
containment or can sit back and relax. This section shows a few ways to
come up with that top-level number. Remember the garbage in/garbage out maxim. Your total
project cost forecast is only as reliable as the information you
provide. At this stage of the game, many costs and durations are
estimates. Still, because these estimates affect your budget, it pays to
be as accurate as possible. To forecast total project cost reliably, make sure you have the following information in your project plan: Costs, including hourly rates and per-use costs, for all work resources assigned to tasks Costs for all material resources assigned to tasks Costs for all cost resources assigned to tasks Any additional fixed costs for tasks
1.1. Viewing the total project cost in the project summary taskThe
project summary task is a great place to spot the total planned project
cost, because it rolls up the totals for all tasks and you can keep it
visible in the first row of the project task list. To use the project
summary task to see rolled-up cost values, follow these steps: With
a task-oriented view like the Gantt Chart visible, choose
Format→Show/Hide and then turn on the Project Summary Task checkbox. A new row appears at the very top of the table in most views. A project
summary node also appears in the Network Diagram view. The project
summary task rolls up the column values in the current table. For
example, in the Entry
table, the typical table shown with the Gantt Chart view, you can see
the total duration, the start date, and the finish date for the entire
project. For columns
that aren't supple enough to roll up, like the Predecessor or Resource
Names columns, the corresponding project summary cells remain blank. Apply
the Cost table by choosing the View tab. In the Data section, click the
down arrow to the right of Tables and then, from the drop-down list,
choose Cost. The
project summary task shows the total cost for the project in its Total
Cost cell. It also shows rolled-up values for Baseline Cost, Cost
Variance, Actual Cost, and Remaining Cost in other columns. Values in the Fixed Cost column don't roll up into outline summary
tasks or the project summary task. This behavior has a purpose: It's so
you can enter a fixed cost for a project phase or the project as a
whole.
Tip: If you spend most of your time in the Gantt Chart view and its sidekick, the Entry
table, consider adding the Cost column to the Entry table. Right-click
the table, and then, on the shortcut menu, choose Insert Column. In the
field name drop-down list that appears, choose Cost.
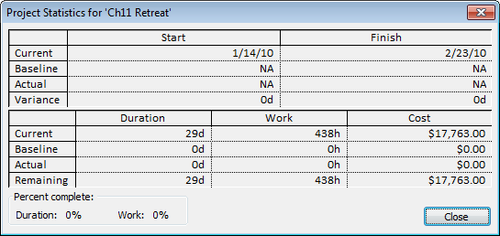
1.2. Viewing the total project cost in Project StatisticsTo get to the single number that indicates your total project costs, use the Project Statistics dialog box as follows: Choose Project→Properties→Project Information. The Project Information dialog box appears. At the bottom of the dialog box, click the Statistics button. The Project Statistics dialog box appears, as shown in Figure 1. In the Cost column, review the value in the Current field, which is the forecasted cost for the project as currently planned. After you set a baseline the Baseline fields are also filled in. When you start tracking progress, the Actual and Remaining fields have values, too.
1.3. Viewing total project cost in the Project Summary reportYou
can get overall project cost information in a printed text report.
Choose Project→Reports→Reports, and then double-click Overview. In the
Overview Reports dialog box, double-click Project Summary. A preview
appears of the Project Summary report, which shows the same information
available in the Project Statistics dialog box. Use
the Project Summary report for status reports, especially since you can
print this report but you can't print the Project Statistics dialog
box. Click Print to get a hard copy. 2. Seeing Costs for Tasks, Resources, and AssignmentsNow
that you've seen the big picture of forecasted costs, you're probably
champing at the bit to learn how to find task costs when all resources
are assigned and where to look for the total cost of one resource's
assignments. This section shows how to break costs down to individual
assignments—that is, how much it costs for one particular resource
working on one particular task. Use one of the following methods to
drill down into costs: Total cost for a task.
First apply the Cost table (View→Data→Tables→Cost) to a task view, and
then, in the Total Cost column, check the value. Or insert the Cost
field (right-click the table and choose Insert Column) into any task
view, and then check the Cost value for the task. In both cases, the
Cost value is the scheduled (planned) cost for the task, including all
assigned resources (work, material, and cost) and any fixed costs.
Note: Depending
on the table you display, you may see the Total Cost or the Cost
column. However, both columns show the same field: Cost. The Cost table
simply uses "Total Cost" as the column title.
Total cost for a resource.
Display the Resource Sheet, and then insert the Cost field (right-click
the table and choose Insert Column) somewhere in the table. The Cost
value for a given resource is the total
cost for the resource for all assigned tasks, based on the standard
rate, overtime rate, cost/use, or other specified resource cost. This
technique is perfect when you want to see how much you're spending for a
specific cost resource, such as travel or training. Total cost for an assignment.
Display the Task Usage view or Resource Usage view. As usual, you can
either apply the Cost table or insert the Cost field in the Usage table
(or whatever table you want to use), as shown in Figure 2.
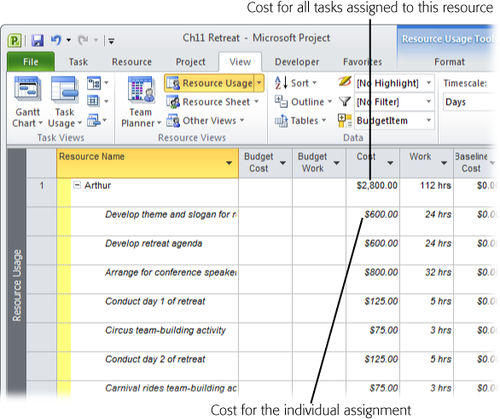
In
the Task Usage view, the cost in the resource name row represents the
cost for the individual assignment—what it costs to have the resource
assigned to the task. The cost in the task name row represents all
assignment costs rolled up to give you a total for the task.
Tip: You can transfer cost information from your Project file to an Excel file for further analysis .
Whether you copy and paste fields from Project into Excel or export
Project information into an Excel spreadsheet, you can apply formulas,
crunch numbers, and create whiz-bang charts and graphs until the cows
(or stakeholders) come home.
3. Adding Custom Budget InformationThe
Cost field is great while you're in the project planning phase and
setting up cost information to compare against your allocated budget. In
this section, you'll learn how to create your very own type of cost
field. You may have specialized cost or budget information you'd like to
see in your project, like budget targets for key tasks and phases. To
create a custom cost field for these types of costs, follow these steps: To create a custom field without adding it to a table, choose Project→Properties→Custom Fields. The Custom Fields dialog box appears. To
insert a custom Cost field in a table, right-click the table and choose
Insert Column on the shortcut menu. In the field name drop-down list,
choose a field, such as Cost2. Right-click the new column and then, on
the shortcut menu, choose Custom Fields to open the Custom Fields dialog
box. Select
the Task option for a custom cost field to be used in task views.
Select the Resource option if the new field is for resource views. A
task cost field represents just task costs, while a resource cost field
works only with resource costs. If you add a custom cost field to a
table, Project automatically selects the custom field in the Field list
and selects the Task or Resource option, depending on whether a task or
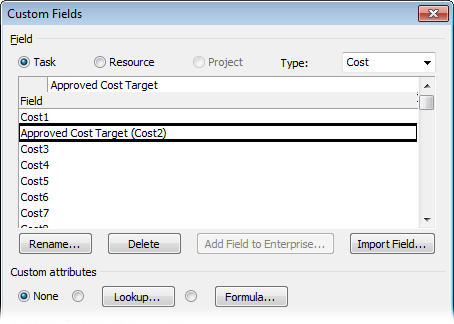
resource view is visible. In the Type box, select Cost, and then select one of the Cost fields that isn't already in use. The Field box lists all the custom cost fields, Cost1 through Cost10, as shown in Figure 3. Project displays custom fields along with their designated names. The
alias for a renamed custom field appears as the column title when you
insert the field into a table. The alias and built-in name both appear
together in other places. For example, if you rename the Cost2 field to
"Approved Cost Target," then the field appears in the field name
listings as "Approved Cost Target (Cost2)" as well as "Cost2 (Approved
Cost Target)." In the Custom Fields dialog box, click OK. The
cost field is ready for you to use in tables. If you haven't already
added the custom cost field to the table, see step 1. The box on Programming Your Custom Cost Fields explains ways you can make cost fields do tricks.
Custom
fields can do more than go by a different name. You can tell them to
calculate values in certain ways or provide hints about valid values. here's a quick overview of what you can do: Calculate values with formulas.
You can create a formula to calculate the contents of other fields and
display the result in a custom cost field—for example, the variance
between the planned cost and the target cost. Provide values with lookup tables. You can create a lookup table with a list of cost values to choose from when entering values in a custom cost field. Roll up values.
You can tell Project how it should roll up values in a custom cost
field into task or group summary rows—for example, by taking the maximum
amount of the group, averaging the amounts, or adding all amounts in
the group together. Roll down values.
You can specify whether Project should distribute the value in the
custom cost field in the time-phased portion of assignment rows in a
usage view.
|
