For playing music, videos, and DVDs
and viewing pictures, Media Center provides an alternative interface to
Windows Media Player, but its feature set is essentially the same. What
makes Media Center really shine is its unique ability to play back live
TV, record individual TV shows or series, and allow you to manage a
collection of recorded programs from a comfy chair with nothing more
than a remote control.
Before you can begin recording TV, you need to have the right hardware. The most important ingredient, of course, is a TV tuner.
Tuners can be internal cards or external devices (typically connected
through a USB port). After installing a tuner, you next have to provide a
television signal (from an over-the-air antenna, a cable TV connection,
or a satellite converter box). You'll need a Media Center remote
control and its infrared receiver (which can be built into the computer
or attached to a USB port on the PC). And you'll need disk space, lots
of it.
1. Setting Up One or More TV Tuners
Windows
Media Center can recognize and use analog, digital, and CableCARD TV
tuners. In the United States, all over-the-air (OTA) broadcasts are in
digital format; connecting an antenna to one or more digital tuners
allows you to record high-definition TV (HDTV) signals. You can connect
an analog tuner directly to a cable input if your cable provider
supports this configuration. To record digital output from a cable or
satellite connection, you must connect the output of a converter box to
the tuner; in this configuration, your recordings will be in standard
definition only. In Windows 7, you can install up to four tuners of each
type.
Setting up a TV tuner
or two requires that you install drivers for the tuner hardware. If
you've selected a popular, well-supported device, the drivers should be
installed automatically and updated by Windows Update. If no Windows 7
drivers are available, try drivers listed as compatible with Windows
Vista.
After you connect a video
source (antenna, cable box, or satellite converter), you need to
configure the TV signal. If you haven't yet set up your hardware, you
can do so by choosing Live TV Setup from the TV strip on the Start menu.
Or choose Settings from the Tasks strip, choose TV, and then select Set
Up TV Signal. In this procedure, you need to identify your signal
provider, enter a ZIP Code so that you can receive the correct program
guide listings, and specify which physical connections your tuner is
using. We recommend that you allow Media Center to perform an automatic
setup first; if the results aren't satisfactory, you can repeat the
setup and choose manual options instead.
Finally, you need to
configure the program guide. For large digital cable and satellite
networks, the most important step in this process is removing access to channels
you never watch. To customize the guide, open Settings, choose TV, and
then choose Guide. If you choose Edit Channels, you're taken to a screen
where you can select or clear the check box next to a channel listing
to add it to or remove it from the guide. You can also change the order
of channels and sort them by name instead of number.
Windows 7 also
offers the capability to edit settings for individual channels. You can
do this from the overall Edit Channels screen (just select a single
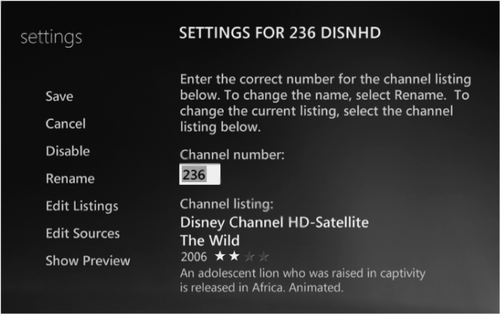
channel's entry and press OK) or by selecting a channel in the Program Guide and then pressing More Info. Either option takes you to a settings page like the one shown in Figure 1.

You can change the channel name or number, but the real payoff comes for Media Center users with multiple TV
tuners who want to specify which sources get preference when recording
from a channel. Let's say you have a digital cable tuner and an
over-the-air tuner both capable of receiving the same channel. In the
guide, the channel appears as 13.1 for the OTA tuner and 213 for the
cable tuner. Using the Edit Listings option, you can combine the two
channels under a single number. Then, using the Edit Sources option, you
can specify that you want the non-copy-protected OTA tuner to have
first shot at recording anything on that channel, with the digital cable
tuner kicking in only if the other tuner is occupied.
Finally, you can create Favorite
Lineups, which are subsets of the program guide that you create based
on your interests and preferences. You might want to create a Favorite
Lineup called Movies, for example, containing only channels that
specialize in movies. To create a Favorite Lineup, right-click anywhere
on the guide and choose Edit Favorites, and then choose Add New.
|
To watch or record high-definition content from premium channels that are available only through a cable subscription, you must have a digital tuner that is capable of decrypting the protected content being delivered by your TV provider. Windows Media Center supports a standard called the Open Cable Unidirectional Receiver (OCUR),
also known as a digital cable tuner (DCT). These devices can be sold
only by a PC maker that has signed an agreement with CableLabs, the
technical trade association that represents the cable-TV industry in North America, and only with a new PC that is specifically built for use with an OCUR device.
The PC must have a
BIOS that has support for a DCT, and you must have a second product key
that is used to activate support for the digital tuners. Your cable
company provides the CableCARD, which uses the PC Card form factor and
is designed to slide into a slot on the DCT. Most cable companies
require that this component be delivered and activated by their
installer. If you set up a DCT and attach the incoming cable feed
without inserting a CableCARD, it functions as a "clear QAM" digital
tuner and allows you to receive any unprotected channels (both standard
and high definition) that are available over your digital cable
connection.
After your CableCARD
device is successfully "paired" with a tuner and then activated on your
account, it cannot be moved. If you try to swap CableCARD devices
between tuners, you'll end up losing all access to the programming you've paid for.
DCTs
can be tricky to install, at least initially. If you're having trouble
getting digital cable to work, you'll need to start the troubleshooting
with your cable company. (You might need to escalate your request a
level or two before you find someone who understands the nuances of
CableCARD support in Windows.)
|
2. Recording TV Programs and Series
The biggest advantage
of using Media Center for TV recording is that program listings are free
and updated regularly. To see what's on TV right now or at any time
until approximately two weeks into the future, choose Guide from the
Start page or press the Guide button on the remote control. In the
guide, a red dot next to a listing means it's set to record. A red dot
with a shadow denotes a series recording.
Use the Channel Up and
Channel Down buttons on the remote control (or the Page Up and Page Down
keys on the keyboard) to move up or down a screen at a time. To jump to
a particular channel, enter its number on the numeric keypad. Virtually
everything in the guide can be selected for interaction. If you press
OK after selecting the thin Categories bar on the left side, for
instance, it expands to show a list of available categories, which you
can use to filter the guide's contents.
|
Search capabilities aren't available directly from the TV program guide, but you can search current listings by going to the Start page and choosing Search from the TV
strip. You can search by title, keyword, categories, movie actor, or
movie director. The same Search box is available from the Add Recording menu.
|
To record an individual upcoming program, highlight its entry in the program
guide and press the Record button on the remote control, or press OK to
display more details and then choose Record from the menu on the
Details page. TV programs that are part of a series offer a text
description, with options to record individual episodes or an entire
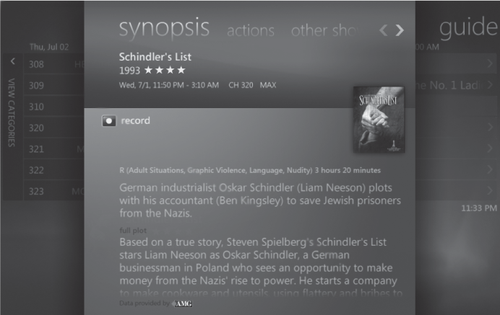
series. Movies offer a richer details page that includes art and an
option to read reviews and see additional cast information, as shown in Figure 2.

The Record button on the
remote cycles through three settings. Press Record a second time to add
the current selection as a series recording using default settings. Press Record a third time to cancel the recording.
Note:
The Other Showings
option is useful when you want to record an upcoming program that's on
at the same time as one you've already chosen to record. Rather than
cancel the original recording, choose Other Showings to see a list of
alternate times and dates. If you're lucky enough to find an additional
showing at a more convenient time, you can choose one of those dates and
avoid the conflict.
To record a series,
start with any listing in that series. Press OK to see the details for
that show and then choose one of the following options:
Record Series
Use this option if you want to add the recording to your series list
using all the current default settings. (To view and adjust these
settings, choose TV, choose Recorder, and finally select Recording Defaults.)
Advanced Record
Select this option from the Actions pane if you want the series
recordings to always start a minute (or two or three) early or end a
little later. You can also choose how many copies of the series to keep
on hand at any given time. For a series recording of a nightly news
show, for example, you might want to keep only one show, discarding
yesterday's news as soon as today's news begins recording.
To see all upcoming
recordings, go to the Start page, select Recorded TV, and choose View
Scheduled. On this list, you can choose Series to see all series
recordings you've set up. This list allows you to rank series to
determine which one should be recorded in the event that two programs
from different series are on at the same time. (If you have two or more
tuners, this sort of conflict is less likely to be a problem, but the
rules still come into play if you have three shows on at the same time.)
The clean, mostly uncluttered Media Center interface sometimes leads to options appearing in unlikely places. A good example is the History
option, which shows you all the programs you've recorded, which ones
failed to record because of a conflict or a hardware or signal problem,
and those that were deleted either automatically or manually. This
option is found, in unintuitive fashion, on the View Scheduled page.
Options here allow you to sort by date or by status (if you start seeing
Bad Tuner messages, it's time to do some troubleshooting). You can also
clear the history.
|
Media Center saves recorded TV programs in the Windows Recorded TV Show format, which uses the file name extension WTV. This file format replaces the Microsoft Recorded TV Show format (DVR-MS), which was used in previous Windows versions. Both are container formats that use the MPEG-2
standard for video encoding and MPEG-1 Layer II or Dolby Digital AC-3
for audio. WTV files include metadata about the content and any digital
rights management (DRM) applied to it.
Like its predecessor, the WTV format consumes a large amount of space.
An hour-long, standard-definition TV program can consume well over 3 GB
of disk space at the highest quality supported by Media Center.
High-definition content uses even more space: we've seen two-hour
programs use as much as 16 GB of disk space. That makes it difficult to
record a movie and then burn it to a standard DVD, which has a maximum
capacity of roughly 4.5 GB. (If you select the Burn DVD option for one
of these large files, Media Center offers to burn it at a "lower
quality" but gives you no way to know just how much lower the quality
will be, nor can you adjust the quality level manually.)
Over the past few years, a number of third-party tools have appeared that support converting DVR-MS files to less demanding formats. The version of Windows Movie
Maker included with Windows Vista offered this capability but, alas, is
not included with Windows 7. Eventually, those conversion tools will
support WTV files, although at the time of this writing we have yet to
see any. As a short-term solution, you can convert any WTV file to
DVR-MS format by opening the Recorded TV folder in Windows Explorer,
right-clicking the file you want to convert, and clicking Convert To
Dvr-ms Format from the shortcut menu. After the conversion is complete,
you can open the file.
The Windows Recorded TV format, like its predecessor, also honors copy protection applied to recordings
by the content provider. You can copy a protected program—such as a
movie from a premium channel such as Home Box Office—and play it back on
the same system on which it was recorded or on a Media Center Extender
connected to that PC. But you can't play it back on another PC using
Windows Media Player or Media Center (if you try, you'll see an error
message). Unprotected files can be freely moved from one PC to another.
You can identify a copy-protected
recording fairly easily from within Media Center. Select the program
from the Recorded TV library and choose More Info. At the bottom of the
Synopsis pane in the Details window, you'll see a Copy Protected label.
Windows 7 incorporates a new DRM technology called PlayReady. If you run into a DRM-protected program you might be prompted to install or upgrade PlayReady.
The theoretical benefit of the PlayReady technology is that it allows
sharing of content by multiple devices within a single domain (such as a
home network) and makes it possible to synchronize protected content
between devices. Only time will tell whether those theoretical
advantages will become real.
|
3. Watching and Managing Recorded TV
To watch
programs you've previously recorded, go to the Start page and choose
Recorded TV from the TV strip (or use the shortcut button on the remote
control). Every recorded item in the list has a name and a thumbnail
image (the thumbnail is generated using an algorithm that is uncanny in
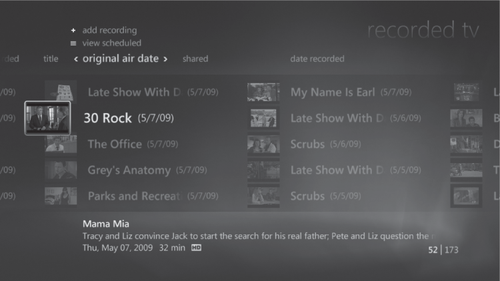
its ability to find an image that fits, usually a face). Figure 3 shows a large collection of all current recordings
in List format. Click More Info and choose View Large from the shortcut
menu to see much larger thumbnails for each program in a list that
scrolls horizontally.

Select any program from the
list and press OK to see the Details window for that program. Options in
the Actions pane allow you to change when the program is automatically
deleted or burn it to a CD or DVD for archival purposes (if the program
isn't copy protected, of course).
|
From Recorded TV, you
can delete any program with no intermediate steps and only a single
confirmation. Select the entry in the list, and push the Clear button
(usually found below the numeric keypad, in the lower left corner of the
remote control). This brings up an "Are you sure?" dialog box with Yes
conveniently selected. Press OK and the program is gone. And when we say
"gone," we mean it. Recordings you delete from Media Center do not go
to the Recycle Bin and cannot be recovered using any supported tools in Windows or Media Center.
|
Sooner or later—usually sooner—you'll run out of disk space, at which point Media Center begins throwing out old recordings
to make way for new ones. You can check on available disk space at any
time: start by choosing Settings from the Tasks strip on the Start menu,
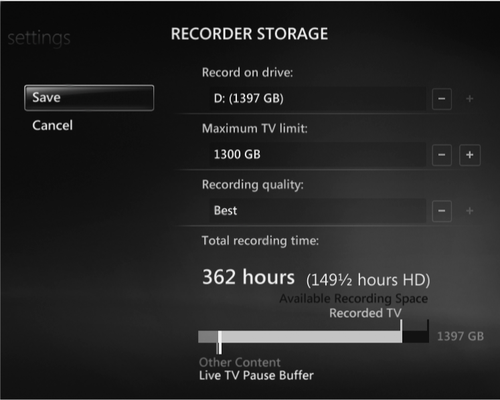
then choose TV, then Recorder, and finally Recorder Storage.
If you want to make sure that you reserve some space on your primary
disk for documents and other data files, adjust Maximum TV Limit.
