Technically, Windows 7 setup is
complete when you reach the desktop and log on for the first time. In
the real world, there's still a short checklist of system settings you'll want
(or need) to go through soon. Most of the items in the following list
are one-time tasks that you'll set and forget. The list doesn't include
performance tweaks or maintenance tasks that you perform occasionally,
nor does it include personalization settings you might want to change
over time. What all of these settings have in common is that they are
per-machine settings, not per-user settings.
1. Adjust
Basic Display Settings
Your screen resolution determines how many pixels are
available for Windows to use when displaying on-screen objects. Objects
on the screen appear larger at lower resolutions and smaller when you switch to a
higher resolution. If setup correctly detected the capabilities of your
monitor and display adapter, your display should be set to the monitor's
native resolution. To adjust the resolution, right-click any empty
space on the desktop and click Screen Resolution on the shortcut menu
(or open Control Panel and click Adjust Screen Resolution, under
Appearance And Personalization). The Screen Resolution dialog box that
opens shows the full range of supported resolutions for your video
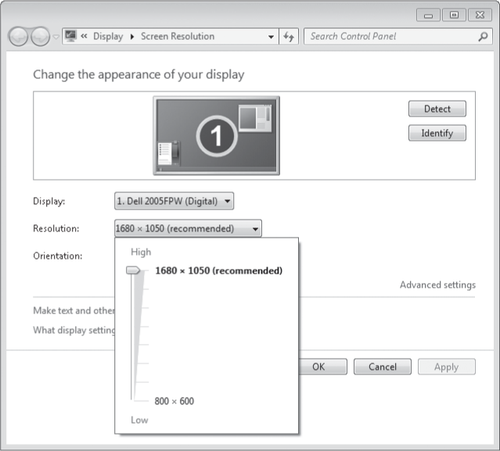
adapter and display (as determined by Plug and Play). In Figure 1, for example, you can move the Resolution
slider to any of eight settings, ranging from 800 by 600 at the Low end of the scale to 1680
by 1050 at the High end.
On analog monitors, you
can adjust the display to any resolution and get acceptable results. On
flat-panel LCD displays, you'll get best results by setting this value
to match the display's native resolution, which corresponds to the
number of pixels on the display. If your video memory is extremely
limited, you might need to choose a lower color depth to enable higher
resolutions.
If you've connected multiple monitors, you can adjust display
settings independently for each one. Click a monitor icon to select
settings for that display.
Figure 1. The (recommended) label appears alongside the setting for the
native resolution of the current display.
2. Update the
Windows Experience Index
The Windows Experience
Index (WEI) measures the performance of key subsystems of your PC,
including the display adapter, memory, CPU, and hard disk. In Windows
Vista, the individual benchmark tests that make up the WEI ran
automatically at the end of setup, adding several minutes to the total
installation time; in Windows 7, setup defers this task until you choose
to run it manually. To fill in these scores and determine whether each
subsystem is performing as expected, open System Properties. In the
place where the rating would normally appear, you should see a link
reading "System rating is not available." Click that link to kick off
the Windows System Assessment program and fill in the missing scores.
3. Check Your
System's Security
A default installation of
Windows 7 includes basic security safeguards that protect your PC from a
variety of threats—with one important exception. Windows 7 does not
include antivirus
software. If you've purchased a new PC with Windows 7 already
installed, the PC maker might have included a full or trial version of a
third-party antivirus program. You can use this software, or replace it
with Microsoft Security Essentials or another package you prefer. To
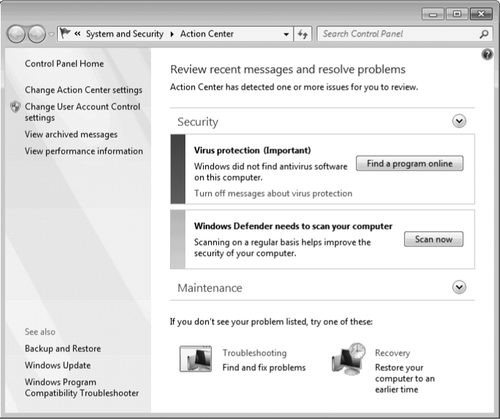
confirm whether you have antivirus software, open Action Center (it's at
the top of the System And Security category in Control Panel) and look
under the Security heading. The warning message shown in Figure
2 indicates that your system requires
additional software for full protection.
If you've chosen to use a
different program in place of any of the Windows default security
features, you should check here after installing the other program to
ensure that it's correctly reporting its coverage to Windows.
4. Test
Network and Internet Connections
Network And
Sharing Center, available under the Network And Internet category in
Control Panel, provides one-stop access to all networking settings. With most hardware, Windows
7 doesn't require any special setup to enable access to the internet and to other computers
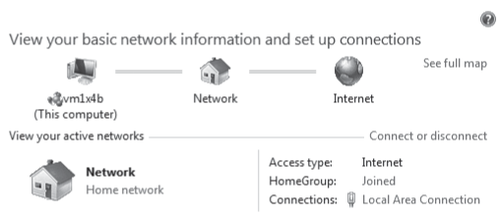
on your network. To verify that your network is functioning properly,
check the graphical display at the top of Network And Sharing Center. It
should resemble the one shown here. If you see a red X between your
Network icon and the Internet icon, click it to start the Network
Troubleshooter.
This is also a
good time to perform some functional tests. Can you access favorite web
pages in your preferred browser? Can you open, save, and change files in
shared network folders? The options elsewhere in Network And Sharing
Center allow you to create, join, or leave a homegroup, tweak adapter
settings, fine-tune advanced file sharing, and perform other advanced
tasks that might be appropriate for your network configuration.
5. Adjust
Windows Features
The basic feature set
of Windows 7 is determined by the edition you install, and a standard
installation makes all the features in your edition available without
asking you (or allowing you, for that matter) to pick and choose. In
addition to these core features, a small set of advanced and specialized
features is available as well. To review the full list and enable or
disable any of the features on it, open Programs in Control Panel and
click Turn Windows Features On Or Off (under Programs And Features).
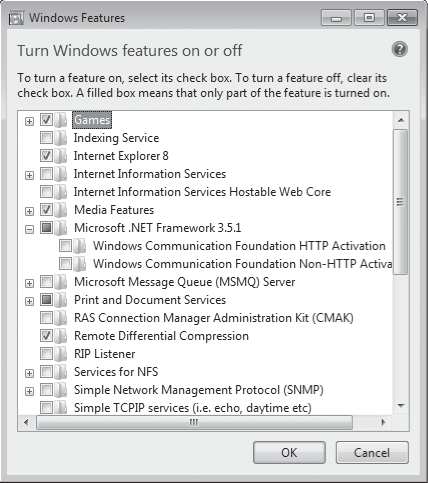
The Windows Features dialog box, shown in Figure 3, indicates which features are
available for your edition. A check mark means the feature is currently
enabled, and a blank box means the feature is disabled. If you see a
filled box, the feature is partially enabled; click the plus sign to the
left of the entry to see more details about it.
You might be surprised
to see that Windows 7 offers the ability to remove some features that
were untouchable in previous editions: Internet Explorer 8, for example,
along with Windows Media Center and Windows Media Player. Removing one or more of
those options (as well as the default selection of games) might be
appropriate on a PC intended for use in a business environment where you
want to lock down access to potential distractions.
The Windows Features list might change over time as you add
Windows features to your system. For example, if you install Windows
Virtual PC, it is added to the list, allowing you to subsequently
disable that feature if desired.
6. Choose
Default Programs
One of the great
strengths of the Windows platform is the staggering number of programs
from which you can choose. Many of those options are designed to handle
the same functions as programs included with Windows 7. For example, you
might prefer Mozilla Firefox to Internet Explorer for daily web
browsing, and fanatic iPod or iPhone owners will almost certainly prefer
iTunes to Windows Media Player. If you prefer a third-party program
(including programs in the Windows Live family) to one of those included
by default with
Windows 7, use the Default Programs dialog box to make your preference
official.
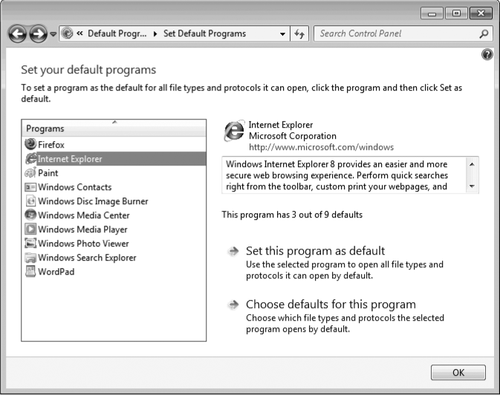
To open Default Programs,
click its link on the Start menu. As Figure 4 shows, you can adjust settings for each program that appears in this
dialog box, setting
the program to use all available defaults or adjusting them
individually.
Even if you've already
used a function within your preferred program to set it as the default, it's worth a
visit to this dialog box to see if another program has managed to hang
on to the right to open one or more file types by default.
7. Personalize
Power and Sleep Settings
If you install a
retail version of Windows 7, the operating system sets default
power-saving and sleep options based on the type of hardware you're
using. On a PC that you purchase with Windows 7 already installed, the
PC maker might set its own power and sleep defaults. In either case, you
should check the current settings to ensure that they match your personal
preferences. If necessary, you can adjust individual power settings or
create a new power scheme. You'll find Power Options in Control Panel,
under the Hardware And Sound category.
2.7.8. Fine-Tune
System Protection Options
The System Protection
feature is one that you probably won't appreciate until you have to use
it, at which point you'll be very, very grateful to the anonymous
programmer who dreamed it up. System Protection takes periodic snapshots
of system files and configuration details, allowing you to run the
System Restore utility to undo changes and roll back a system
configuration to a time when it was known to work correctly. In Windows
7, those volume snapshots also include real-time backups of individual
data files, allowing you to recover from unwanted edits or unexpected
deletions by restoring a previous version of a deleted or changed file.
Those backed-up
files and settings come at a cost in disk space, however. On a system
where available storage is in short supply, you might want to reduce the
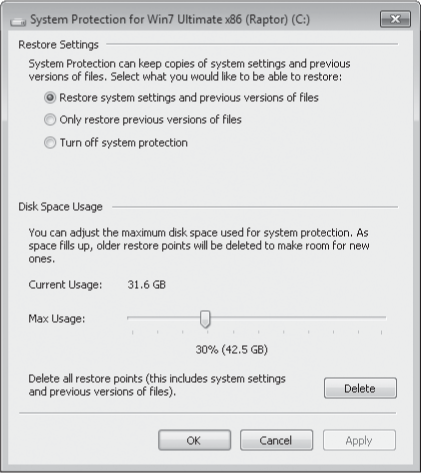
amount of disk space set aside for System Protection. Figure 5 shows the settings dialog box for a
system volume approximately 140 GB in size. You can move the Max Usage
slider to adjust disk space usage or use the options at the top to
disable all or part of the System Protection feature on this drive.
Figure 5. Use
these settings to restrict the amount of space that Windows 7 uses for
System Restore snapshots and previous versions of files.
9. Create
Additional User Accounts
If you anticipate that
your computer will be used by more than one person, set up an account
for each additional user now. Creating standard accounts for users
ensures that they won't be able to install malware or incompatible
software in system folders and will be unable to install unsigned device
drivers that can cause system instability. They'll also be blocked from
deleting essential system files.
10. Set Up a
Regular Backup Schedule
When you've finished
with setup and tweaked basic system settings to match your preferences,
it's a perfect time to set up a regular backup schedule. The first step,
of course, should be to back up your newly installed and properly
tweaked and tuned system by creating a system image. This option is
available as part of the built-in system-image feature, which is part of
the program in all retail editions of Windows 7. (If you prefer, you
can choose from a multitude of third-party products that offer similar
backup features.) After the image is complete, be sure to create a
system repair disk so that you can restore the backed-up image easily in
the event of a disk failure or other problem.