A Windows Form is a blank canvas: It doesn't do much
on its own. To bring your Windows Form to life, you must add controls to
it. Controls are UI elements, such as buttons and text boxes, designed
for interacting with your Windows Form. Controls breathe life into your
Windows Forms by
Providing structure and navigation in the form of menus, toolbars, and status bars Allowing users to interact with your forms by using buttons, labels, and text boxes Displaying dialog boxes to provide user feedback about your application's state
|
Putting controls on a form is
also a way of designing an application. The form with controls and no
code is an adequate prototype with which you can then proceed to plan
the code. By taking the time to think through the application and place
the controls as they will be in the final application, you'll likely
have fewer bugs, flaws, and debugging issues during the development
process.
|
|
1. Introducing the control toolbox
Visual Studio provides a toolbox chock full of controls. The control toolbox, shown in Figure 1-3, includes all the commonly used controls that even casual Windows users are familiar with, such as
Labels, text boxes, and buttons Check boxes, list boxes, and combo boxes Calendars and date pickers
The toolbox displays controls in groups, or tabs:
All Windows Forms: Contains an alphabetical list of controls. Common Controls: Lists frequently used controls, such as labels and text boxes. Containers: Used for laying out and grouping other controls on the form. Menus & Toolbars: Creates the menus and toolbars your application uses. Data: Contains controls and wizards for accessing data.
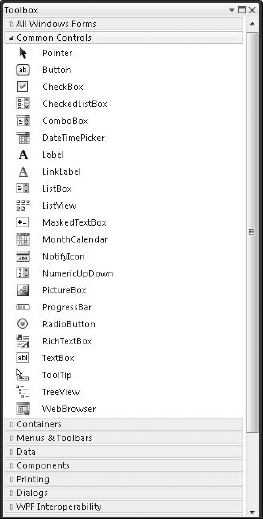
Components: Contains controls that provide back-end services, such as connecting to an event log. Printing: Provides printing features. Dialogs: Allows you to add common dialog boxes, such as those used for saving files. WPF Interoperability: Provides interoperability between Windows Presentation Foundation and Windows Forms. Crystal Reports: Allows you to add a Crystal Report to your form. General: Contains an empty group.
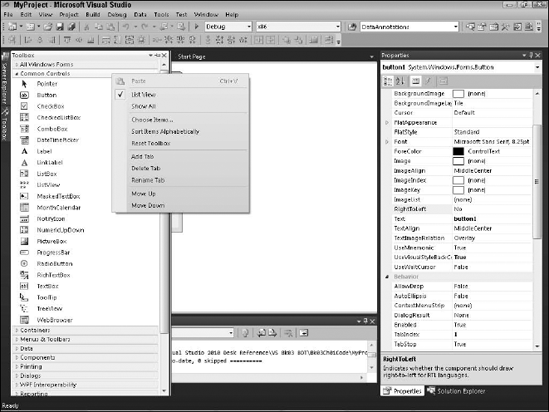
2. Customizing the toolbox
You can customize the toolbox by
Adding and removing tab groups Moving tab groups up or down Adding and removing controls to and from the tab groups
To customize the toolbox, follow these steps:
Right-click an item, such as a specific control or tab, in the toolbox you want to customize. A contextual menu appears, as shown in Figure 2. From the shortcut menu, choose the action you want to take. |
To add new controls to the toolbox, choose Choose Items from the contextual menu.
|
|
|
Whenever possible, you should
use the controls provided in Visual Studio. Using them creates a
consistent user experience because Windows users are generally familiar
with most Windows controls. Sometimes, however, you may need a control
that isn't available in the Visual Studio toolbox. You have several
options:
Build your own. Because .NET is an object-oriented language, you can extend an existing control or build your own. Use ActiveX controls. Windows Forms can host ActiveX controls, which are built by using the Component Object Model (COM) technology. You add controls to the Visual Studio toolbox by choosing the Choose Toolbox Items command from the Tools menu. Buy the control. Many third-party vendors sell controls. You could also sell a control that you build. Download the control.
Sometimes, you can find controls available for free or as shareware on
the Internet. Be sure to read the license before you redistribute
controls you find there.
|
3. Adding controls to your form
The easiest way to add a control
to a form is to drag and drop it from the toolbox onto the Windows
Form. You can also draw a control to specify its exact size. To draw a
text box on a Windows Form, follow these steps:
Click the text box control in the toolbox. If the toolbox is closed, press Ctrl+Alt+X to display it. Move your mouse pointer to the Windows Form. Note: You don't need to drag the text box. The pointer changes to a plus sign (+). |
If you change your mind
about drawing the control, click a different control or click the
pointer in the toolbox to reset your mouse pointer without adding a
control to the form.
|
|
In the upper-left corner, click the mouse pointer wherever you want to start drawing the text box. |
To draw a default-size text box, click and release your mouse button without dragging.
|
|
Drag the mouse pointer to the upper-left corner where you want the text box to end, as shown in Figure 3, and release the mouse button. The
text box is drawn on the form. When you're done placing controls, the
next step is typically to format them and set how you want them to
behave. See the next section, "Manipulating Controls," for details.
|
