You have an idea how the BLOB
storage service is hosted in Windows Azure. Let’s look at how files are
stored in the service. In this section, we’ll look at the three layers
of BLOB storage:
The account
The
container
The BLOB
To help explain these
concepts, we’ll use figure 1 as a reference. Figure 1 shows how an MP3 file might be stored in BLOB
storage.
Before we get all
technical about accounts, containers, and BLOBs, keep this in mind: an
account is simply your account. Dave has an account, Jim has an account,
and you have an account. An account is about ownership. A container is
somewhere you can store your BLOBs. Containers are about access control
(public or private access) and some level of organization.
With that in mind, let’s look at some of the
specifics.
1. Accessing the
BLOB (file)
In figure 1,
you can see how files (otherwise known as BLOBs) are stored in BLOB
storage. The BLOB Podcast01.wma resides in the container ChrisConverted,
which resides in the storage account silverlightukstorage. A BLOB can’t
directly reside in a storage account
and must live in a storage container. If you do need to make the BLOB available as if
it’s at the top level of the account (as if it doesn’t have a
container), you can store the BLOB in the root container.
Because storage services use a
REST-based architecture, you can retrieve a file from BLOB storage by
performing an HTTP GET request to the URI
for the BLOB. The following URI would let you retrieve Podcast01.wma
from the ChrisConverted container (held in the silverlightukstorage
storage account) from the live BLOB storage service: http://silverlightukstorage.blob.core.windows.net/ChrisConverted/Podcast01.wma.
We could formalize the URI
for the live storage account as follows: http://<storageAccount>.blob.core.windows.net/<Container>/<BlobName>.
Let’s now take a closer look
at accounts, containers, and BLOBs to get a clearer understanding of
these components.
2. Setting up a
storage account
When
you sign up for Windows Azure, you can create a storage account in the
Azure portal. The storage account is the top level for all storage
services (BLOBs, queues, and tables) that reside under it.
When you create your
storage account, you’ll be assigned a subdomain for each storage
service. The following three domains are for the storage services:
http://<storageAccountName>.blob.core.windows.net/
http://<storageAccountName>.queue.core.windows.net/
http://<storageAccountName>.table.core.windows.net/
In our previous example, the
name of the storage account was silverlightukstorage, which means that
the top-level URI for each service in our account would be as follows:
|
There are a couple of things
to consider about your storage account, the major one being this: do
you have one large account, or a separate account for each application?
Although this is ultimately up to you, a good guide would be access
control. If you’re a small shop, then one overall account is probably
suitable; however, a single account wouldn’t work so well in, say,
Microsoft or IBM. In these larger organizations, separating by
application is probably a more suitable approach.
|
If you don’t like the
beautiful subdomain assigned to you for BLOB storage (xxxxx.blob.core.windows.net)
then you can always assign your own domain name.
3. Registering
custom domain names
What we’ll do now is step
through the process of associating your own domain name with the BLOB
storage service. You’ll be able to access your WMA file using this URI: http://blobs.chrishayuk.com/ChrisConverted/Podcast01.wma.
To register a custom domain name
with a BLOB storage account, you have to do the following:
Register
a suitable domain with your domain provider.
Set
up a domain to point at Windows Azure.
Validate
that you own the domain.
Set up the subdomain
to point at BLOB storage.
We’re going to skip the registering a suitable
domain step. If you don’t know how to do that, then I’m sure GoDaddy (or
some other provider) will happily provide some instructions so they can
extract some lovely dollar bills (or British Pounds, or Euro Euros)
from your pocket.
Set Up a Suitable
Domain
After you’ve registered
your domain (for example, chrishayuk.com), you need to let Windows Azure
know that you want to point a suitable subdomain at it. To do that, log
in to the Azure portal. Select your storage account
(silverlightukstorage), and then click the Manage Domains button. You’ll
be faced with the page shown in figure 2.
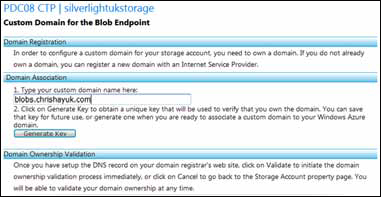
After you’ve entered the name
of the domain (including the subdomain) that you want to point to the
BLOB storage account, you need to validate the domain.
Validating that you Own
the Domain
Validate the domain by
clicking the Generate Key button. After you click the button, you’ll be
presented with the screen shown in figure 3.
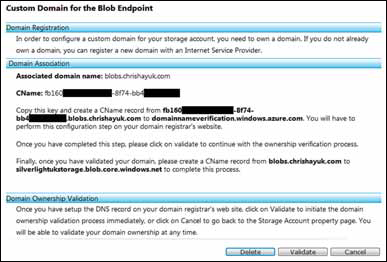
The window in figure 3
indicates that you need to perform two actions:
Add a new CNAME for the GUID (fb160. . .)
that points to verify.windowsazure.com.
Add a new CNAME for the subdomain
(blobs.chrishayuk.com) that points to your BLOB storage account
(silverlightukstorage.blob.core.windows.net).
Whichever company you
used to register your domain probably manages the DNS for your domain
name. Using their web control panel, you should be able to create the
subdomain using a CNAME. Figure 4 shows the CNAMEs for chrishayuk.com in the GoDaddy
Domain Manager.

If you manage your own DNS
server, you already know how to set up a CNAME; if not, your system
administrator will certainly be able to (although he might not be very
pleased that you’re looking to replace him with an automated system).
After you’ve set up your
CNAMEs, return to the Windows Azure portal a little later to validate
the domain (click the Validate button shown in figure 3).
As soon as the domain has been validated, you’ll be able to use your
custom domain name.
Why do you need to come back
later? Funnily enough, this is all to do with replication. After you’ve
updated the DNS details on the server that’s responsible for
maintaining your domain records, this update needs to be replicated to
all the other DNS servers in the world. This replication delay is the
reason that you’ll have to come back later (usually 10 minutes to an
hour); it’ll take a little time for the Windows Azure DNS servers to
receive that update. Perhaps the world’s DNS servers should use Windows
Azure instead.
OK, you’ve got your custom
domains set up and you understand containers; let’s look at how you can
use them to store BLOBs.
4. Using containers
to store BLOBs
In BLOB storage, you
can’t store BLOBs directly in a storage account because every BLOB must
live in a container. A container is really a top-level folder. Although
you can set permissions directly on a BLOB, this can be a pain with a
large number of BLOBs. To alleviate that administrative headache, you
might want to group similar BLOBs that have similar access levels in the same container.
Then you can set permissions at the container level rather than at the
individual BLOB level.
In BLOB storage, there are two
levels of access that you can set on a container: private and public.
Private Containers
BLOBs in a private
container are restricted to the owner of the account. If you need to
list the contents or download a BLOB stored in a private container, you
need to make a request signed with your shared authentication key .
In figure 1,
the container ChrisOriginals is a private container. If you wanted to
access the BLOB podcast01.mp3, you would make a GET request to the
following URI (this request must be signed with either your account
master key or a pregenerated shared key; we’ll explain this later): http://silverlightukstorage.blob.core.windows.net/ChrisOriginals/Podcast01.mp3.
Full Public Read Access
and Public Read-Only Access For BLOBS
If the container is set to full
public read access, then you can retrieve any BLOB held in the container
over HTTP without providing authentication credentials. Not only that,
you can list all the BLOBs in that container and query data about the
container.
With public
read-only access for BLOBs, anonymous requests will only be able to read
a BLOB (you won’t be able to read container data or list the BLOBs in
the container).
In figure 4, the container ChrisConverted is a public container;
anyone on the internet would be able to download the file podcast01.wma
by making an HTTP GEThttp://silverlightukstorage.blob.core.windows.net/ChrisConverted/Podcast01.wma. request to
If you need to
perform any operations beyond the container permission level (for
example, if you need to upload or modify a BLOB), you need to provide
authentication credentials (account owner or shared access) because
these operations are restricted operations.
So far we’ve talked only
about the live BLOB storage service. Now we’ll take some time to look at
how you can develop against the BLOB storage service by using a
development version of the BLOB service that’s in the development
storage service.
