Windows Azure Content Delivery Network
Delivering content
worldwide can be a challenge. As more and more people gain access to the
Internet, more and more people (hopefully) will be visiting our site.
The ability to deliver content to our visitors is limited by the
resources we've used for our application. One way of handling
bottlenecks is to move commonly used files (such as CSS or JavaScript
libraries) or large media files (such as photos, music, and videos) to
another network with much greater bandwidth, and with multiple locations
around the world. These networks are known as Content Delivery Networks (CDNs),
and when properly utilized to deliver content from a node
geographically closer to the requester, they can greatly speed up the
delivery of our content.
The Windows Azure
Content Delivery Network is a service that locates our publicly
available blobs in data centers around the world, and automatically
routes our users' requests to the geographically closest data center.
The CDN can be enabled for any storage account, as we saw in the service
setup.
To access blobs via the CDN,
different URL is used than for standard access. The standard endpoint
for our sample application is http://jupitermotors.blob.core.windows.net.
When we set up CDN access, our service is assigned a GUID, and CDN
access is through a generated URL, which will be assigned in our Windows
Azure Developer portal when we enable the feature. A custom domain can
also be used with the CDN.
Blobs are cached at the CDN endpoints for a specified amount of time (default, 72 hours). The time-to-live
(TTL) is specified as the HTTP Cache-Control header. If a blob is not
found at the geographically closest data center, the blob is retrieved
from the main Blob Storage and cached at that data center for the
specified TTL.
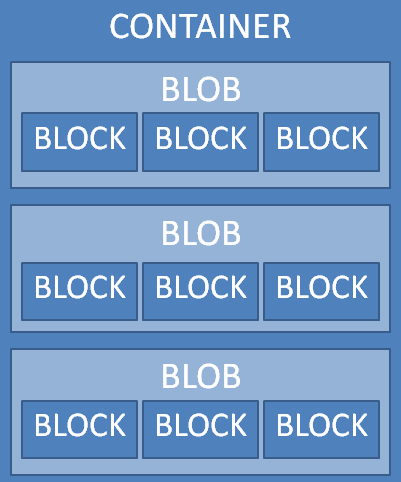
Blob Storage Data Model
The Blob Storage Data Model
is a simple model consisting of four different components: a storage
account, containers, blobs, and blocks or pages. A container is a way
to organize blobs. Think of a container as a "folder" that can hold many
"files". These "files" are blobs. A blob consists of one or more blocks
or pages of data. In the following diagram, we can see a visual
representation of a container, blobs, and blocks. Our storage account
can hold an unlimited number of containers, and each container can hold
an unlimited number of blobs. Each blob, as mentioned above, can be
either 200 GB or smaller (block blob) or up to 1 TB (page blob). Each
block in a block blob can be up to 4 MB in size, which implies that a
200 GB block blob will contain a tremendous number of blocks.
Blob Storage
There are two mechanisms for
accessing Blob storage the REST-ful Blob Storage API and a .NET client
library called the StorageClient Library. Documentation for the REST-ful
API can be found at http://msdn.microsoft.com/en-us/library/dd135733.aspx, whereas the StorageClient Library documentation can be found at http://msdn.microsoft.com/en-us/library/ee741723.aspx.
Representational State Transfer
What is REST? REST stands
for Representational State Transfer, and even if the term is not
familiar, the concepts probably are. REST architecture forms the basis
for the World Wide Web. In REST, a client sends a document to a server,
called as request, and the server replies with another document, called
as response. Both the request and the response documents are
"representations" of either the current or intended "state". The state
in this context is the sum total of the information on the server. A
request to list all the posts in a forum receives a response describing
the current state of the forum posts. A request containing a reply to
one of those posts represents the intended state, as it changes the
forum's information. Systems built on these concepts and utilizing a set
of HTTP verbs are described as REST-ful.
The Blob Storage API
Now that we have an idea of
what REST is, we now understand why it's important that the Blob Storage
API is built on a "RESTful" interface. The Blob Storage API uses the
HTTP/REST operations PUT, GET, DELETE, and HEAD. These operations perform the following functions:
PUT: This command will insert a new object, or if the object already exists, it will overwrite the old object with the new one.
GET: This command will retrieve an object.
DELETE: This command will delete an object.
HEAD: This command will retrieve properties and metadata.
Using the Blob Storage
API, we can work with containers, blobs, and blocks via HTTP/REST
operations. As we examine the API in the coming sections, we will notice
that many of the operator/request URI combinations are similar. The
magic happens with the request headers and request bodies.
Working with containers using the REST interface
We are able to perform a number of actions with containers using the Blob Storage API. Containers help us to:
List all containers for our storage account
Create new containers Retrieve all container properties and metadata Set metadata on containers Get and set the access control list (ACL) for a container Delete a container (and its contents)
Working with containers using the StorageClient library
The CloudBlobClient class is the class used to interact with blob containers. The CloudBlobContainer class acts on a single container.
|
Parameter
|
Rest API
|
Client Library
|
|---|
|
List Containers
|
Using the GET operator, we can retrieve a list of containers for our storage account. The request URI is in the form http://<account>.blob.core.windows.net/?comp=list, where<account>
will be replaced with our account name. The request will retrieve the
entire list of containers (up to 5,000 items at a time). If a storage
account has more than 5,000 containers, a continuation token will be
returned, so the full list can be paginated by making subsequent
requests and including this continuation token.
|
The CloudBlobClient.ListContainers method is used to list the containers in a storage account. The overloads ListContainers(<prefix>) is used to list only the containers whose names begin with the prefix, and ListContainers(<prefix>,<details>) is used to specify the level of detail to be returned. Detail options are passed as ContainerListingDetails, and the options are All, Metadata, and None.
| |
Create Containers
|
Using the PUT operator, we can create a new container for our storage account. The request URI is in the form http://<account>.blob.core.windows.net/<container>?restype=container where <account> will be replaced with our account name and <container> is the name of the new container. If the container already exists, the operation will fail.
|
The CloudBlobContainer.Create or CloudBlobContainer.CreateIfNotExists methods are used to create a container in our storage account.
| |
Get Container Properties
|
Using the GET/HEAD operator, we can
retrieve all the user-defined metadata and system properties for a
specified container. The request URI is in the form http://<account>.blob.core.windows.net/<container>?restype=container where <account> will be replaced with our account name and <container>
is the name of the container.
In addition to a container's metadata, there are a series of properties
such as the Last-Modified date and ETag. Retrieving the properties of a
container returns both the system properties and any metadata.
|
The CloudBlobContainer.FetchAttributes method is used to query the system properties and container metadata. The properties are then accessed via the CloudBlobContainer.Properties property.
| |
Get Container Metadata
|
Using the GET/HEAD operator, we can retrieve only the user-defined metadata for a specified container. The request URI is in the form http://<account>.blob.core. windows.net/<container> ?restype=container&comp= metadata where <account> will be replaced with our account name and <container>
is the name of the container.
Each container can have up to 8 KB of metadata associated with it. We
can use this metadata for a variety of purposes such as categorizing the
contents of the container (Christmas videos, photos of RVs, and so on).
Getting the metadata returns only the metadata.
|
After calling the CloudBlobContainer.FetchAttributes method, metadata are accessed via the CloudBlobContainer.Metadata property.
| |
Set Container Metadata
|
Using the PUT operator, we can set one or more of the user-defined metadata for a specified container. The request URI is in the form http://<account>.blob.core. windows.net/<container> ?restype=container&comp= metadata where<account> will be replaced with our account name and<container> is the name of the container.
|
The CloudBlobContainer.SetMetadata method is used to add metadata to a container.
| |
Get Container ACL
|
Using the GET/HEAD operator, we can get the access control list for a specified container. The request URI is in the form http://<account>.blob.core.windows.net/<container>?restype=container&comp=acl where<account> will be replaced with our account name and<container> is the name of the container.
There are three levels of permissions that can be applied to a container:
Full public read, in which both container and blob data can be read by anonymous users Public read access for blobs only, in which only blob data can be read by anonymous users No public read access
The permissions on a container are known as the Access Control List, or
ACL, a term also applied to folder permissions on the Windows OS.
|
The CloudBlobContainer.GetPermissions is used to retrieve the container's ACL.
| |
Set Container ACL
|
Using the PUT operator, we can set the access control list for a specified container. The request URI is in the form http://<account>.blob.core.windows.net/<container>?restype=container&comp=acl where<account> will be replaced with our account name and<container> is the name of the container.
|
The CloudBlobContainer.SetPermissions method is used to set a container's ACL.
| |
Delete Container
|
Using the DELETE operator, we can
mark the container to be deleted. The container is not deleted right
away, but later during a garbage cleanup process. The request URI is in
the form http://<account>.blob.core.windows.net/<container>?restype=container where<account> will be replaced with our account name and<container> is the name of the container.
|
The CloudBlobContainer.Delete method is used to delete a container.
|
Working with blobs
Working with blobs using the REST interface is as easy as working with containers. The same PUT/GET/DELETE/HEAD operators are used with slightly different request URIs. In the client library, the CloudBlob class is used to interact with individual blobs. Another useful class for working with blobs is the BlobRequest class . The BlobRequest class has many similar methods to the CloudBlob class, and also includes the methods for working with blocks in block blobs.
|
Parameter
|
Rest API
|
Client Library
|
|---|
|
List Blobs
|
Using the GET operator, we can retrieve a list of blobs in a container. The request URI is in the form http://<account>.blob.core.windows.net/<container>?restype=container&comp=list, where<account> will be replaced with our account name and<container> is the name of the container we're retrieving the list from. The request will retrieve the entire list of blobs in<container>
(up to 5,000 items at a time). If a container has more than 5,000
blobs, a continuation token will be returned. The full list can be
paginated by including the continuation token in subsequent requests.
|
The CloudBlobContainer.ListBlobs method is used to return a list of all blobs in a container.
| |
Create Blob
|
Using the PUT operator, we can create a new blob in a container. The request URI is in the form http://<account>.blob.core.windows.net/<container>/<blob> where<account> will be replaced with our account name,<container> is the name of the container, and<blob>
is the name of the blob.
Note that all blobs in a container must have a unique name for that
container! Also, creating a blob doesn't actually "create" the blob; it
just reserves space for the blob. The blob isn't created until its
contents are uploaded to the blob.
|
A blob is not created until its contents are uploaded. For smaller files, the simplest method is to use the CloudBlob.UploadFile method. For large page or block blobs, the methods for creating a blob differ.
| |
Get Blob
|
Using the GET operator, we can retrieve a blob, blob properties, and metadata in a container. The request URI is in the form http://<account>.blob.core.windows.net/<container>/<blob> where<account> will be replaced with our account name,<container> is the name of the container, and<blob> is the name of the blob.
|
To retrieve a specific blob, we use one of the download methods such as CloudBlob.DownloadToFile.
| |
Get Blob Properties
|
Using the HEAD operator, we can retrieve a blob's properties and metadata in a container. The request URI is in the form http://<account>.blob.core.windows.net/<container>/<blob> where<account> will be replaced with our account name,<container> is the name of the container, and<blob> is the name of the blob. This will not retrieve the blob contents, only the properties and metadata.
|
For retrieving properties and metadata, we call CloudBlob.FethAttributes, and access the specific information we want via CloudBlob.Properties and CloudBlob.Metadata.
| |
Set Blob Properties
|
Using the PUT operator, we can set a blob's properties in a container. The request URI is in the form http://<account>.blob.core.windows.net/<container>/<blob>?comp=properties where<account> will be replaced with our account name,<container> is the name of the container, and<blob> is the name of the blob.
|
To set a blob's properties, we call CloudBlob.SetProperties.
| |
Get Blob Metadata
|
Using the GET/HEAD operator, we can retrieve a blob's metadata in a container. The request URI is in the form http://<account>.blob.core.windows.net/<container>/<blob>?comp=metadata where<account> will be replaced with our account name,<container> is the name of the container, and<blob> is the name of the blob.
|
For retrieving properties and metadata, we call CloudBlob.FethAttributes, and access the specific information we want via CloudBlob.Properties and CloudBlob.Metadata.
| |
Set Blob Metadata
|
Using the PUT operator, we can set a blob's metadata in a container. he request URI is in the form http://<account>.blob.core.windows.net/<container>/<blob>?comp=metadata where<account> will be replaced with our account name,<container> is the name of the container, and<blob> is the name of the blob.
|
To add metadata to a blob, we call the CloudBlob.SetMetadata method.
| |
Delete Blob
|
Using the DELETE operator, we can mark a
blob to be deleted. The blob is not deleted right away, but later
during a garbage cleanup process. The request URI is in the form http://<account>.blob.core.windows.net/<container>/<blob> where<account> will be replaced with our account name,<container> is the name of the container, and<blob> is the name of the blob.
|
In the client library, to delete a specific blob, we'd call CloudBlob.Delete
| |
Lease Blob
|
The request URI is in the form http://<account>.blob.core.windows.net/<container>/<blob>?comp=lease where<account> will be replaced with our account name,<container> is the name of the container, and<blob> is the name of the blob. The action is passed in the request header in the x-ms-lease-action
property.
Note that a lease on a blob is a lock, to make sure only one process can
make changes to the blob at any given time. Leases are for one minute,
which can be renewed. We can acquire, renew, release, and break a lease
using the API. The difference between releasing a lease and breaking it
is that releasing a lease will make the blob available immediately,
where breaking it will allow the blob to be modified once the lease
expires.
|
There is currently no way to manage leases via the client library. | |
Snapshot Blob
|
Using the PUT operator, we can create a read-only copy of a blob in a container, called a snapshot. The request URI is in the form http://<account>.blob.core.windows.net/<container>/<blob>?comp=snapshot where<account> will be replaced with our account name,<container> is the name of the container, and<blob>
is the name of the blob. This method is useful as a form of version
control, to provide history of edits, or as a recovery strategy where
blobs are frequently edited.
|
In the client library, we create a snapshot using the CloudBlob.CreateSnapshot method.
| |
Copy Blob
|
Using the PUT operator, we can copy a blob in a container to a different location in the storage account. The request URI is in the form http://<account>.blob.core.windows.net/<container>/<blob> where<account> will be replaced with our account name,<container> is the name of the container, and<blob> is the name of the blob.
|
To copy a blob in the client library, we call CloudBlob.CopyFromBlob.
| |
Create Blocks
|
Using the PUT operator, we can create a new block to be committed as part of a blob. The request URI is in the form http://<account>.blob.core.windows.net/<container>/<blob>?comp=block&blockid=id where<account> will be replaced with our account name,<container> is the name of the container, and<blob> is the name of the blob. The blockid is a unique name for the block, and you would replace the id with the block name following the blockid= expression.
|
In the client library, we call BlobRequest.PutBlock to upload a block.
| |
Create Block List
|
Using the PUT operator, we create a list of blocks that a blob consists of. The request URI is in the form http://<account>.blob.core.windows.net/<container>/<blob>?comp=blocklist where<account> will be replaced with our account name,<container> is the name of the container, and<blob> is the name of the blob.
|
To upload a block list using the client library, we use BlobRequest.PutBlockList.
| |
Get Block List
|
Using the GET operator, we retrieve a list of blocks that a blob consists of. The request URI is in the form http://<account>.blob.core.windows.net/<container>/<blob>?comp=blocklist where<account> will be replaced with our account name,<container>is the name of the container, and<blob> is the name of the blob.
|
To get the block list, we call the BlobRequest.GetBlockList method.
|
|
