2. Create a Meeting Scheduler Visual Web Part
2.1. Create a Meeting Scheduler Visual Web Part
Open the Visual Studio solution you created in the previous exercise, right-click the solution, and select Add | New Project. Select the SharePoint installed templates, and then select Empty SharePoint Project. Provide a name for the project (for example, SchedulingWebPart), and click OK. When prompted, select Deploy As Farm Solution, and click Finish. Right-click the project, and select Add | New Item. Select SharePoint, and then select Visual Web Part. Provide a name for the Web Part (such as ScheduleWebPart), and click Add. When the Web Part item has been added, walk through the same process you did in the first exercise in this article to add the SQL Azure database by using the ADO.NET EDM. You can use the same name to configure the model (that is, CustomerEntities). After
adding the EDM, create a UI that looks similar to the following image.
To do this, right-click the Visual Web Part ASCX file (that is,
ScheduleWebPartUserControl.ascx), and select View Designer.
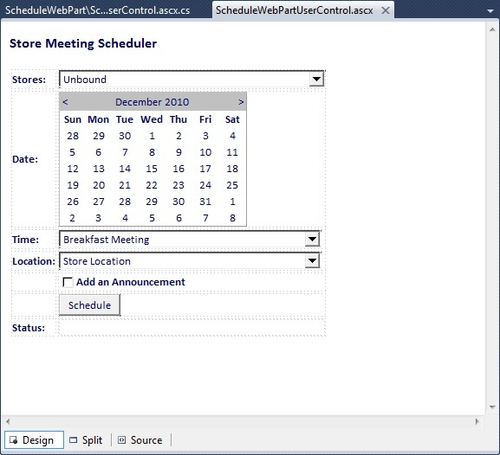
Note that you’ll add the controls in the following table to your Visual Web Part UI. | Control Type | Control Name |
|---|
| Label | lblcompanies | | Drop Down List | drpdwnlstStores | | Label | lblDate | | Calendar | clndrControl | | Label | lblMeetingTime | | Drop Down List | drpdwnMeetingTime | | Label | lblLocation | | Drop Down List | drpdwnStoreLocation | | Checkbox | chkbxAddAnnouncement | | Button | btnSubmit | | Label | lblStatus | | Label | lblMessageToUser |
The
code for the Visual Web Part UI is shown in the following code snippet.
Note that the code has been trimmed to remove the default code that was
created when you first created the Visual Web Part: ...
<style type="text/css">
.style1
{
color: #000066;
font-family: Calibri;
}
</style>
<p class="style1">
<strong>Store Meeting Scheduler</strong></p>
<table>
<tr>
<td><asp:Label ID="lblCompanies" runat="server" Font-Names="Calibri"
Font-Size="Small" ForeColor="#000066" Text="Stores: " Font-Bold="True"></
asp:Label></td>
<td>
<asp:DropDownList ID="drpdwnlstStores" runat="server" Font-Names="Calibri"
Font-Size="Small" ForeColor="#000066" Height="24px" Width="307px">
</asp:DropDownList>
</td>
</tr>
<tr>
<td><asp:Label ID="lblDate" runat="server" Font-Names="Calibri" Font-Size="Small"
ForeColor="#000066" Text="Date:" Font-Bold="True"></asp:Label></td>
<td><asp:Calendar ID="clndrControl" runat="server" Font-Names="Calibri"
Font-Size="Small" ForeColor="#000066" Height="100px" Width="217px"></
asp:Calendar></td>
</tr>
<tr>
<td><asp:Label ID="lblMeetingTime" runat="server" Font-Names="Calibri"
Font-Size="Small" ForeColor="#000066" Text="Time:" Font-Bold="True"></asp:Label>
</td>
<td>
<asp:DropDownList ID="drpdwnMeetingTime" runat="server" Height="24" Width="302px"
Font-Names="Calibri" Font-Size="Small" ForeColor="#000066">
<asp:ListItem>Breakfast Meeting</asp:ListItem>
<asp:ListItem>Lunch Meeting</asp:ListItem>
<asp:ListItem>Dinner Meeting</asp:ListItem>
</asp:DropDownList>
</td>
</tr>
<tr>
<td><asp:Label ID="lblLocation" runat="server" Font-Names="Calibri"
Font-Size="Small" ForeColor="#000066" Text="Location:" Font-Bold="True">
</asp:Label></td>
<td>
<asp:DropDownList ID="drpdwnStoreLocation" runat="server" Height="24"
Width="302px"
Font-Names="Calibri" Font-Size="Small" ForeColor="#000066">
<asp:ListItem>Store Location</asp:ListItem>
<asp:ListItem>Corporate</asp:ListItem>
</asp:DropDownList>
</td>
</tr>
<tr>
<td> </td>
<td><asp:CheckBox ID="chkbxAddAnnouncement" runat="server" Font-Names="Calibri"
Font-Size="Small" ForeColor="#000066" Text="Add an Announcement"
Font-Bold="True" /></td>
</tr>
<tr>
<td> </td>
<td><asp:Button ID="btnSubmit" runat="server" Font-Names="Calibri"
Font-Size="Small" ForeColor="#000066" Text="Schedule"
onclick="btnSubmit_Click" /></td>
</tr>
<tr>
<td><asp:Label ID="lblStatus" runat="server" Font-Names="Calibri"
Font-Size="Small" ForeColor="#000066" Text="Status:" Font-Bold="True">
</asp:Label></td>
<td><asp:Label ID="lblMessageToUser" runat="server" Font-Names="Calibri"
Font-Size="Small" ForeColor="#000066" Text=" " Font-Bold="True"></asp:Label></td>
</tr>
</table>
Right-click the ASCX file, and select View Code. In the code-behind, add the following bold code: using System;
using System.Web.UI;
using System.Web.UI.WebControls;
using System.Web.UI.WebControls.WebParts;
using System.Data.SqlClient;
using System.Data;
using Microsoft.SharePoint;
using System.Collections.Generic;
using System.Linq;
namespace SchedulingWebPart.ScheduleWebPart
{
public partial class ScheduleWebPartUserControl : UserControl
{
CustomersEntities dc = new CustomersEntities();
string queryString = "SELECT * from Customers.dbo.StoreInformation;";
DataSet azureDataset = new DataSet();
string mySPSite = "http://blueyonderdemo";
protected void Page_Load(object sender, EventArgs e)
{
populateDropDownBox();
}
private void populateDropDownBox()
{
string storeName = "";
string connectionString = "Server=tcp:<your server name>.database.windows.
net;Database=" +
"Customers;User ID=<your user ID>;Password=<your password>;
Trusted_Connection=False;" +
"Encrypt=True;";
using (SqlConnection connection = new SqlConnection(connectionString))
{
SqlDataAdapter adaptor = new SqlDataAdapter();
adaptor.SelectCommand = new SqlCommand(queryString, connection);
adaptor.Fill(azureDataset);
foreach (DataRow custRecord in azureDataset.Tables[0].Rows)
{
storeName = custRecord[2].ToString();
drpdwnlstStores.Items.Add(storeName);
}
}
}
protected void btnSubmit_Click(object sender, EventArgs e)
{
string storeNameFromList = drpdwnlstStores.SelectedItem.ToString();
string meetingLocation = drpdwnStoreLocation.SelectedItem.ToString();
string meetingDate = clndrControl.SelectedDate.ToShortDateString();
string meetingTime = drpdwnMeetingTime.SelectedItem.ToString();
double meetingTimeHours = 0;
if (meetingTime == "Breakfast Meeting")
{
meetingTimeHours = 8;
}
else if (meetingTime == "Lunch Meeting")
{
meetingTimeHours = 12;
}
else if (meetingTime == "Dinner Meeting")
{
meetingTimeHours = 17;
}
if (chkbxAddAnnouncement.Checked == true)
{
createAnEvent(storeNameFromList, meetingLocation, meetingDate,
meetingTimeHours);
createAnAnnouncement(storeNameFromList, meetingLocation, meetingDate);
lblMessageToUser.Text = "A new event and an announcement have been " +
"created for this meeting.";
}
else
{
createAnEvent(storeNameFromList, meetingLocation, meetingDate,
meetingTimeHours);
lblMessageToUser.Text = "A new event has been created for this
meeting.";
}
}
private void createAnAnnouncement(string storeNameFromList,
string meetingLocation,
string meetingDate)
{
string finalStoreLocation = "";
var query = from store in dc.StoreInformations
where store.StoreName== storeNameFromList
select store;
foreach (var item in query)
{
finalStoreLocation = item.StoreAddress;
}
using (SPSite site = new SPSite(mySPSite))
{
using (SPWeb web = site.OpenWeb())
{
web.AllowUnsafeUpdates = true;
SPList list = web.Lists["Announcements"];
SPListItem item = list.Items.Add();
item["Title"] = storeNameFromList + " Meeting";
item["Body"] = storeNameFromList + " Meeting";
item["Store Address"] = meetingLocation + ": " +
finalStoreLocation;
item["Meeting Date"] = meetingDate;
item.Update();
web.AllowUnsafeUpdates = false;
}
}
}
private void createAnEvent(string storeNameFromList, string meetingLocation,
string meetingDate, double meetingTimeHours)
{
string finalStoreLocation = "";
DateTime startOfMeeting = DateTime.Parse(meetingDate).
AddHours(meetingTimeHours);
DateTime endOfMeeting = startOfMeeting.AddHours(2);
var query = from store in dc.StoreInformations
where store.StoreName == storeNameFromList
select store;
foreach (var item in query)
{
finalStoreLocation = item.StoreAddress;
}
using (SPSite site = new SPSite(mySPSite))
{
using (SPWeb web = site.OpenWeb())
{
web.AllowUnsafeUpdates = true;
SPList list = web.Lists["Calendar"];
SPListItem item = list.Items.Add();
item["Title"] = storeNameFromList + " Meeting";
item["Location"] = finalStoreLocation;
item["Description"] = storeNameFromList + " Meeting";
item["Start Time"] = startOfMeeting;
item["End Time"] = endOfMeeting;
item.Update();
web.AllowUnsafeUpdates = false;
}
}
}
}
}
You’ll recognize some of the
code in this example because you created similar code in the first
exercise to query the ADO.NET EDM and insert records into SharePoint. For example, you’ll recognize the code that issues a SQL command to query the SQL
Azure database, the code that sets the ADO.NET EDM data context and
queries for a specific record, and the code that inserts the record
(based on the retrieved information from SQL Azure) into SharePoint.
(Note that in this example, though, you hard-coded the SQL connection
string [including credentials]; this is something you would never do in
practice. You would need to include these separately, such as string
variables in the project’s resources.) Two differences to note in this
code, though, are as follows: The different data types across the SharePoint lists (for example, DateTime and string) and how you need to convert data that you’re retrieving from the Visual Web Part controls. How you’re creating simple conditionals with the Morning, Lunch, or Dinner options in the meeting time drop-down list (drpdwnMeetingTime). Having three conditionals here made it more optimal when using the AddHours method in the example.
Now that you’ve created the Visual Web Part, you need to configure SharePoint
for the EDM you just added. To do this, double-click the app.config
file in your Visual Studio project to open it. Copy the connectionStrings setting from the app.config file, and then navigate to the SharePoint web.config file (that is, C:\inetpub\wwwroot\wss\VirtualDirectories\80\web.config). Paste the connectionStrings configuration at the end of the web.config file as in the following code listing: <configuration>
...
<connectionStrings>
<add name="CustomersEntities" connectionString="metadata=res://*/AzureStores.
csdl|res://*/AzureStores.ssdl|res://*/AzureStores.msl;provider=System.Data.
SqlClient;provider connection string=" Data Source=<server name>.database.
windows.net; Initial Catalog=Customers;
Persist Security Info=True; User ID=<user ID>; Password=<password>; MultipleActiveRes
ultSets=False"" providerName="System.Data.EntityClient" />
</connectionStrings>
</configuration>
Return to the Visual Studio project. Right-click the SharePoint project, and select Deploy. (Be sure that you’ve updated the Site URL property to point to your local SharePoint site.) After
the project has successfully deployed, navigate to your SharePoint
site. Click Site Actions | Edit Page, select the Insert tab, and click
Web Part. Navigate
to where you deployed your Visual Web Part (that is, to the SP And
Azure category), select the Web Part, and click Add. Save the page to
propagate your changes to the server. After you’ve added the Web Part to SharePoint,
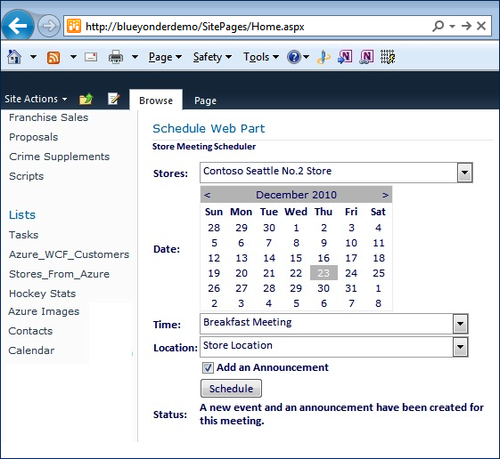
select a store by using the autopopulated drop-down list. Then select a
date and a time of day for the meeting. Select Store Location (because
we didn’t add any code to handle the Corp Location), and select the Add
An Announcement check box. Click Submit when done.
The result is shown in Figure 1.
When you’re done,
you should see the Status label automatically update with a message that
indicates that both an event and an announcement have been added to the
SharePoint site. Thus, the Visual Web Part has used both SQLDataAdapter and the ADO.NET EDM to query and filter SQL
Azure data and then insert data into SharePoint by using the server
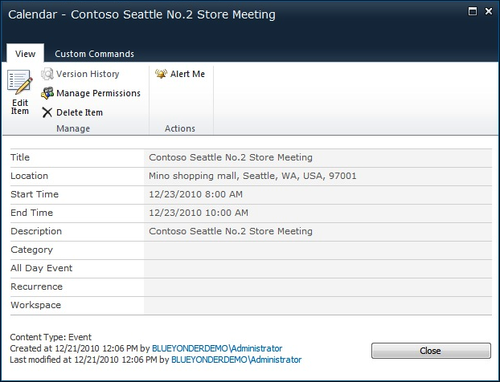
object model. If you navigate to the Announcements and Calendar lists,
you should see the newly added list items. Figure 2 illustrates the newly added calendar event that has inserted data from SQL Azure into the list item.
This example provided a glimpse into the process of creating a Visual Web Part that uses both the ADO.NET EDM and the SQLDataAdapter object to interact with SQL Azure. You also saw how you used the server object model to insert data into SharePoint.
However, what if you want to do something more complex; what if you want to use a remote API that uses Silverlight as the client and perhaps even pulls in another cloud service or data source beyond SQL
Azure into your application? This is absolutely possible, and
remarkably, it’s not only straightforward, but you can also do something
similar to what you created in this article using Business Connectivity Services (BCS). That is, you can use SharePoint Designer to create an external list pointing to the StoreInformation table in the Customers database, and then you can use the external list to integrate with Bing
Maps and Silverlight to dynamically load data from SQL Azure (via the
external list) into a Silverlight application. This example not only
illustrates how you can integrate multiple technologies (for example,
Bing Maps, SharePoint, Silverlight, and SQL Azure), but also shows how
you can use Silverlight to create a more dynamic user experience in
SharePoint. You’ll walk through this example in the next section.
|
