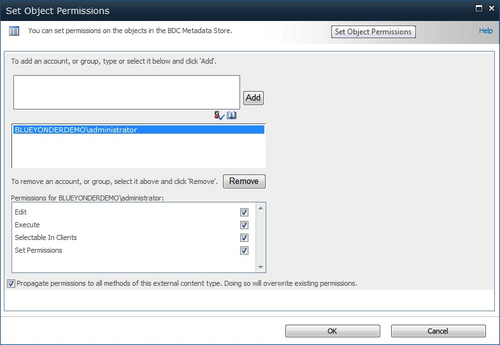
3. Set Permissions for an External Content Type
Navigate to SharePoint Central Administration | Manage Service Applications, and select Business Data Connectivity Services.
Find your newly created external content type in the list of external content types (for example, CustomerDataECT), and either click it or select the check box beside it.
Click Set Object Permissions on the SharePoint ribbon.
Add
the Active Directory alias of a valid user that you want to have
permissions for the external content type (that is, the external list)
and click Add. Then select all of the check boxes you want to set for
the permissions for that user, and click OK.
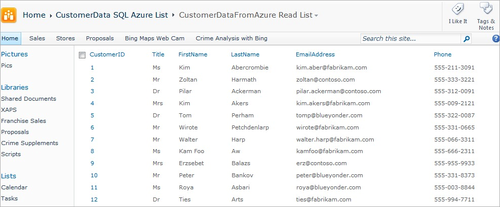
To test the list, navigate back to the new Customer Data external list and reload the list.
The
first time the external list is loaded, you’ll need to authenticate
against the external content type with the credentials that are required
to access the SQL Azure database and table. To do this, click Click Here To Authenticate as shown in the following image.

Enter the SQL
Azure user name and password (you’ll need to enter the password twice),
and click OK. The external list will now render, loading the data from
SQL Azure as configured with the appropriate level of permissions for
the list.
At this point, you now have a functioning external list that surfaces SQL
Azure data in SharePoint. And although you’ve created a no-code
solution, this type of solution could fall equally on the plates of a
developer or an IT pro.
The external list, though, is not just restricted to SharePoint; you can extend a view of the SQL
Azure data to the client as well (that is, the Office client). For
example, navigate to the new external list and click the List tab. On
the List tab, you’ll see Sync To SharePoint Workspace and Connect To
Outlook as available options—see Figure 1. These are available because you created a Contact Office type when creating the ECT.

If you click Sync To
SharePoint Workspace, you can view the external list offline.
(SharePoint Workspace is the SharePoint 2010 offline workspace that you
can use to work on your SharePoint libraries and lists offline and then
synchronize them when you’re back online.) When you click Sync To
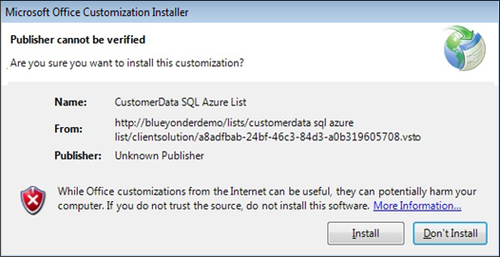
SharePoint Workspace (or Connect To Outlook, for that matter), you are
prompted to install a client-side application—the ECT is installed as an
Office add-in on the client so it can be used in SharePoint Workspace
and Outlook. Figure 2
illustrates the dialog box prompt for the install. Click Install, and
the ECT will be installed and enabled on your client machine.
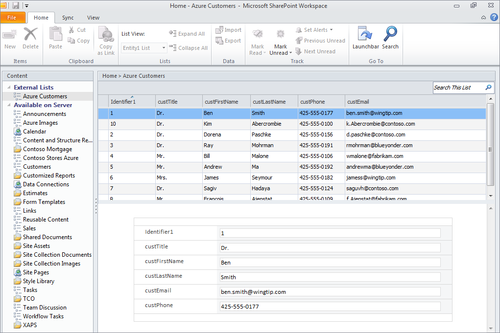
After you install the Office
add-in (which uses the Visual Studio Tools for Office [VSTO]
infrastructure for the Office developers out there), you can open
SharePoint Workspace and, assuming you’ve been delegated read/write
permissions, you can manage the SQL
Azure customer data from within your SharePoint Workspace instance. If
you’re offline, when you connect back to your corporate network, the
changes will be propagated to the external list in SharePoint and to the
SQL Azure database. Figure 3 illustrates what the SQL Azure customer list looks like in SharePoint Workspace 2010.
You can also manage the SQL Azure data from within Microsoft Outlook 2010. Figure 4 illustrates what the SQL Azure data looks like when using Outlook to manage the customer data. Note that when you created the ECT,
you created it as a Contact Office type. You also mapped the specific
properties of the Contact Office type as you walked through the ECT
wizard. Here is where you actually see the contact type manifested: you
can see the external list as an additional item in the navigation pane
(SharePoint External Lists), but the object is a contact, so Outlook
automatically creates contact cards for each one of the records that is
pulled from SQL Azure.

When installed on your computer, the installation process creates a local SQL Compact instance of the external data. This enables the ECT to manage your permissions
through to the external system (in this case, SQL Azure) and yet also
manage the updates to that external system from the client. If you make
any changes on the client, a synchronization process updates the
external list—assuming you have read/write permissions to interact with
the external system.
Now that you’ve walked
through creating an external list by using an ECT and the BCS, let’s
move on to using SQL Azure data in a slightly different way.
