With our web service and worker roles in place, it's
time to develop the application our drivers will use in order to confirm
that the customer has accepted his/her vehicle. What we're about to do
can be accomplished by any technology capable of calling a web service,
but we'll use a simple Windows application to build on our strengths in
.NET development. Our aim here is to cover some basics of Windows forms
development, and one way to connect Windows Forms to Azure.
Brief overview of the application
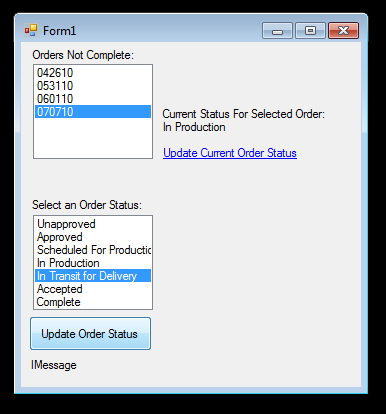
Our application has two
purposes. The first purpose is to show the current status of an order.
This is handled by selecting an order from the listbox and clicking a
link to update a label with the selected order's status. This is done
using our WCF web services by passing the OrderHeaderID
to the web service and accepting the order status produced as output.
The application will then update the label with the returned string.
The second purpose is to be able
to update status for an order by selecting the order from the listbox,
selecting the new order status for the order, and clicking a button to
update the order. When the button is clicked, the OrderHeaderID for the selected order and the OrderStatusID for the selected status is sent via the web service and added to the queue for processing by our worker role.
JupiterMotorsERP local application
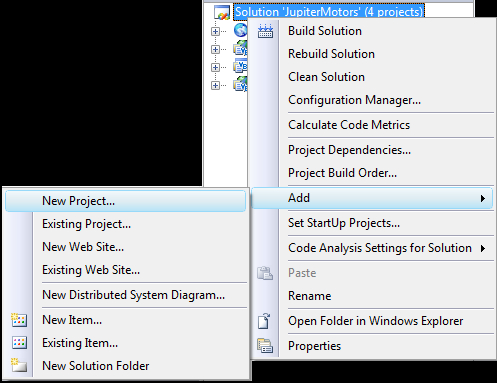
Adding our local application to the solution is very simple. Right-click on our solution, and choose Add | New Project....
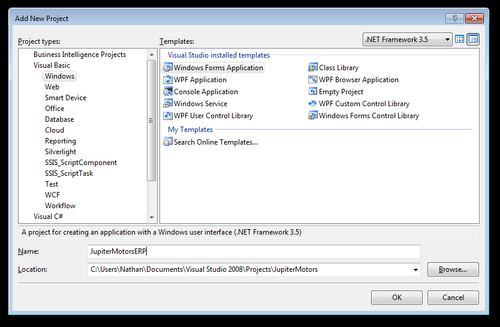
Under the project type Windows, select Windows Forms Application. Name the project as JupiterMotorsERP and click OK.
This will create a Form1.vb file and an app.config file. The Form1.vb will be our form design and code, whereas the app.config will hold any settings we wound need for the application.
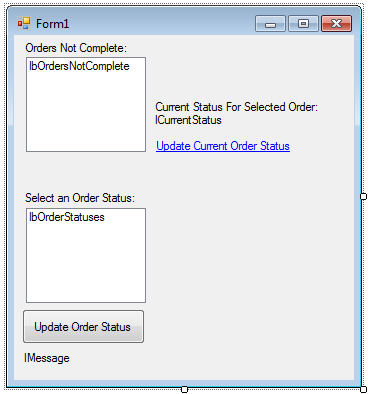
As the first step toward setting up our local application, we're going to build the design of our form. We need the following:
Two listboxes named lbOrdersNotComplete and lbOrderStatuses
A label named lCurrentStatus and another named lMessage
A link button called lnkUpdateCurrentStatus
A button called btnUpdateOrderStatus
Our sample application form now looks like the following screenshot:
It's going to be a little
tough for us to code our Windows Forms application to use our web
services, as we haven't yet told the project where we're going to call
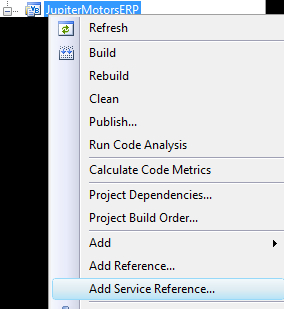
the services. This is done by right-clicking on the project and choosing Add Service Reference....
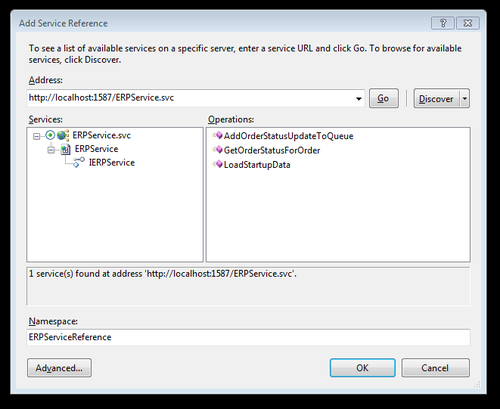
This is where Visual Studio does some great things. We can click the Discover
button, and it will search the solution for available web services; we
can also manually type in the URL of the service that we want to
integrate with. For developing our application now, we're going to click
the Discover button and let it find our web service in our WCF web role. Finally, name the service reference as ERPServiceReference and click OK. This will add the necessary code to app.config. We are now ready to run the application!
Adding App.config code
This code was inserted into the app.config
file once the service reference was set up. We are good with using the
code generated for us, but should any changes need to be made to the
service reference (such as changing the endpoint from a local address to
a production address), this is where you would make them:
<system.serviceModel>
<bindings>
<wsHttpBinding>
<binding name="WSHttpBinding_IERPService" closeTimeout="00:01:00"
openTimeout="00:01:00" receiveTimeout="00:10:00" sendTimeout="00:01:00"
bypassProxyOnLocal="false" transactionFlow="false" hostNameComparisonMode="StrongWildcard"
maxBufferPoolSize="524288" maxReceivedMessageSize="65536"
messageEncoding="Text" textEncoding="utf-8" useDefaultWebProxy="true"
allowCookies="false">
<readerQuotas maxDepth="32" maxStringContentLength="8192" maxArrayLength="16384"
maxBytesPerRead="4096" maxNameTableCharCount="16384" />
<reliableSession ordered="true" inactivityTimeout="00:10:00"
enabled="false" />
<security mode="Message">
<transport clientCredentialType="Windows" proxyCredentialType="None"
realm="">
<extendedProtectionPolicy policyEnforcement="Never" />
</transport>
<message clientCredentialType="Windows" negotiateServiceCredential="true"
algorithmSuite="Default" establishSecurity Context="true" />
</security>
JupiterMotorsERP local applicationApp.config code, adding</binding>
</wsHttpBinding>
</bindings>
<client>
<endpoint address="http://localhost:1587/ERPService.svc" binding="wsHttpBinding"
bindingConfiguration="WSHttpBinding_IERPService" contract="ERPServiceReference.IERPService"
name="WSHttpBinding_IERPService">
<identity>
<dns value="localhost" />
</identity>
</endpoint>
</client>
</system.serviceModel>
Now, if we double-click somewhere
in the form, it will open up the code for our application. This is
where we will add the following code to handle the web service calls,
listbox, data bindings, and the events for the link and button clicks.
Public Class Form1
Private Sub Form1_Load(ByVal sender As System.Object, ByVal e As System.EventArgs) Handles MyBase.Load
Try
Dim _client As New ERPServiceReference.ERPServiceClient
Dim _resultsSet As New DataSet
_resultsSet = _client.LoadStartupData()
lbOrdersNotComplete.SelectedItem() = Nothing
lbOrdersNotComplete.DataSource = _resultsSet. Tables("OrdersNotComplete").DefaultView
lbOrdersNotComplete.DisplayMember = "CustomerPO"
lbOrdersNotComplete.ValueMember = "OrderHeaderID"
lbOrdersNotComplete.SelectedItem() = Nothing
lbOrderStatuses.DataSource = _resultsSet. Tables("OrderStatuses").DefaultView
lbOrderStatuses.DisplayMember = "Description"
lbOrderStatuses.ValueMember = "OrderStatusID"
lbOrderStatuses.SelectedItem() = Nothing
Catch ex As Exception
JupiterMotorsERP local applicationApp.config code, addinglMessage.Text = ex.Message()
End Try
End Sub
Private Sub btnUpdateOrderStatus_Click(ByVal sender As System.Object, ByVal e As System.EventArgs) Handles btnUpdateOrderStatus.Click
Dim _client As New ERPServiceReference.ERPServiceClient
_client.AddOrderStatusUpdateToQueue(lbOrdersNotComplete. SelectedValue, lbOrderStatuses.SelectedValue)
End Sub

Private Sub lnkUpdateCurrentStatus_LinkClicked(ByVal sender As System.Object, ByVal e As
System.Windows.Forms.LinkLabelLinkClickedEventArgs) Handles lnkUpdateCurrentStatus.LinkClicked
Dim _client As New ERPServiceReference.ERPServiceClient
lCurrentStatus.Text = _client.GetOrderStatusForOrder( lbOrdersNotComplete.SelectedValue)
End Sub
End Class
Testing our application
To test our application, we need
to run the entire solution in debug mode. We can easily do this in
Visual Studio by pressing the F5
button. The web role, worker role, and WCF web role should all start up
in the development fabric once the solution is built, except our local
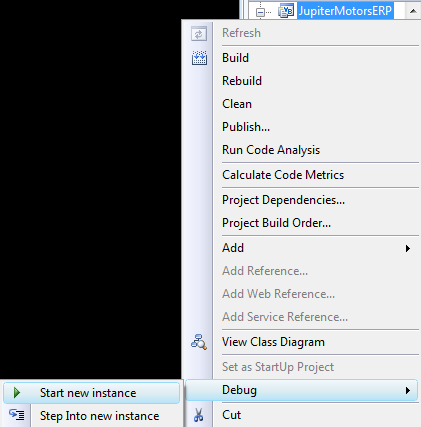
application. Once all the web and worker roles have started, we can
start an instance of our local application by right-clicking on the
project and selecting Debug | Start new instance.
Our application will start up, bind the listboxes using the data
returned from the web services, and allow us to now check the order
statuses for any order not yet complete in the database. We can also
change the status of any of these orders in the listbox. Note that the
order status changes do not occur immediately. The changes are placed in
the queue for processing and our worker role has a sleep timer on it.
Once the worker role picks up the message, it is updated and can be
checked by clicking the link and updating the label.