Preparation application for deployment
Because we've been using
our configuration files for our connection strings in the cloud project,
we need to make a few small changes. Let's change the connection
strings in our configuration files in Visual Studio.
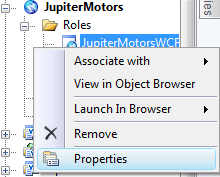
In our cloud project, for each role in our Roles folder, we need to perform the following steps:
1. Right-click the role and choose Properties.
2. Choose the Settings tab, and you should see our connection strings pointing to our Development Storage.
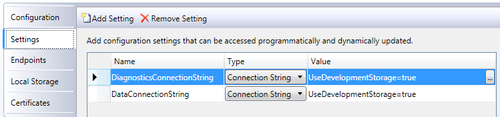
3.
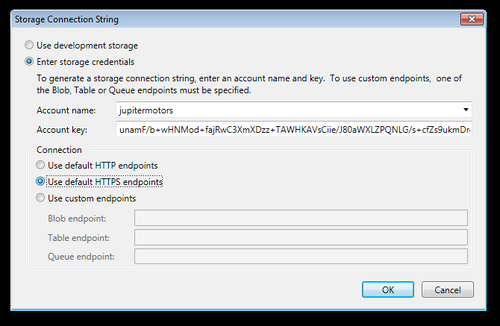
These connection strings will be required to change to point to our
Storage Account in the cloud. This can be easily done by clicking the
"..." button to the far right of the connection string. It's going to
ask us for some information such as the account name and the account
key, both of which were provided when setting up the Storage Account. We
can look these up in the Windows Azure Developer portal if we cannot
remember them.
4.
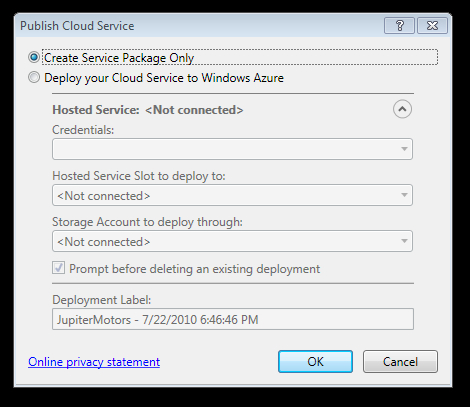
Finally, the last step is to publish the cloud project. We can easily
do this by right-clicking on the cloud project and choosing Publish....
We will get a window once again, asking us how we want to publish our
cloud project. We have an option of creating the Service Package only,
or deploying directly to Windows Azure. Because we love working in the
Windows Azure Developer portal, we're just going to select the Create the Service Package Only option, which will help package everything up into two files one is .cspkg file, which is our compiled code for our cloud project roles, and the other is the .cscfg file, which is our configuration settings file for our cloud project roles.
Ready for deployment
It's time to play in the
Windows Azure Developer portal once again. We're going to give it all
the information needed to get our cloud project up and running in
Windows Azure.
Let's go to our Hosted Service and see what we have there.
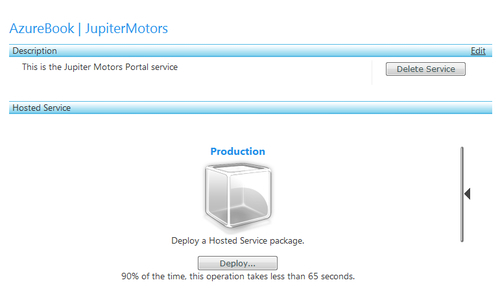
This looks nice and easy. What
did we come here to do? The answer is to deploy our cloud project. And
how are we going to do that? If you are thinking we should click on the Deploy... button, then you're absolutely correct. Go ahead and click the Deploy... button to begin deployment.
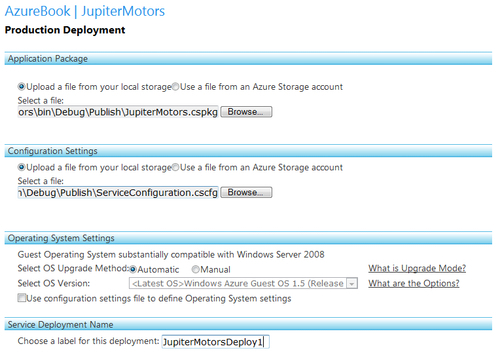
The next step is also
fairly easy. Remember the files that Visual Studio created for us when
we published the cloud project? We're going to need them here. Both
files were created in the solution's Bin folder, under the release configuration named folder (Debug, Release, etc.), and in the Publish
folder. The first file we're looking for is the Application Package
file, or the .cspkg file. The Configuration Settings file is the .cscfg file.
The next section on the
deployment page asks about Operating System Settings. What's this? Well,
each role instance is technically a miniature virtual machine running
in the Windows Azure Fabric, and the virtual machine needs an OS. The OS
builds are a miniature version of Windows Server 2008 (limited feature
set). This OS is constantly worked on to patch any security flaws, fix
bugs, and all the other typical everyday maintenance you would expect a
company to do to maintain a server OS. There are options on which OS
version we would like our applications to run against if we choose the
Manual OS Upgrade Method. Here's the catch: Depending on which SDK we
built our application with, we need to choose a compatible OS to use. To
choose the correct OS, click the What are the Options?
link and the article maintained by Microsoft will let you know the
minimum OS that can be used. All SDKs are supported by the newer
operating systems.
Because the newest OS
version supports our SDK, we're going to let Windows Azure automatically
upgrade our OS and choose the newest OS for us at time of deployment.
Finally, we need to name
(label) our deployment. This is just to help us know about this
deployment. We could use a release or version number, a timestamp, among
other things, to help us know what is deployed.
Once these steps are all completed, click the Deploy button and let Windows Azure do some magic!
The Windows Azure Developer portal will keep us updated on the progress of the deployment.
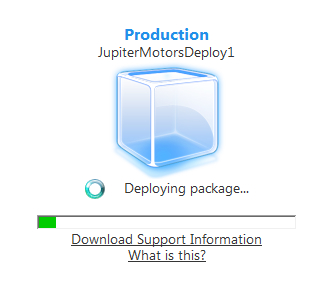
Congratulations!
Our cloud project is deployed! Are we done? Well, the answer is not at
all. It's in the cloud, but it's not doing anything yet. We'll get to
that in a little while, but first, let's have a quick look at changing
the configuration in the portal.
