7. Configuring the ACS namespace
The ACS needs to be configured
for your service. You’ve already learned how to define a namespace, and
the namespace is a container for the rest of the ACS configuration. You
can also chain namespaces together, which is the key mechanism for
providing simple delegation.
Each namespace has four
components: issuers, scopes, rules, and token policies. These elements
work together to help secure your REST service.
The AppFabric SDK provides
two tools for configuring your service, both of which run locally and
call into the management service: ACM.exe (used from the command line)
and the Azure configuration browser. (You can use the management service
as a third option, but that’ll require more work on your part.) Beyond
the tool that sets up the namespace, there aren’t any management tools
on the ACS portal.
The ACM.exe tool can be found
in the tools folder where you installed the AppFabric SDK. ACM is most
useful when you’re automating a process or want to script the
configuration. But keep in mind that calls to the AppFabric management
endpoint aren’t free, like the Windows Azure management endpoints are.
The Azure configuration
browser is shipped with the SDK, but as a sample in source-code form in a
separate download file. You need to load the solution and compile it to
use it. This distribution approach is really useful because you can
then extend the tool to meet your needs, and the browser is a lot easier
to use than the command-line tool.
The
configuration browser does have a few limitations. First, it’s really
ugly, but that’s OK. The second is that, at this time, it can’t update
an existing cloud configuration; it can only deploy a complete
configuration. This means that any time you make a change, you have to
delete the configuration in the cloud and completely redeploy the new
configuration. An advantage of this approach is that you can store your
configuration locally in an XML file, which aids in backup and
configuration management.
You’ll need to provide your
service name and your management key with either tool. For the ACM.exe
application, you can put your settings in the app.config file, which
saves you from having to type them in as part of your commands every
single time.
Issuers
Issuers are actors in the ACS
system and represent consumers of your service. When you create an
issuer, you need to provide both a display name and an official issuer
name. Once the issuer is created, a signing key will be generated for
you. This is the key the issuer must sign their requests with when they
ask the ACS service for a token.
To create an issuer from a command line, you would use the following command:
acm create issuer
         -name:MaineReversal
         -issuername:MaineReversal
         -autogeneratekey
In the configuration browser you’ll need to right-click on the Issuers node and choose Create. Figure 3 shows how to set up your first client, Maine Reversal.
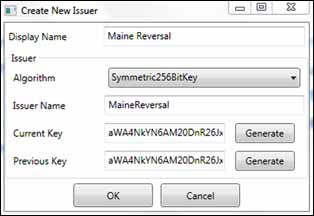
Setting up an issuer in the
system is akin to creating a user. The issuer needs a name (comparable
to a username) and a signing key (which is like a password). These are
the credentials the issuer will use to request an ACS token.
Token Policy
A token policy defines how you
want your tokens to be created. Because token-based systems can be
vulnerable to token-replay attacks, you’ll first want to set a lifetime
timeout for the token. This is expressed in seconds. When the token is
created, it’ll be stamped with the time when the token will expire. Once
it’s expired, the token will be considered invalid and won’t be
accepted by a service. You have to check for this expiration explicitly
when you validate the token.
The command for creating a token policy at the command line is as follows:
acm create tokenpolicy -name:StringReversalInc -autogeneratekey
To create a token policy in the configuration browser, right-click on the Token Policy node and select Create. Figure 4 shows the Create New Token Policy dialog box, where you can create a policy for your string service.
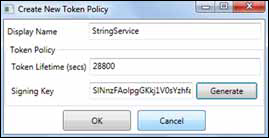
The second piece of data
you’ll need for your token policy is the signing key, which can be
generated for you. This is the key that will be used to sign the tokens
generated for you by the ACS.
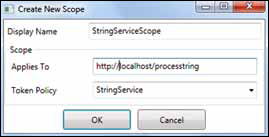
Scopes
A scope is a container that’s
tied to a service URI. It brings together the rules that you want
applied to your service, as well as the token policy you want used for
that service.
To create a scope at the
command-line level, you’ll need the ID of the token policy you want to
assign to the scope. You can get the tokenpolicyid from the output of the create tokenpolicy command discussed in the previous section. This is the command for creating a scope:
acm create scope -name:StringServiceScope
           -appliesto:http://localhost/processstring
           -tokenpolicyid:tp_4cb597317c2f42cba0407a91c2553324
When you’re using the
configuration browser, you won’t need to provide the token policy
ID—you’ll be able to choose it from the drop-down list. You can
associate a policy to a namespace by creating a scope, as shown in figure 5.
There are several advanced uses
for scopes . These include managing
a large number of service endpoints with a few scopes, and chaining
namespaces together for delegation.
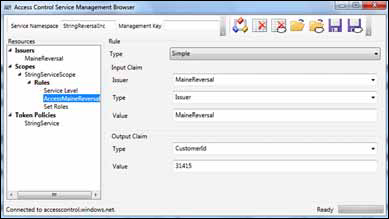
Rules
Rules
are the heart of the ACS system. When a token is created by ACS, the
rules for the related scope are executed. This is the process that
allows you to transform the consumer’s request into something your
application can act on. Rules can also be used to create claims out of
thin air, and put them in the resulting token.
For example, suppose you wanted to place a claim in the token that represents the consumer’s customerid,
to make it easier for your service to identify the account the request
is related to. You could create a rule that says, “If this is for issuer
MaineReversal, add a claim called customerid with a value of 31415.” Figure 6 shows how you could create this rule.
Another rule you could use
would assign a new role value based on mappings you’ve worked out with
the customer. Perhaps their system tracks their users with a role of
ServiceManager—this would be a group the user belongs to at Maine
Reversal. Your system doesn’t know that role name, and you don’t want to
add all of your customers’ role types to your system—that would get
very complex very quickly. The rule in figure 7 creates the roles claim with the manager value.

You can then create a rule that finds a claim called roles with a value of Sales-Manager, and replaces it with a claim called roles that has a value of manager.
In this way you’ve moved the customer configuration and mapping out of
your service and into the authorization service where it belongs.
Creating a rule at the command line is a little more complex than using the configuration browser:
acm create rule -name:MaineReversalMap -scopeid:scp_e7875331c2b880607d5709493eb2751bb7e47044 -inclaimissuerid:iss_6337bf129f06f607dac6a0f6be75a3c287b7c7fa -inclaimtype:roles -inclaimvalue:ServiceManager -outclaimtype:roles -outclaimvalue:manager
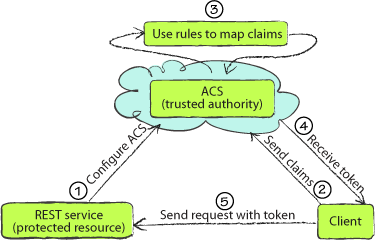
8. Putting it all together
You’ve come a long way in
stopping illicit use of your service. Now you can control who uses it
and how they use it. You’ve updated your service to consume tokens,
you’ve updated the client to submit tokens with service requests, and
you’ve prepared the ACS service with your configuration.
How does this all work? In
this simple scenario, the client requests an access token from ACS,
providing its secret key and issuer name. ACS validates this and creates
a token, using the scope rules you set up to create claims in the new
token. The client then attaches the token to the message in the
authorization header.
Figure 8 should look familiar; it’s much like the DMV example, but it shows the technical actors and how they interact.
When your service finally
receives the message, you’ll grab the token from the header and verify
it. You want to make sure that it’s valid and hasn’t been tampered with.
Once you trust it, you can make decisions on what to do.
In our example, you can take the customerid
value and verify that they’re still a paying customer, and if so,
respond to their request. You can stop using the token at this point and
respond like normal, or you can shred the token and use the claims
throughout the application.
If
you were protecting an ASP.NET website instead of a REST-based WCF
service, you could take those claims, put them in a class that
implements IPrincipal, and use the class to make role decisions throughout your code.
We’ve finished a quick lap
around ACS. ACS’s sibling is the Service Bus, which will let us connect
anything to anywhere, with just a little bit of WCF and cloud magic.
