There are inevitably times when you will need to
cross organizational boundaries in order to get trading partners,
customers or suppliers integrated into your business processes.
Traditionally, in a BizTalk environment, this would mean that you would
have Web services hosted in IIS or in the BizTalk process on the BizTalk
Servers. You then would reverse-proxy those services to make them
available outside the firewall. You will also likely have a load
balancer in play for either volume or high-availability purposes.
You would further need to
define a security strategy. Crossing a security boundary like this is
never easy and commonly introduced moving parts and some degree of risk.
By extending the ESB on-ramp to the Windows Azure platform, we can address several of these concerns. Windows Azure provides the Windows Azure platform Service Bus and the
Windows Azure platform Access Control Service. These are both services
we can use to extend the BizTalk on-ramp to Windows Azure.
Receiving Messages from Azure’s AppFabric Service Bus
The
previously described WCF-Custom adapter allows you to select any
bindings that are available on a given machine. When you install the
Windows Azure platform AppFabric SDK, you get several new WCF relay
bindings that allow you to communicate with the Service Bus. Instead of
directly opening our infrastructure to the outside world, we will
instead use that relay feature. External partners can publish their
messages to the Service Bus, and we will receive them because we are the
subscriber.
From an implementation
perspective, it is trivial to receive messages from the Service Bus. You
just create a new BizTalk receive location, choose one of the relay
bindings, set the security credentials, and enable the receive location.
Once you are done that, you have created an endpoint in the Service Bus
(with an identifying namespace), and the Windows Azure Service Bus will
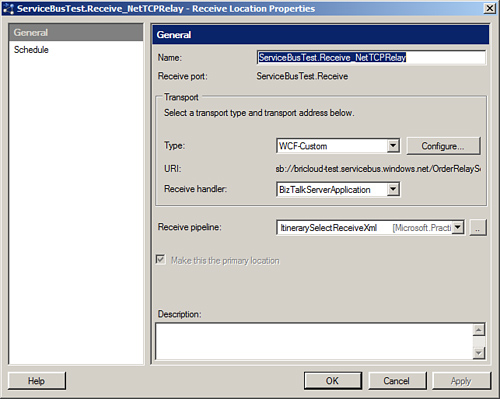
send messages matching that endpoint to you. Figure 1 shows what this receive location looks like.

The receive pipeline being used here (ItineraryReceiveXml),
is one of the standard pipelines included with the ESB Toolkit. This
means we could potentially implement something like passing a received
message into the business rules engine; having a business
rules engine evaluation determines which itinerary to use, retrieves
that itinerary from the repository and stamps it on the message. This is
identical to the sort of sequence we may go through if we were picking
up a message from a SharePoint document list or from a flat file. The
only difference is we made a couple of minor configuration changes to
the WCF-Custom adapter settings and now we have extended our on-ramp to
the cloud.
We have a secured pipe up to
the Service Bus because we are the ones that initiated and secured the
connection (using standard WCF message and transport security options).
In addition, anyone publishing messages intended for the service
endpoint will need to be authorized by the Windows Azure platform Access
Control Service before they can do so. This secures the link from the
external organization to the cloud.
Sending Messages to Azure’s AppFabric Service Bus
In addition to extending
the ESB on-ramp to the cloud, we can take advantage of the Windows Azure
platform Service Bus by sending messages to it from our on-premise ESB.
Using the WCF-Custom adapter provider and the Windows Azure platform,
AppFabric SDK gives us the necessary relay bindings and we simply need
to set the appropriate adapter provider properties.
From a BizTalk perspective, we
can use the WCF-Custom adapter with either a static or dynamic send
port. From an ESB perspective, though, the preferred approach would be
to use an itinerary that uses a dynamic off-ramp (send port) to send the
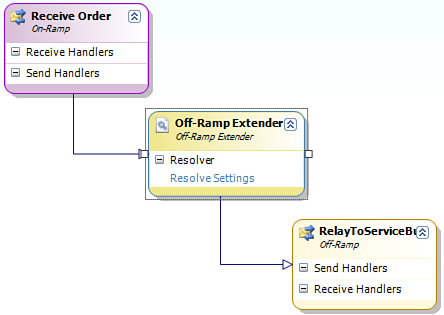
message. This itinerary would specify the processing steps to receive a
message, resolve the destination and adapter properties, and then relay
the message on (Figure 2).

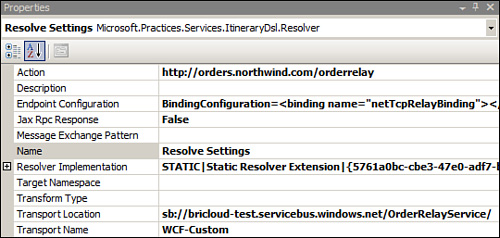
The properties of the Resolve Settings resolver are shown in Figure 3.
To keep things simple, this example uses a static resolver (which means
that the statically defined settings will be dynamically applied when
the itinerary is executed).

In order for this to function
properly, it is crucial that the Action, Endpoint Configuration and
Transport Location properties be set correctly. The Endpoint
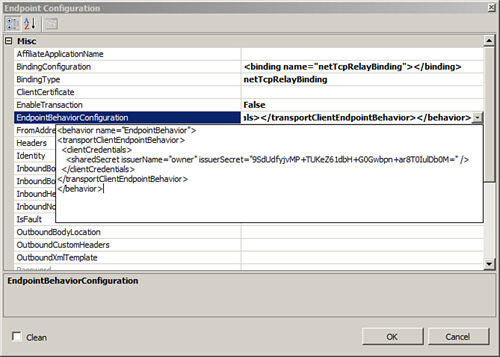
Configuration properties are now set as shown in Figure 4.
