Using AlphaTestEffect
At a high level, the AlphaTestEffect
enables you to get performance benefits by quickly (and early)
rejecting pixels based off their alpha level. There are only a few
things important on this effect, so we won’t have a large example here.
Like the DualTextureEffect, AlphaTestEffect implements the IEffectMatrices and IEffectFog interfaces. There are two important properties on this effect: first is the AlphaFunction, which describes how to compare the alpha, and second is the ReferenceAlpha, which is what each pixel’s alpha component is compared to (using the AlphaFunction).
The CompareFunction enumeration has a variety of ways each pixel can be compared to the ReferenceAlpha, and if the compare function evaluates as true, that pixel is accepted, processed, and potentially rendered. If you use the Always value, all pixels are accepted much like the Never value accepts no pixels. Each of the others behaves as expected with Less, LessEqual, Equal, Greater, GreaterEqual, and NotEqual.
Using EnvironmentMapEffect
Have you ever seen (either in
the real world or in a game) a brand new car sitting outside on a bright
and sunny day? Did you notice how the car looked so shiny? Did you
notice how the car reflected the outside world on itself? This effect is
called the EnvironmentMapEffect because you map the environment onto an object. Like BasicEffect, this effect implements all three interfaces.
Environment maps are done by rendering a cube texture (the TextureCube class) as a reflection over any objects that need to have the reflection. A cube texture
is (as the name implies) a texture that covers a cube, so it has six
different faces. However, it covers the inside of the cube. The effect
is rendered as if the object is sitting inside the cube with the texture
reflecting off the object.
To show this effect,
create a new game project. Add some content from the downloadable
examples to your content project. You need the model that you will
render the reflection, so add the environmentmapmodel.fbx model. Add the six textures the skybox will use (skybox0-5.jpg).
Next, add a few variables:
Model model;
EnvironmentMapEffect envEffect;
TextureCube texture;
Like always, you’ll need to instantiate these variables, too, so update your LoadContent method by adding the following:
model = Content.Load<Model>("environmentmapmodel");
envEffect = new EnvironmentMapEffect(GraphicsDevice);
envEffect.Projection = Matrix.CreatePerspectiveFieldOfView(
    MathHelper.PiOver4,
    GraphicsDevice.Viewport.AspectRatio, 1.0f, 100.0f);
envEffect.View = Matrix.CreateLookAt(
    new Vector3(2, 3, 32), Vector3.Zero, Vector3.Up);
texture = new TextureCube(GraphicsDevice, 256,
    false, SurfaceFormat.Color);
Color[] facedata = new Color[256 * 256];for (int i = 0; i < 6; i++)
{
    Texture2D tempTexture = Content.Load<Texture2D>(
    "skybox" + i.ToString());
    tempTexture. GetData<Color>(facedata);
    texture.SetData<Color>((CubeMapFace)i, facedata);
}
envEffect.Texture = (model.Meshes[0].Effects[0] as BasicEffect).Texture;
envEffect.EnvironmentMap = texture;
envEffect.EnableDefaultLighting();
envEffect.EnvironmentMapAmount = 1.0f;
envEffect.FresnelFactor = 1.0f;
envEffect.EnvironmentMapSpecular = Vector3.Zero;
The beginning of this code is familiar: Load the model, create the effect, and set up the camera. You then need to create a new TextureCube object that is used as your environment map, and that needs to be filled with data.
To easily fill the
environment map with data, load each face of the cube map into its own
temporary texture and copy the data to the appropriate face of the cube
texture. After the cube texture has data, set the parameters for the
effect and you’re ready to start rendering.
The Texture parameter, much like BasicEffect, is simply the texture the object is supposed to have, what it would look like without reflections. The EnvironmentMap parameter is the cube texture that contains the reflection data, and EnvironmentMapAmount
is a float describing how much of the environment map could show up
(from 0.0f, or nothing, to 1.0f, or the max). The default amount is
1.0f.
The FresnelFactor
parameter describes how Fresnel lighting should be applied to
environment map, independent of the viewing angle. With a low value, the
environment map is visible everywhere. With a value of 0.0f, the
environment map covers the entire object, and a large value shows only
the environment around the edges. The default value is also 1.0f.
The EnvironmentMapSpecular
parameter is a bit special. It blends the alpha from the environment
map into the final image using this value. This enables you to embed
maps into your environment map to have cheap specular highlights (rather
than having to actually use the GPU to render more lights). Even though
it is set, its default value is also Vector3.Zero.
Lastly, enable the standard lighting rig. Now you’re ready to render this model. Include the DrawModel method you used several times so far.
private void DrawModel(Model m, Matrix world, EnvironmentMapEffect be)
{
    foreach (ModelMesh mm in m.Meshes)
    {
        foreach (ModelMeshPart mmp in mm.MeshParts)
        {
            be.World = world;
            GraphicsDevice.SetVertexBuffer(mmp.VertexBuffer,
                 mmp.VertexOffset);
            GraphicsDevice.Indices = mmp.IndexBuffer;
            be.CurrentTechnique.Passes[0].Apply();
            GraphicsDevice.DrawIndexedPrimitives(
                PrimitiveType.TriangleList, 0, 0,
                mmp.NumVertices, mmp.StartIndex, mmp.PrimitiveCount);
        }
    }
}
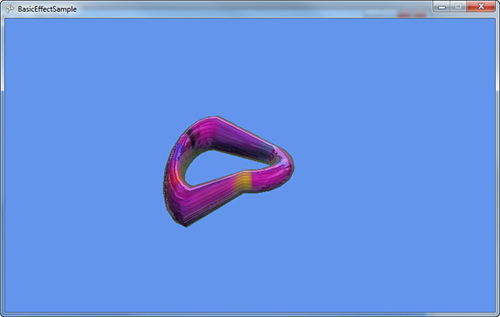
Finally, to see how the model reflects the environment map, add the following lines to the Draw method and see your reflection map (see Figure 1).
float time = (float)gameTime.TotalGameTime.TotalSeconds;
DrawModel(model, Matrix.CreateRotationY(time * 0.3f) *
    Matrix.CreateRotationX(time), envEffect);

As the model rotates, you can see the reflection of the environment around it. Manipulating the EnvironmentMapAmount parameter as well as the FresnelFactor parameter changes how much reflection you see. With that, let’s move on to the last of the built-in effects.