Creating the Interface
Open the GesturesViewController.xib file in Interface Builder. It’s time to create our UI.
As I mentioned when we
started, we don’t have to concern ourselves with any of the typical
actions or events in this project. We’ll add some objects, and then
connect their outlets.
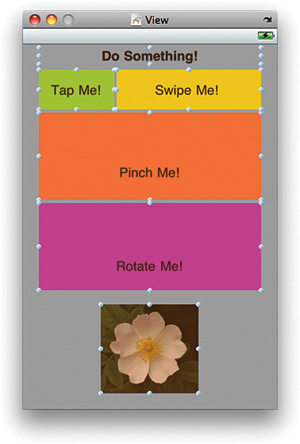
To build the interface, start by dragging four UIView
instances to the main view. Size the first to a small rectangle in the
upper-right portion of the screen; it will capture taps. Make the second
a long rectangle beside the first (for detecting swipes). Size the
other two views as large rectangles below the first two (for pinches and
rotations). Use the Attributes Inspector (Command+1) to set the
background of each view to be something unique.
Did you Know?
The views you are adding are
convenient objects that we can attach gestures to. In your own
applications, you can attach gesture recognizers to your main
application view or the view of any onscreen object.
Did you Know?
Gesture recognizers work based
on the starting point of the gesture, not where it ends. In other
words, if a user uses a rotation gesture that starts in a view but ends
outside the view, it will work fine. The gesture won’t “stop” just
because it crosses a view’s boundary.
For you, the developer, this is a big help for making multitouch applications that work well on a small screen.
Next, drag labels into each of the four views. The first label should read Tap Me!. The second should read Swipe Me!. The third label should read Pinch Me!. The fourth label should read Rotate Me!.
Drag a fifth UILabel
instance to the main view, and center it at the top of the screen. Use
the Attributes Inspector to set it to align center. This will be the
label we use to provide feedback to the user. Change the label’s default
text to Do something!.
Finally, add a UIImageView
to the bottom center of the screen. Use the Attributes Inspector
(Command+1) and Size Inspector (Command+3) to set the image to
flower.png and the size and location to X: 98.0, Y:328.0, W:123.0,
H:112.0.
The finished view should resemble Figure 4.
Connecting the Outlets
To access our gesture
views and feedback objects from the main application, we need to connect
the outlets defined earlier. Starting with the top-left view,
Control-drag from the File’s Owner icon to the view. Choose the tapView outlet when prompted, as shown in Figure 5.
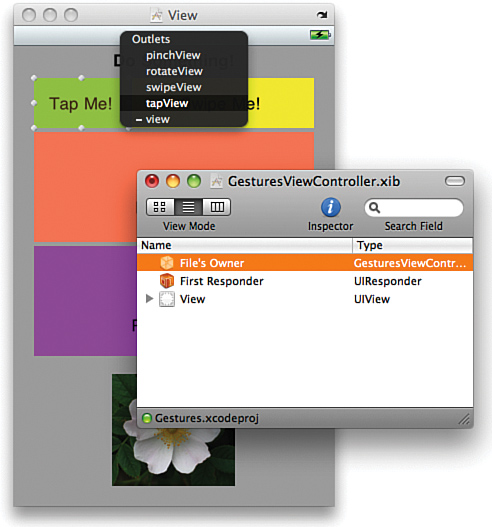
Repeat this process, connecting the top-right view to the swipeView outlet, the bottom-left view to pinchView, and the bottom-right view to rotateView. Connect the top UILabel to outputLabel and the bottom UIImageView to imageView.
We can now close the XIB file and exit Interface Builder. It’s time to connect our gesture recognizers.
Implementing the Tap Gesture Recognizer
We’re going to start
implementing the gesture recognizer logic by implementing the “tap”
recognizer. What you’ll quickly discover is that after you’ve added one
recognizer, the pattern is very, very similar for the others.
Creating the Recognizer
The
first thing to consider is this: Where do we want to instantiate a
gesture recognizer? For this project, it makes sense that the user can
start inputting gestures as soon as the application starts and the views
are visible. So the viewDidLoad method is a good spot. Update the GestureViewController.m file so that the viewDidLoad reads as displayed in Listing 2.
Listing 2.
 1: - (void)viewDidLoad {
 2:     [super viewDidLoad];
 3:
 4:     //Taps
 5:     UITapGestureRecognizer *tapRecognizer;
 6:     tapRecognizer=[[UITapGestureRecognizer alloc]
 7:                        initWithTarget:self
 8:                        action:@selector(foundTap:)];
 9:     tapRecognizer.numberOfTapsRequired=1;
10:     tapRecognizer.numberOfTouchesRequired=1;
11:     [tapView addGestureRecognizer:tapRecognizer];
12:     [tapRecognizer release];
13: }
|
Line 5 kicks things off by declaring an instance of the UITapGestureRecognizer object, tapRecognizer. In line 6, tapRecognizer is allocated and initialized with initWithTarget:action. Working backward, the action is the method that will be called when the tap occurs. Using @selector(foundTap:), we tell the recognizer that we want to use a method called foundTap to handle our taps. The target we specify, self, is the object where foundTap lives. In this case, it will be our view controller (GestureViewController) object, or self.
Lines 9–10 set two properties of the tap gesture recognizer:
NumberOfTapsRequired: The number of times the object needs to be tapped before the gesture is recognized
NumberOfTouchesRequired: The number of fingers that need to be down on the screen before the gesture is recognized
In this example, we’re defining a
“tap” as one finger tapping the screen once. Feel free to play with
these properties as much as you like!
In Line 11, we use the UIView method addGestureRecognizer to add the tapRecognizer to the tapView. Our view is now tap-aware, and we can release tapRecognizer in line 12.
The next step is to add the code to respond to a tap event.
Responding to the Recognizer
Responding to the tap gesture recognizer is just a matter of implementing the foundTap method. Add this new method to the GestureViewController.m file, as follows:
- (void)foundTap:(UITapGestureRecognizer *)recognizer {
    outputLabel.text=@"Tapped";
}
Ta da! Your first gesture
recognizer is done! We’ll repeat this process for the other four, and
we’ll be finished before you know it!
Did you Know?
If you want to get the coordinate
where a tap gesture (or a swipe) takes place, you add code like this to
the gesture handler (replacing <the view> with the name of the recognizer’s view):
CGPoint location = [recognizer locationInView:<the view>];
This will create a simple structure named location, with members x and y, accessible as location.x and location.y.
