Implementing the Rotation Gesture Recognizer
The last multitouch
gesture recognizer that we’ll add is the rotation gesture recognizer.
Like the pinch gesture, rotation returns some useful information that we
can apply visually to our onscreen objects, notably velocity and
rotation. The rotation returned is the number of radians that the user
has rotated his or her fingers, clockwise or counterclockwise.
Did you Know?
Most of us are
comfortable talking about rotation in “degrees,” but the Cocoa classes
usually use radians. Don’t worry. It’s not a difficult translation to
make. If you’d like, you can calculate degrees from radians using the
following formula:
Degrees = Radians × 180 / Pi
There’s not really any reason
we need to do this in this project, but in your own applications, you
may want to provide a degree reading to your users.
One last time, edit the viewDidLoad method and add the following code fragment for the rotation recognizer:
UIRotationGestureRecognizer *rotationRecognizer;
rotationRecognizer=[[UIRotationGestureRecognizer alloc]
                 initWithTarget:self
                 action:@selector(foundRotation:)];
[rotateView addGestureRecognizer:rotationRecognizer];
[rotationRecognizer release];
The rotation gesture recognizer is added to the rotateView and set to trigger foundRotation when a gesture is detected.
Responding to the Recognizer
I’d love to tell you how
difficult it is to rotate a view and about all the complex math
involved, but I pretty much gave away the trick to rotation in the foundPinch method earlier. A single line of code will set the UIImageView’s transform
property to a rotation transformation and visually rotate the view. Of
course, we will also need to provide a feedback string to the user, but
that’s not nearly as exciting, is it?
Add the foundRotation method in Listing 4 to your GesturesViewController.m file.
Listing 4.
 1: - (void)foundRotation:(UIRotationGestureRecognizer *)recognizer {
 2:     NSString *feedback;
 3:     double rotation;
 4:     rotation=recognizer.rotation;
 5:     feedback=[[NSString alloc]
 6:               initWithFormat:@"Rotated, Radians:%1.2f, Velocity:%1.2f",
 7:               recognizer.rotation,recognizer.velocity];
 8:     outputLabel.text=feedback;
 9:     imageView.transform = CGAffineTransformMakeRotation(rotation);
10:     [feedback release];
11: }
|
Again, we declare a feedback string and a floating-point value, this time rotation, in lines 2–3. Line 4 sets the rotation value to the recognizer’s rotation property. This is the rotation in radians detected in the user’s gesture.
Line 5 creates the feedback string showing the radians rotated and the velocity of the rotation, while line 8 sets the output label to the string.
Line 9 handles the rotation itself, creating a rotation transformation and applying it to the imageView object’s transform property.
Line 10 finishes up by releasing the feedback string.
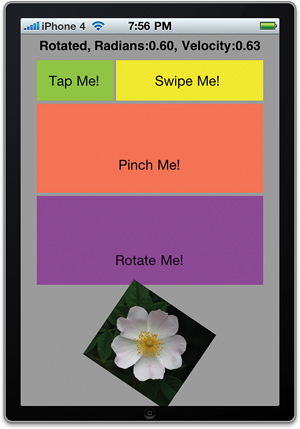
Build and Run to test your
application now. You should be able to freely spin the image view using a
rotation gesture in the rotate view, as shown in Figure 7.
Although it might seem like we’ve finished, there’s still one gesture we need to cover: a shake.
Implementing the Shake Recognizer
Dealing with a shake is a bit different from the other gestures covered this hour. We must intercept a UIEvent of the type UIEventTypeMotion. To do this, our view controller or view must be the first responder in the responder chain and must implement the motionEnded:withEvent method.
Let’s tackle these requirements one at a time.
Becoming First Responder
For our view controller to be a
first responder, we have to allow it and then ask for it. Add the
following two methods to the GesturesViewController.m file:
- (BOOL)canBecomeFirstResponder {
    return YES; // For the shake event
}

- (void)viewDidAppear:(BOOL)animated {
    [self becomeFirstResponder]; // For the shake event
    [super viewDidAppear: animated];
}
Our
view controller is now prepared to become the first responder and
receive the shake event. All we need to do now is implement motionEnded:withEvent to trap and react to the shake itself.
Reacting to a Shake
To react to a shake, implement the motionEnded:withEvent method as shown in Listing 5.
Listing 5.
1: - (void)motionEnded:(UIEventSubtype)motion withEvent:(UIEvent *)event {
2:     if (motion==UIEventSubtypeMotionShake) {
3:         outputLabel.text=@"Shaking things up!";
4:         imageView.transform = CGAffineTransformMakeRotation(0.0);
5:         imageView.frame=CGRectMake(originX,originY,originWidth,originHeight);
6:     }
7: }
|
First things first: In line 2, we check to make sure that the motion value we received (an object of type UIEventSubtype) is, indeed, a motion event. To do this, we just compare it to the constant UIEventSubtypeMotionShake. If they match, the user just finished shaking the device!
Lines 3–4 react to the shake
by setting the output label, rotating the image view back to its default
orientation, and setting the image view’s frame back to the original
size. In other words, shaking the iPhone will reset the image to its
default state. Pretty nifty, huh?
You can
now run the application and use all the gestures that we implemented
this hour. Although not a useful app in and of itself, it does
illustrate many techniques that you can use in your own applications.
