1. Problem
You need to use the Windows Phone 7 microphone to register your voice and reproduce it in a funny way.
2. Solution
You can use the Microphone class from the Microsoft.Xna.Framework.dll assembly and the Play method provided by the SoundEffect class.
3. How It Works
In the Microsoft.Xna.Framework.Audio namespace, the Microphone class is defined; this class provides access to the device's microphone. The Microphone class (see Figure 1 for the class diagram) has the BufferReady event that is raised at regular intervals depending on the BufferDuration setting. Within the BufferReady event handler, you can call the GetData method provided by the Microphone
class in order to retrieve a portion of the registered audio buffer.
This buffer has a fixed size that you can calculate by calling the GetSampleSizeInBytes method from the Microphone class.
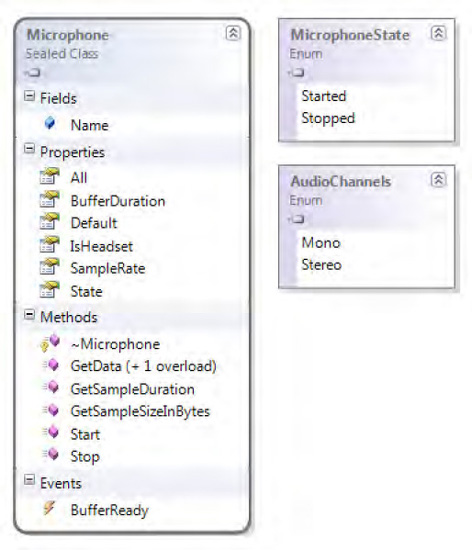
The microphone is started by using the Start method from the Microphone class and is stopped by the Stop method. The Microphone class is sealed, so you cannot create an instance from it; you have to call the static Default property from the Microphone class, which returns an instance of the Microphone object representing the default microphone.
To play the recorded audio, you have to use the Play method provided by the SoundEffect class. Before using this method, you need to create an object from the SoundEffect
class by using one of the two provided constructors. The first
constructor accepts the audio buffer as a bytes array, the audio sample
rate, and the number of audio channels to use during the audio playing.
The second constructor accepts—in addition to those three parameters— an
offset value indicating from where the audio play has to start, the
count representing the amount of data to play, and loops parameters to
reproduce a looping sound.
The SoundEffect class provides a mix of static and instance methods. Among the static methods worth noting is the FromStream method, which retrieves a SoundEffect object from a stream. Among the instance methods worth noting is the CreateInstance method, which returns a SoundEffectInstance object. Before calling the Play method, you can use the CreateInstance method to return a SoundEffectInstance object and set its own 3D audio space parameters. Moreover, you can use the SoundEffectInstance object to set audio pitch, volume, and pan.
4. The Code
To demonstrate using the microphone and reproducing sound, we have created the FunnyRepeater Silverlight for Windows Phone 7 application.
In the MainPage.xaml file, you add just a single button that starts and stops the audio recording from the microphone. You use the PageTitle TextBlock control to display the recording status.
<!--ContentPanel - place additional content here-->
        <Grid x:Name="ContentPanel" Grid.Row="1" Margin="12,0,12,0">
            <Button x:Name="btnRecord" Click="btnRecord_Click" Content="Record" />
        </Grid>
In the MainPage.xaml.cs code file, you start defining at the class level a Microphone object and some buffer data. In the MainPage constructor, you add the hook to the BufferReady event.
public partial class MainPage : PhoneApplicationPage
    {
        Microphone mic = Microphone.Default;
        byte[] data = null;
        MemoryStream audio = null;

        // Constructor
        public MainPage()
        {
            InitializeComponent();
            mic.BufferReady += new EventHandler<EventArgs>(mic_BufferReady);
        }
When the BufferReady event is raised, you store the provided audio buffer into a MemoryStream
object. This is necessary because this event is raised at regular
intervals and provides slices of audio registration. Thanks to the MemoryStream object, you can store the entire audio recording.
void mic_BufferReady(object sender, EventArgs e)
        {
            mic.GetData(data);
            audio.Write(data, 0, data.Length);
        }
Behind the button click event handler stays the core of this
application. First of all, to know when the button has either to start
or to stop the audio recording, you check the State property provided by the Microphone class. When State is equal to the MicrophoneState.Stopped value, it means the microphone is not working and you can start it. When you want to start the audio recording, you set the BufferDuration property to 100 milliseconds—so that the BufferReady
event is raised every 100 milliseconds. Then you prepare the bytes
array buffer to receive audio data. This array will have a capacity
equal to the value returned by the GetSampleSizeInBytes method provided by the Microphone class. The GetSampleSizeInBytes method accepts a TimeSpan object set equal to the BufferDuration property value. A fresh new MemoryStream object is created—so that each time a recording is started, you don't have the new recording appended to the old one—and the Microphone is started with the Start method. Finally, the PageTitle and the button's Content are set according to the new state.
If the button is used to stop the recording, you use the Stop method from the Microphone
class to stop the microphone recording. Then the page title and
button's content are set according to their new states, and the
registration is played by calling the PlayRecordedAudio method. Finally, when the audio playing is over, PageTitle is set back to the original value.
private void btnRecord_Click(object sender, RoutedEventArgs e)
        {
            if (mic.State == MicrophoneState.Stopped)
            {
                mic.BufferDuration = TimeSpan.FromMilliseconds(100);
                data = new byte[mic.GetSampleSizeInBytes(mic.BufferDuration)];
                audio = new MemoryStream();
                mic.Start();
                this.PageTitle.Text = "recording...";
                btnRecord.Content = "Stop";
            }
            else
            {
                mic.Stop();
                this.PageTitle.Text = "playing";
                btnRecord.Content = "Record";
                btnRecord.IsEnabled = false;
                PlayRecordedAudio();
                this.PageTitle.Text = "ready";
            }
        }
In the private PlayRecordedAudio method, you create an object from the SoundEffect class providing the MemoryStream buffer. This buffer is converted to an array with the ToArray method. Finally, you provide the SampleRate microphone audio sample rate, and the mono audio channel. You play the recorded audio by using the Play
method that accepts three parameters: the volume, the pitch, and the
pan. All those parameters are float numbers but have different ranges.
The volume parameter goes from 0.0 f (float) (no sounds) to 1.0 f (the
volume is equal to the MasterVolume
set in the phone). The pitch parameter is responsible for the funny
effect. It reproduces the sound one octave higher than the original. The
last parameter is the pan value, which represents the audio balancing
heard from the left and right ears.
private void PlayRecordedAudio()
        {
            SoundEffect se = new SoundEffect(audio.ToArray(), mic.SampleRate,
                                             AudioChannels.Mono);
            se.Play(1.0f, 1.0f, 0.0f);
            btnRecord.IsEnabled = true;
        }
5. Usage
You can use this
application both in the emulator and the physical device. If you choose
the former, the PC's microphone will be used.
From Visual Studio 2010,
press Ctrl+F5 so that the application is started. If you choose the
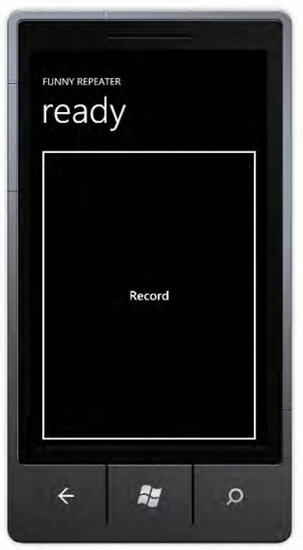
emulator, the application will look like Figure 2.
Now you can press the Record
button and start to say what you would like to say. Press the Stop
button, and hopefully you will hear your voice repeating your speech,
but in a funny way.
