5. Sharing Information with Users Outside the Company
In response to more advanced needs of users,
Outlook 2007 has provided functions to help extend familiar
collaboration tools into unfamiliar areas. Much of the functionality
available among users of the same Exchange environment is now available
across the Internet. This is a great enabler for users because it is now
easier to collaborate with colleagues from other companies.
Configuring Free/Busy Time to Be Viewed via the Internet
In the past, it required specialized software
and connectors to exchange free/busy information with another Exchange
organization. Free/busy information is what tracks the availability of
users in terms of having appointments, being in meetings, or having free
time available. Exchange administrators and mailbox owners can publish
this free/busy information outside of their Exchange environment to more
easily set up meetings with other organizations. If this functionality
is needed, this information can be published to a web server available
to both organizations. In the past, you could use a service provided by
Microsoft called the Microsoft Office Internet Free/Busy Service, but
this service is no longer available. This service has been replaced by
Office Online. By publishing free/busy information to a shared website,
users outside of the Exchange organization can view published free/busy
information over the Internet. They can also use the same website to
schedule meetings with recipients from the participating organizations.
This option is available for users accessing Exchange with the Outlook
2002 or later clients.
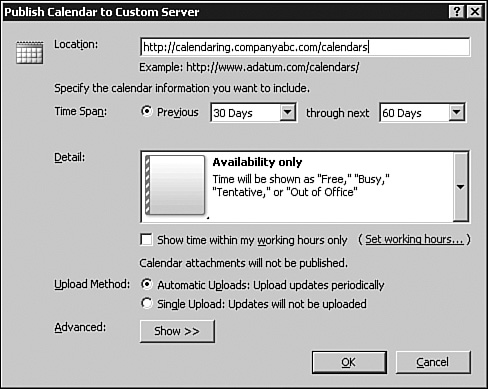
To configure free/busy time to be displayed on the Internet with a custom server, follow these steps:
1. | Right-click the calendar to be shared.
|
2. | Choose Publish to Internet and Publish to Custom Server.
|
3. | Enter the URL to which you will publish your information.
|
4. | Choose the time frame you want to publish as well as the options and upload method, similar to that shown in Figure 3.
|
5. | Click OK.
|
To stop sharing this information on the custom server, complete the following steps:
1. | Right-click the shared calendar.
|
2. | Choose Publish to Internet.
|
3. | Choose Remove from Server.
|
4. | Click Yes.
|
To configure which service will publish the free/busy information, follow these steps:
1. | To use a locally provided website, click Publish at My Location, and enter the URL to the location.
|
2. | Click OK.
|
3. | You might be prompted to install some files to complete the installation of the added functionality.
|
4. | Click Yes to install. The Outlook feature is installed.
|
5. | Click OK two more times.
|
To publish a calendar to Office Online, follow these steps:
1. | From the navigation pane, right-click the calendar you want to share.
|
2. | Choose Publish to Internet and then click Publish to Office Online.
|
3. | Register for Office Online if you do not already have a Windows Live ID.
|
4. | Specify how much information you want to upload (in days).
|
5. | Choose your options, permissions, and upload method.
|
6. | Click OK and information will be published.
|
7. | Optional: Send invites to contacts to share your information.
|
To stop sharing this information on Office Online:
1. | Right-click the shared calendar.
|
2. | Choose Publish to Internet.
|
3. | Choose Remove from Server.
|
4. | Click Yes.
|
Viewing Free/Busy Time via the Internet
If granted necessary permissions, Outlook users
from one organization can view free/busy information from another
organization’s users via the shared website. The user can send meeting
requests, add the user to a group schedule, and see free/busy time just
as they could with users from their own organization. To do this, the
end user must access the free/busy information website, click on View
Free/Busy Times on the Web, and enter the email address of the user
whose free/busy time is to be viewed.
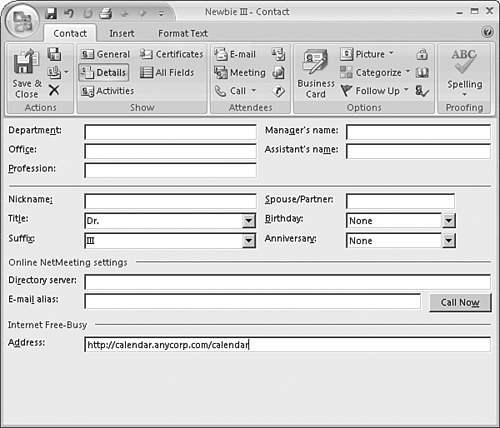
The user also has the option to see a free/busy search path for their contacts. To do so, follow these steps:
1. | In the navigation pane, click Contacts, and then double-click an entry to open a contact.
|
2. | Click the Details tab.
|
3. | Under
the text that reads Internet Free-Busy, type the fully qualified path
of the location that you want to search for this contact’s free/busy
information in the Address box. You can use any valid URL format, such
as: http://..., file://\\..., or ftp://...., as shown in Figure 4.
|
To let other users know about your shared calendar information, you can do the following:
1. | Right-click the shared calendar.
|
2. | Click Publish to Internet.
|
3. | Click Share Published Calendar.
|
4. | Enter the email addresses of the people with whom you want to share your free/busy information.
|
5. | Click Send.
|
The person who will be accessing the shared calendar will also need a Windows Live logon.
They will receive a message stating the following:
Andrew Abbate has invited you to add the "Andrew_Abbate_Calendar" Internet Calendar
subscription to Microsoft Office Outlook.
You can open this calendar on any computer with an Internet calendar compatible
program installed, such as Microsoft Office Outlook 2007.
Sending Contact Information to Others
As the business world becomes more and more
electronic, old customs such as the exchange of paper business cards are
being replaced by more modern methods. Virtual Business Cards, or
vCards have greatly increased in popularity. These vCards enable an
Outlook user to send anyone a small file containing their contact
information. Because of the vCard format, this contact information can
then be imported into the recipient’s contact list. The vCard can
contain common information such as the following:
Name
Address
Phone numbers
Email address
Job title
Going beyond the concepts of a typical business card, a vCard can also include the following:
vCards can be emailed as attachments or they can be automatically attached to outgoing messages as part of a signature file.
To email a vCard, follow these steps:
1. | Open the contact that will become the vCard.
|
2. | Click Actions, Send as Business Card.
|
3. | Input information into the email and send the email.
|
When the user receives the card, he can open it and Save and Close into his own contacts area.
To include a vCard in an AutoSignature, follow these steps:
1. | Click Tools, Options.
|
2. | Click the Mail Format tab and click Signatures.
|
3. | Edit an existing AutoSignature or create a new one.
|
4. | In the toolbar above the text window, click the Business Card icon.
|
5. | Select the business card from your contacts, and click OK.
|
6. | Click OK. |
