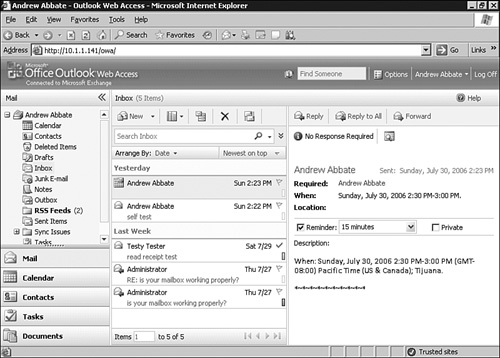
The user interface (UI) of the new OWA client, shown in Figure 1,
looks and feels almost exactly like the full Outlook 2007 client,
lacking only the To-Do bar. It has the same basic pane structure, the
same color scheme, the full folder tree, and the ability to change the
widths of the columns. It includes many similar elements and components
found in Outlook 2007 to allow users to retain the same level of
familiarity with the tools and options when moving from the full Outlook
2007 to OWA 2007.
Using Multiple Panes
By default, the OWA standard authentication mode
client offers a very familiar pane when working within the UI. When
users initially open OWA, they are presented with five basic panes.
These panes are meant to organize the information presented in OWA and
to take the best advantage of the available space.
The five panes are as follows:
The
Folder list is the upper-left pane, which lists all the folders
available in the user’s mailbox. This includes Calendar, Contacts,
Deleted Items, Drafts, Inbox, Junk E-Mail, Notes, Outbox, Sent Items,
Sync Issues, Tasks, and any custom created folders.
To simplify navigation within OWA, there is a
shortcut bar that is located below the Folder list. This shortcut bar
lists shortcut icons to the Inbox, Calendar, Contacts, Tasks, and
Documents. Another helpful feature is the new mail notification pop-up.
When a new message arrives, a vertical pop-up appears in the lower-left
corner of OWA that notifies the user that they have new mail. The user
can then click that button to refresh OWA and view the new message.
Note
Users familiar with OWA from Exchange 2003
might notice that the Options button is no longer in the shortcut bar.
The Options button has moved to the upper-right portion of the interface
near the Log Off button.
The middle pane changes slightly as the user
goes between mail, calendaring, and contacts. The pane lists the
contents of whatever Exchange feature is selected in the Folder list or
icon in the shortcut bar. For example, if Inbox is selected in the
Folder list, the middle pane displays the existing and new messages in
the Inbox just as it would in the full Outlook 2007 client. When using
other options, such as the Calendar, there is one pane shown in the
middle, not a split screen, as shown when the Inbox is highlighted. The
middle pane has been designed to always provide the best experience for
the given folder type rather than trying to keep its behavior the same.
In addition, an optional pane called the reading pane is available (shown on the far right of Figure 1).
The reading pane is turned on by default and shown when viewing the
Inbox. This pane shows the content or body of the message highlighted in
the center pane. This reading pane can also be configured to sit below
the middle pane rather than to the right. This allows the user to
further customize their own experience to their personal preferences.
The toolbar across the top is called the
Infobar. Like Outlook, it provides choices that are available while you
view the information in the middle pane. The choices change depending on
what a user is viewing when working within OWA. Different options are
available when working with the Inbox, Calendar, and other options.
Changing the Size of the Panes
To customize the OWA UI, a user can easily
configure the width or height of the panes available. With OWA 2007, the
adjustments of pane sizing can be saved when a user logs off. These
sizing adjustments are remembered and restored when a user logs back on
to OWA.
1. | To
change the size of work area panes within OWA, hover the mouse pointer
over the border between the panes, and wait for the double arrow or
horizontal double arrow to appear.
|
2. | When
the arrow appears, hold down the left mouse button and move the border
right/left or up/down to resize the pane to the size you want.
|
3. | When the pane is in the proper place, release the left mouse button, and the pane will maintain the newly created size.
|
Using Pull-Down Menus
Some icons in OWA allow a user to perform
several different tasks. Icons that contain a downward facing arrow next
to them allow users to choose different options. To view the choices
available with these options, click the arrow to the right of the icon
or the icon to see a menu similar to the one shown in Figure 2.
To choose an option, move the mouse pointer down the list and view the
choices as they are highlighted. To choose an option, highlight the
option and click the desired choice.
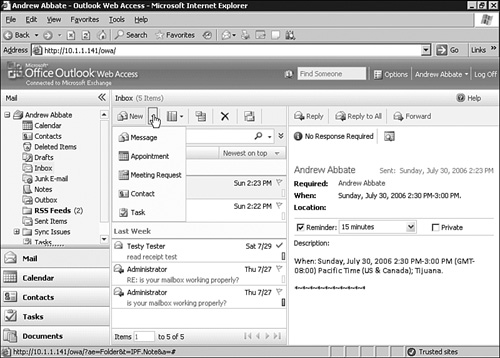
If there is no arrow next to the icon, the icon provides only a single choice, by clicking it.
Moving Through the OWA Features
You can move through the different OWA features
in a couple of ways. The first is by clicking the buttons that represent
the feature you want to access. For example, the shortcut bar presents
you with labeled icon buttons for options, such as the Contacts or the
Inbox. By clicking once on the icon button, you can access the feature
as it is opened in the center pane.
Another
option is to select the desired options in the folder tree located in
the folder pane. Clicking the Inbox or any other folder in the list also
allows the feature to be opened in the center pane. In fact, if you
select an option in this manner you will see that the same option is now
highlighted in the shortcut bar.
Moving Through Email Pages
When the Inbox folder is selected, email
messages are displayed in the middle pane with the body of the message
in the reading pane. When working with the Inbox, you can now configure
how many email messages are displayed on the screen at one time. To
modify the number of messages shown per screen, complete the following
steps:
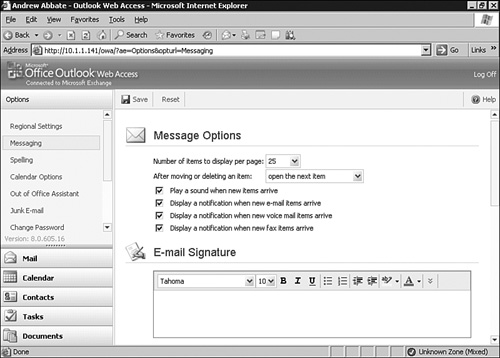
1. | Click Options in the upper-right portion of the screen.
|
2. | Select Messaging from the left pane.
|
3. | In Message Options, shown in Figure 3, set the Number of Items to Display per Page option to the value you want.
|
4. | Click Save.
|
When users have large numbers of messages, it
can be difficult to get to the page containing the message they want. To
move through the pages of messages, click the left or right arrow
button at the bottom of the middle pane to navigate between pages. To go
to the end or beginning of the pages of messages, click the arrow with
the vertical line next to it. The arrow pointing left displays the
beginning of the email pages; the arrow to the right displays the end.
Often,
a simpler way to organize the messages when trying to find a particular
one is to use the Description bar, organizing emails by the From,
Subject, Date Received, and more field options when the pane is moved
over. Click the options to sort messages based on these criteria. This
can simplify the process of trying to find a message that came from a
particular user.
Also keep in mind that you still have access to
the search features if you feel you have enough information to search on
rather than just scanning through a large pile of messages to find the
one you are looking for.
Changing the Viewing Order and Using the Two-Line View
Users can change the viewing order of email
messages in the Inbox or other email folders by using these selections.
The default initial configuration is to display the most recent messages
received by the users at the top of the email list. To change the view
so the new messages go to the bottom of the list, click the phrase
Newest on Top in the middle pane with a down-pointing arrow next to it.
This rearranges the messages so the oldest received email is at the top.
The clickable phrase will now read Oldest on Top.
Users can also choose to turn off the two-line
view, thus consolidating the information about the email message into a
single line. This allows a user to show more messages per page in OWA.
The two-line view is configured as on by
default. To change the two-line view to a different view, click the
Single Line/Multiple Line button located just to the left of the Delete
button.
Using the Reading Pane
As
was the case with previous versions of the OWA client, the reading pane
is an option that can be toggled on or off. Turning on the reading pane
opens a vertical pane on the far-right side of the OWA user interface
that shows the content of the message. The ability to scroll through the
contents of the message in the reading pane enables you to view the
whole message without having to physically open it. The location of the
reading pane is customizable and can be located either on the right
vertical pane, or as a horizontal pane at the bottom of the page. If the
reading pane is toggled off, OWA removes the pane entirely, allowing
for more space for the middle pane.
To configure the reading pane, complete the following steps:
1. | Click
the reading pane icon. The drop-down menu provides choices as to where
to put the reading pane (the default location is the right side of the
OWA UI).
|
2. | Choose Right to configure the vertical pane on the right side; choose Bottom to configure the horizontal pane.
|
3. | Choose
Off to turn the reading pane off. When the reading pane is removed, the
middle pane expands to take up the space the reading pane used.
|
Reading a message via the reading pane acts much
the same as double-clicking a message to open it. Both methods update
the mailbox to know that a message has been read. This results in a new
message changing its appearance in the middle pane from bold to not
bold. This signifies that the message has been read. One difference to
be aware of is that when viewing messages via the reading pane, even
though you have read the message, a read receipt would not be generated
if the sender had requested one. That only occurs via OWA if the message
is double-clicked and read.
Creating New Folders
To further organize a mailbox, users can create
folders and subfolders in their mailbox or Inbox while using OWA. You
can easily create a type of additional folder that can be viewed and
accessed in the Folder list:
1. | To create a new folder, click the location in the Folder tree in the left pane where you want the folder to be created.
|
2. | Right-click the parent folder (which includes Mailbox) in the folder tree, and choose Create New Folder, as shown in Figure 4.

|
3. | Name the folder and press Enter.
|
After being created, the new folder is
immediately accessible for use and appears in the location where it was
placed in the Folder list.
Changes to Public Folders in OWA 2007
There
is one major change to the way that OWA views public folders in OWA
2007. It doesn’t. Microsoft is no longer offering the ability to access
public folders via OWA. This is part of Microsoft’s shift in focus from
public folders in Exchange to SharePoint.
Using OWA Help
As with all Microsoft applications, help is also
available to users in OWA by clicking Help from the menu bar. The Help
pages allow users access to information on features as well as
step-by-step instructions for completing various tasks. Unfortunately,
this Help feature does not enable searching or viewing by index as with
the full Outlook 2007 client. OWA Help topics are organized by groups
according to the topic headings for simple access to any available
topic. For example, if your question deals with meetings, you can
navigate to the calendar area and expand it to working with meetings and
see all the topics dealing with meetings. By clicking the plus sign
(+), you can expand all the topics under the contact heading, as shown
in Figure 5,
enabling a view of all subheadings that become available. When you
click a subheading, the Help information appears in the right pane.

Logging Off OWA 2007
When
a user has logged on to OWA with FBA, they will find a Log Off button
located on the right of the Infobar. By having this Log Off button
available, it is easy for the user to securely log off OWA and close the
session. This prevents another user from navigating back to the mailbox
and impersonating the user. This is especially important when a user is
attaching to OWA via a public or shared computer. A user needs to click
the Log Off button to log off from OWA.
