When it comes to support, few things are better for
troubleshooting than a snapshot of what went wrong. One of the great
features available in the free Support Debugging Tool from Microsoft is
the ability to grab screenshots and environment files, such as the Dynamics.set
file, and e-mail them for support. This e-mail doesn't have to go to
Microsoft. It can go to a company's Microsoft Partner, an internal
support team, or almost anyone else who could help. It's also nice to be
able to grab screenshots from within the Dynamics GP interface rather
than relying on an external tool such as the Windows Snipping Tool.
Installing the Support Debugging Tool adds a camera icon to the Standard toolbar. Additionally, the Ctrl + S key combination can be used, making it easy to grab an error message and send out for help.
In this recipe, we'll look at the Screen Capture functionality included in the Support Debugging Tool.
How to do it...
To use the Screen Capture feature of the Support Debugging Tool:
1. Select Financial from the Navigation Pane. Select General under Transactions.
2. In the Transaction Entry window click on the blue arrow next to Batch ID to open the Batch Entry window as well.
3. Use one of these three options to capture the screenshot:
Click on the camera icon on the Standard toolbar
Press Ctrl + S on the keyboard
Select the Microsoft Dynamics GP menu followed by Tools | Capt䂡re Screenshots.
4. The Support Debugging Tool ScreenShot
window will open with attached screenshots of both of the open windows.
The checkboxes on the left allow specific windows to be included or
excluded in a support e-mail:
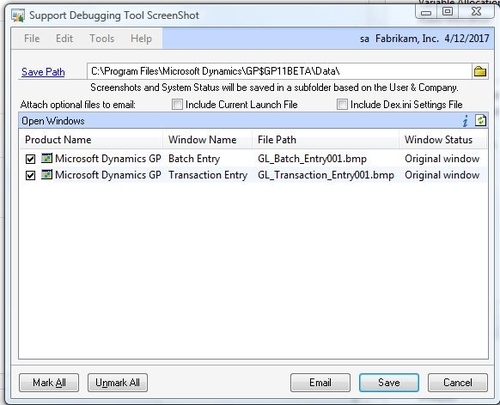
5. Next to Attach optional files to email select the checkboxes to Include Current Launch File and Include Dex.ini Settings File. These settings will attach the Dynamics.set file and Dex.ini file used to launch Dynamics GP.
6. Click on the Email button. The user's e-mail application will open with the files attached and information included in the body of the e-mail:
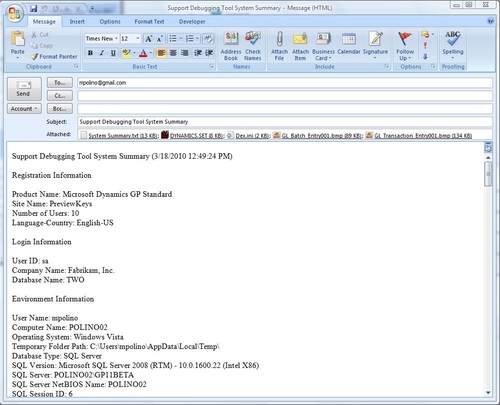
Users simply need to add the e-mail address of the recipient and send the e-mail.
How it works...
The Screen Capture feature in the Support Debugging
Tool is a godsend for anyone who has had to deal with uncaptured error
messages or misquoted error text. Furthermore, it provides a consistent
output result for support personnel to use to review data.
There's more...
In addition to the basic settings of the Screen
Capture feature there are some defaults that can be set to make it even
more useful.
Default Settings
To change the default settings for capturing screenshots:
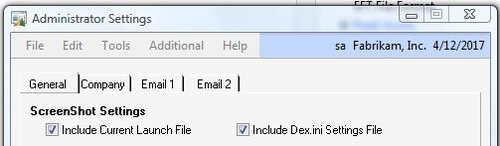
1. In the Support Debugging Tool window select Debugger | Administrator Settings.
2. Enter the system password if prompted.
3. In the General tab select the checkboxes next to Include Current Launch File and Include Dex.ini Settings File to include these files by default when a user takes a screenshot:
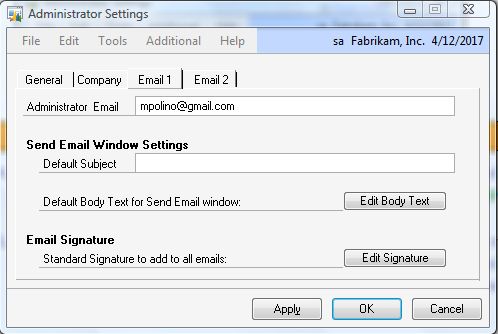
4. Click on the Email 1 tab. Add an e-mail ID to the Administrator Email field to provide a default e-mail recipient for support requests and click on Apply. Do not add my e-mail address. I can't support everyone!
5. Click on the Email 2 tab. The Email Mode
field is used to control the type of e-mail mode. The options include
using Outlook to send e-mail, using the SQL Server, or using a generic
MAPI client to send support e-mails. If the SQL Server is used, other
fields are exposed to allow additional setup options:
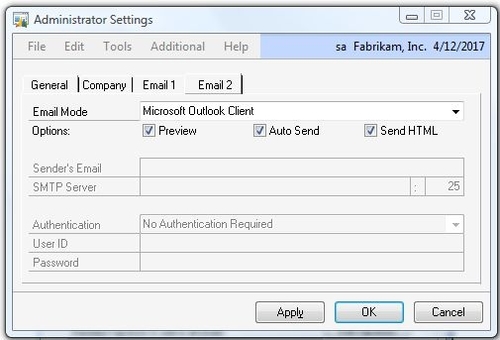
6. Finally, below the Email Mode field are three settings fields. The three fields and their uses are:
Preview: A preview window opens in Dynamics GP to review the e-mail before it goes out. If Auto Send is off users may have the opportunity to review the e-mail again in their mail client.
Auto Send: Sends the e-mail without the user having to press send in their e-mail client. However, this does not override the Preview button if it is selected.
Send HTML: Sends the e-mail in HTML format instead of text format.
