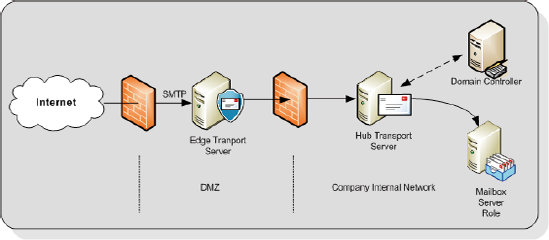
In order to offer Exchange
services, the Edge Transport Server has a local copy of the most
significant information of the company's Active Directory. This is
stored in a Lightweight Directory Services database, which was formerly
known as "Active Directory Application Mode" or ADAM. This database only
stores a subset of the Active Directory information, and only
informational items like recipients that exist in the internal Exchange
organization. No information is stored that can compromise the company's
Active Directory security.
NOTE
The Edge Transport Server should never be a member of the forest that holds the Exchange organization.

Being in the DMZ
(demilitarized zone), the Exchange Server 2010 Edge Transport Server
role does not have full access to the corporate network, so it does not
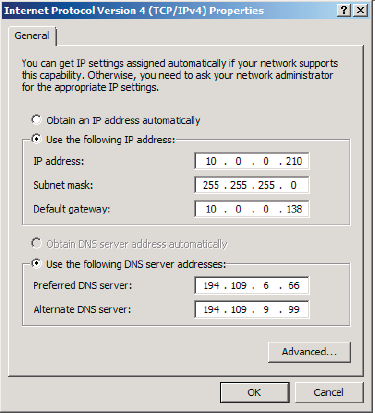
have access to the corporate Domain Controllers, and since the Edge
Transport Server is in the DMZ, it cannot use the company's internal DNS
servers, and so needs to use external DNS servers instead. The Edge
Transport Server must always be able to resolve external SMTP hosts for
delivering messages, hence the external DNS server entries.

As part of its role, the
Edge Transport Server also needs to deliver SMTP messages to the
internal Hub Transport Server. To resolve these servers, they have to be
added to the Edge Transport Server's HOSTS file.
Being in the DMZ (and therefore not
a part of the internal domain) the Edge Transport Server's DNS Suffix
has to be configured manually. To do this, follow the steps below.
Open the properties of "My Computer" on the Edge Transport Server.
Select Computer Name and click on the Change button.
On the Computer Name tab click the More button.
In the "Primary DNS Suffix for this computer" enter your external DNS Suffix.
Click OK and reboot your computer.
The Exchange Server 2010 Edge Transport Server role has the following prerequisites:
1 Installing Active Directory Lightweight Directory Services
The Active Directory
Lightweight Directory Services (AD LDS), previously known as Active
Directory Application Mode or ADAM, can be installed using the Windows
Server 2008 Server Manager. To install the AD LDS follow the steps
below.
Log on to the server, click the Start button and select the Server Manager.
In the Server Manager, click "Roles" and in the action click "Add Roles."
Click Next on the "before you begin" page.
On the "select server role" page, select the "Active Directory Lightweight Directory Services" and click Next.
On the Introduction page, click Next.
On the Confirmation page, click Install.
On the Installation Results page, click Finish.
The Active Directory Lightweight Directory Services role is now installed and the server is ready for the Edge Server Role.
2 Installing the Edge Transport Server role
When all the prerequisite
software for the Exchange Server 2010 Edge Transport Server role is
installed, you can move on to the Exchange server itself.
Log
on to the server with local administrator credentials, go to the
installation media and start the setup.exe installation program.
Once
all prerequisite software is installed correctly, the first two options
are grayed out and you can directly select "Install Exchange Server
2010."
On the Introduction Page click Next.
Accept the License Agreement and click Next.
Select whether or not you want to participate in the Error Reporting Feature and click Next.
On
the Installation Type page select "Custom Installation" and click Next.
If needed, you can select another directory where the Exchange software
is installed.
On
the Server Role Selection page select the Edge Transport Server role.
Notice that when you select this role the other roles (Mailbox, Client
Access, etc.) are grayed out immediately. Click Next to continue.
The
setup program will now perform a readiness to check to see if your
server is capable of running the Edge Transport Server role. When
successfully completed click Install to continue.
The
Exchange binaries will now be copied to the local disk, the Management
Tools will be installed and the Edge Transport Server will be installed.
This can take quite some time to finish.
When finished you can continue configuring the Edge Transport Server using the Exchange Management Console.
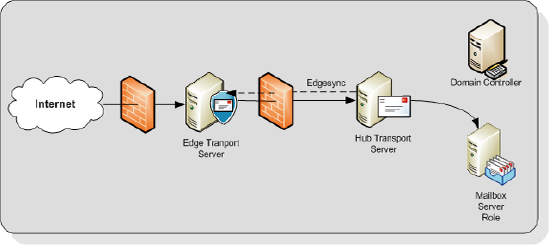
The Edge Transport Server is
now installed, but not yet configured. It is possible to configure
everything, like the Accepted Domains, Send Connectors, etc., manually
using the Exchange Management Console. An easier way is to use a
synchronization process which synchronizes information from the Hub
Transport Server within the company's Active Directory and Exchange
organization to the Edge Transport Server in the DMZ. This process is
called the Edge Transport Synchronization, or Edgesync.
3 Configuring Edge Transport Synchronization
As I mentioned, the
Exchange Server 2010 Edge Transport Server is not part of the internal
Active Directory and Exchange organization, and is typically installed
in the network's DMZ. A mechanism obviously needs to be in place for
keeping the server up to date with information.
For example, for the
recipient filtering in the Edge Transport Server to take place, the
server needs to know which recipients exist in the internal Exchange
environment. The Edge Transport Server also
needs to have knowledge about the existing Hub Transport Server in the
internal Exchange organization, where the Edge Transport Server has to
deliver its SMTP messages to.
This information is
pushed from an internal Hub Transport Server to the Edge Transport
Server by a process called Edgesync. Please note that for a successful
synchronization from the Hub Transport Server to the Edge Transport
Server, you have to open port 50636 on the internal firewall. This port
has to be opened from the internal network to the DMZ and not vice versa.

To setup an Edge
Synchronization, a special XML file has to be created on the Edge
Transport Server. This XML file has to be imported to a Hub Transport
Server on the internal network creating a relationship between the Edge
Transport Server and the respective Hub Transport Server. Once that
relationship is created, the Edgesync service can be started. To setup
the Edgesync service, please follow these steps:
Log on to the Edge Transport Server using an administrator account and open an Exchange Management Shell.
Enter the following command:

Copy the <<filename.xml>> to a directory on the Hub Transport Server.
Log on to the Hub Transport Server using an administrator account and open an Exchange Management Shell command prompt.
Enter the following command:

When successfully finished on the Exchange Management Shell command prompt, enter the following command:

The Edge Synchronization process should now successfully start.
On
the Edge Transport Server, open the Exchange Management Shell and check
if the settings are identical to the settings on the Hub Transport
Server.
When
making changes to the internal Exchange organization, these changes
will automatically replicate to the Edge Transport Server in the DMZ.