The AllTagsHtmlPlaceholderControl Class
Begin by adding a class file named AllTagsHtmlPlaceholderControl.cs to the UsefulPlaceholderControls project. Add the required namespaces above the namespace declaration:
using System;
using Microsoft.ContentManagement.Publishing;
using Microsoft.ContentManagement.Publishing.Extensions.Placeholders;
using Microsoft.ContentManagement.WebControls.Design;
using Microsoft.ContentManagement.WebControls;

namespace UsefulPlaceholderControls
{
  . . . code continues . . .
}
As we are simply modifying the way the HtmlPlaceholderControl behaves, the control will inherit from the HtmlPlaceholderControl class and support only HtmlPlaceholderDefinitions:
[SupportedPlaceholderDefinitionType(typeof(HtmlPlaceholderDefinition))]
						public class AllTagsHtmlPlaceholderControl : HtmlPlaceholderControl
{
  public AllTagsHtmlPlaceholderControl()
  {
  }
}
We don’t need to do anything in the constructor, so leave it empty.
Saving All Kinds of Tags
The trick behind getting the placeholder to accept all kinds of tags is to not save them as tags in the first place.
Tags are defined by an opening less-than sign (<), the element’s name, followed by a closing greater-than sign (>). For example, the tag that describes the start of a script block is <script>.
To fool the placeholder into accepting every tag, regardless of whether it’s a simple bold tag <b> or a script tag <script>, we will replace all less-than (<) and greater-than (>) characters with the strings “~LT~” and “~GT~” respectively. As a result, what gets saved to the placeholder is just funny looking text like this:
~LT~script~GT~
function Greet()
{
    alert(document.all.MyTextBox.value);
}
~LT~/script~GT~
The converted text does not contain any
restricted tags. It is saved to the placeholder without any problems.
Interestingly, the popular Telerik r.a.d. editor uses the same technique
to allow special tags.
Since the conversion process is done when the posting is saved, we will modify the SavePlaceholderContent() method. Add the overridden SavePlaceholderContent() method directly below the constructor. Within the save, we will call a method named Escape() (defined right after this) that converts all tags to text.
protected override void SavePlaceholderContent(PlaceholderControlSaveEventArgs e)
{
  EnsureChildControls();
  ((HtmlPlaceholder)(this.BoundPlaceholder)).Html = Escape(this.Html);
}
Escaping Tags
The Escape() method simply replaces all less-than (<) characters with ~LT~ and all greater-than characters (>) with ~GT~.
It is probably worth noting that only HTML markup tags will contain the < and >
characters. If an author enters these characters as part of the main
text within the placeholder, MCMS encodes the less-than character to < and the greater-than character to >. Therefore we don’t have to worry about the Escape() routine messing up content entered by the author.
private string Escape(string input)
{
  return input.Replace("<","~LT~").Replace(">","~GT~");
}
UnEscaping Tags
The act of reverting the ~LT~ and ~GT~ characters back to the < and > characters is done by the UnEscape() method. Add it directly below the Escape() method.
private string UnEscape(string input)
{
  return input.Replace("~LT~","<").Replace("~GT~",">");
}
Loading Content for Authoring and Presentation
To display the content, all we need to do is unescape the ~LT~ and ~GT~ strings back to the < and > characters respectively.
The
first place where content is displayed is in authoring view when
authors update the placeholder’s content. We only need to convert the
text when the placeholder is being edited, or when the Web Author is in
the AuthoringReedit mode. The UnEscape() method defined earlier does the conversion. Add the overridden LoadPlaceholderContentForAuthoring() method shown below:
protected override void LoadPlaceholderContentForAuthoring(
                                              PlaceholderControlEventArgs e)
{
  EnsureChildControls();
  if (WebAuthorContext.Current.Mode == WebAuthorContextMode.AuthoringReedit)
  {
    base.Html = UnEscape(((HtmlPlaceholder)(base.BoundPlaceholder)).Html);
  }
  else
  {
    base.LoadPlaceholderContentForAuthoring(e);
  }
}
Uploaded content is, needless to say, also shown
in presentation view. Regardless of whether or not the content is
displayed when viewing the posting for preview or published modes, the ~LT~ and ~GT~ strings must be converted back to < and > characters respectively. We will do the conversion in the overridden LoadPlaceholderContentForPresentation() method. Append the method to the code:
protected override void LoadPlaceholderContentForPresentation(
                                              PlaceholderControlEventArgs e)
{
  EnsureChildControls();
  base.Html = UnEscape(((HtmlPlaceholder)(base.BoundPlaceholder)).Html);
}
The control is complete. Save and build the solution.
Using the AllTagsHtmlPlaceholderControl
To use the AllTagsHtmlPlaceholderControl, copy the UsefulPlaceholderControl.dll library file to the bin
directory or add it as a reference to the project. After adding the
control to the Toolbox, drag and drop it onto template files as you
would with regular placeholder controls. Set the PlaceholderToBind property of the control to an existing HtmlPlaceholderDefinition.
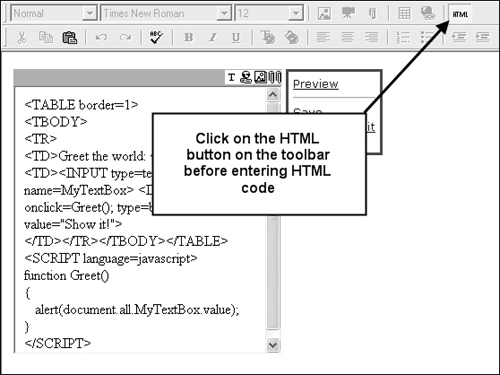
In addition, if authors are planning to save restricted tags like <script> blocks and <input> elements, you will need to set the AllowHtmlSourceEditing property of the control to true. The WYSIWYG editor does not allow authors to copy and paste the restricted tags in Design view. They will have to click on the HTML button on the authoring toolbar before pasting the HTML code into the control.
