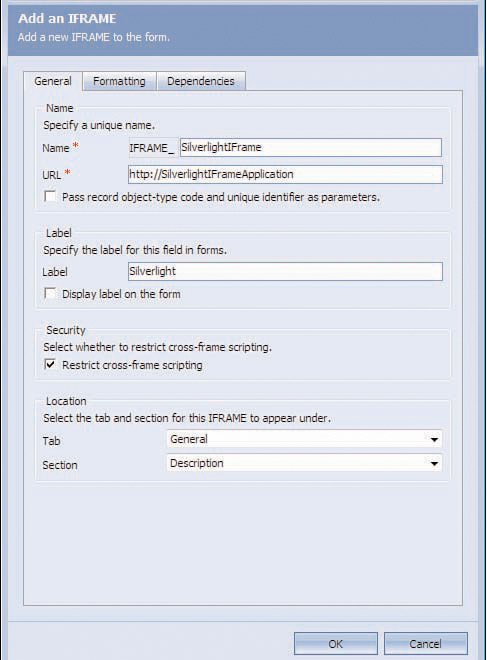
Deploying Silverlight Using IFrames
The most common way to
integrate the Silverlight application is by using IFrames, which are
located either in the main screen of the CRM (possibly used as
dashboards) or inside the entity (such as an account summary, a rich
note entity, and many others). To set up this feature in Microsoft
Dynamics CRM, follow these steps:
1. | Open Microsoft Dynamics CRM.
|
2. | Click Customizations on the navigation menu on the left.
|
3. | Click Customize Entities.
|
4. | Open the Accounts entity.
|
5. | Click Forms and Views.
|
6. | Open the form.
|
7. | Click Add a Tab from the Common Tasks list located on the right side.
|
8. | Give it a name (for example, Silverlight Account Dashboard), and then click OK.
|
9. | Navigate to the new tab created.
|
10. | Click Add a Section and give it a friendly name (for example SilverlightSection). Then click OK.
|
11. | Select the newly created IFrame.
|
12. | Click Add an IFrame with the following properties:
Name: SilverlightIFrame
URL: http://<<siteURL>>
|
13. | Check the Pass Record Object-Type Code and Unique Identifier as Parameters check box.
|
14. | Click OK.
|
15. | Click Save and Close to save the form modifications.
|
16. | Click Save and Close to save the entity modifications.
|
17. | Click the Accounts entity, and then select Publish, to deploy the changes (see Figure 1).

|
Notes Entity
The
built-in notes entity for Microsoft Dynamics CRM stores only the raw
text with a date and timestamp. In addition, the notes entity is
difficult to search, and you can’t copy and paste more than one note at a
time. Silverlight can add a multimedia mask on top of the notes entity,
which can potentially unlock other features, such as searching, copying
and pasting, rich text formatting, inserting images, and much more.
Silverlight can also provide a user-friendly interface for end users to
view the notes and organize them graphically (see Figure 2).

In any Silverlight application, there are two necessary components:
Then you build the Silverlight XAML file to add the snazzy user interface.
Building a WCF web service is like building a standard web service. All you need to do is declare a public function called GetNotesAsync. The GetNotesAsync function is responsible for accessing the related notes based on the AccountID of the current object. Add the following piece of code inside that function:
CrmSdk.CrmAuthenticationToken authToken = new CrmAuthenticationToken();
authToken.OrganizationName = "MicrosoftCRM";


CrmSdk.CrmService crmService = new CrmSdk.CrmService();
crmService.Credentials = System.Net.CredentialCache.DefaultCredentials;
crmService.CrmAuthenticationTokenValue = authToken;


QueryExpressionHelper qeHelper = new QueryExpression-Helper(EntityName.annotation.ToString());
qeHelper.Columns.AddColumn("subject");
qeHelper.Criteria.Conditions.AddCondition("objectid", ConditionOperator.Like, Request.QueryString["ObjectId"]);


BusinessEntityCollection annotationRetrieved = service.RetrieveMultiple(qeHelper.Query);


foreach (annotation annotationItem in annotationRetrieved.BusinessEntities)
     writer.Write(annotationItem.nptetext + "<BR>");
Add the following lines in page.xaml:
<UserControl x:Class="CRMSL2B2.Page"
    xmlns="http://schemas.microsoft.com/winfx/2006/xaml/presentation"
    xmlns:x="http://schemas.microsoft.com/winfx/2006/xaml"
    Width="800" Height="600">
   <StackPanel x:Name="LayoutRoot" Background="White">
        <Button Width="240" Height="25" x:Name="btnGetNotes"
Click="btnGetNotes_Click" >
            <TextBlock>List Notes</TextBlock>
        </Button>
       <ListBox Height="500" Width="500" x:Name="dlNotes"/>
    </StackPanel >
</UserControl>
The “code behind” for button will look like this:
System.Windows.Browser.HtmlPage.Window.Alert("Loading...");


BasicHttpBinding bind = new BasicHttpBinding();
EndpointAddress endpoint = new EndpointAddress("http://<server>/CRMData/CRMWCF.svc");
DSvc.CRMWCFDataServiceClient client = new DSvc.CRMWCFClient(bind, endpoint);
client.getNotesCompleted += new EventHandler<CRMSL2B2.WDS.ListAccountsCompletedEventArgs>(client_getNotesCompleted);
client.GetNotesAsync();
Note
It is recommended to
add an additional web service layer for security and reliability
reasons. Also, it is recommended to build applications loosely coupled
and highly cohesive.
After the code has been compiled and deployed, you can integrate that into the CRM using IFrames.