1. Adding User Accounts in Bulk
User accounts can be added to Lync
Online/Office 365 using a comma-separated values (CSV) file. The CSV
file must be specifically formatted with the correct column headings to
be successfully imported. To facilitate this process, Microsoft
provides a sample CSV file with the appropriate column headings that
can be downloaded from the Online Portal and then adjusted using a text
editor.
The following steps describe the process for
downloading the sample CSV file, editing the file, and then importing
it into Lync Online/Office 365:
1. Log on to the Office 365 Portal.
2. On the left side of the main page, click Users and Groups.
3. At the Users and Groups page, click on the Bulk add symbol, which is just to the right of the plus symbol above the user list.
4. At the Select a CSV file page, click on Download a sample CSV file.
5. At the File Download prompt, click Save and then choose a local subdirectory to save the file to.
6. Use Excel or a text editor such as Notepad to navigate to the location where the file was saved, and open the file named Import_User_Sample_en.csv.
7. Edit the file, replacing the sample entries with actual user accounts that will be imported into Lync Online.
8. When finished, save
the file, and return to the select a CSV file page in the Online
Portal. Click Browse, navigate to and select the import file, and then
click Next.
9. At the Verification
results screen, the results of the import process are displayed. If
there are errors, click on the View link to display the log file and
determine the cause of the errors. For example, in Figure 1 the log file reveals a spelling error in the
domain name of one of the user accounts, whereas the other accounts
were verified. At this point, it is possible to correct any errors in
the CSV file, click the Back button, and then reimport the file.

Figure 1. Log file from the bulk user import process.
10. After all user accounts have been verified, at the Verification results screen click Next.
11. At the Settings
screen, under Set sign-in status select either Allowed or Blocked to
set the initial status of the users when the accounts are created.
12. In the Set user location section, use the drop-down menu to select the user’s location, and then click Next.
13. At the Assign
licenses screen, select the check box for the Lync Online plan that the
user will be licensed for, along with any other Office 365 services and
plans that the organization has a subscription for.
14. At the Send
results in email page, keep the default selection of Send email if the
username and temporary password for the new account should be sent to
an administrator via email, and then enter up to five recipient email
addresses separated by semicolons. When finished, click Create.
15. At the
Results page, verify that the user accounts have been successfully
created, and make note of the temporary passwords automatically
generated. Click Close to complete the procedure.
2. Preparing Client Systems for Lync Online
The preparation of client systems for Lync
Online is largely a matter of installing the Lync client on each
system. However, there are several additional requirements for client
systems to be compatible with Office 365:
• The Microsoft Online Services Sign In
Assistant must be installed to enable Lync to authenticate to Microsoft
Online Services. Much like the Lync client, this software is provided
in the form of a Windows Installer file, and it can therefore be
installed using any of the standard deployment methods.
• Although not an absolute
requirement, it is highly recommended to run the Microsoft Office 365
Desktop Setup utility on each client system, because the tool
automatically detects and installs required updates and components.
3. Configuring Federation and Public IM
For each new instance of Lync Online,
federation with other organizations and with public IM providers is by
default disabled for the organization. The following steps are used to
enable federation and public IM:
1. Log on to the Office 365 Portal.
2. On the main page, click the Admin tab at the top, and then select Lync from the drop-down menu to open the Lync Admin Center.
3. On the left side, click Organization, and then click on the link for External communications at the top.
4. At the External
communications page, under External access, use the drop-down menu to
select the domain federation option that meets the organization’s
policy for communication with external organizations. If the
organization will manage a blacklist of SIP domains for which
communication is not allowed, select the option for On except for
blocked domains. If the organization will instead manage a whitelist of
SIP domains for which communication is allowed, select the option for
On only for allowed Domains.
5. To enable communication with public IM providers, click the check box under Public IM connectivity.
6. Depending on the
domain federation mode option chosen in the previous step, the SIP
domain list displayed under the Blocked or allowed domains section will
be used as either a whitelist or a blacklist. To add a SIP domain to
the list, click the plus symbol that appears above the list.
7. At the Add a domain
box, enter the name of the domain that will be allowed or blocked in
the Domain name field, and then click Add to save the setting. The
domain is then listed as an allowed or blocked domain, as shown in Figure 2.
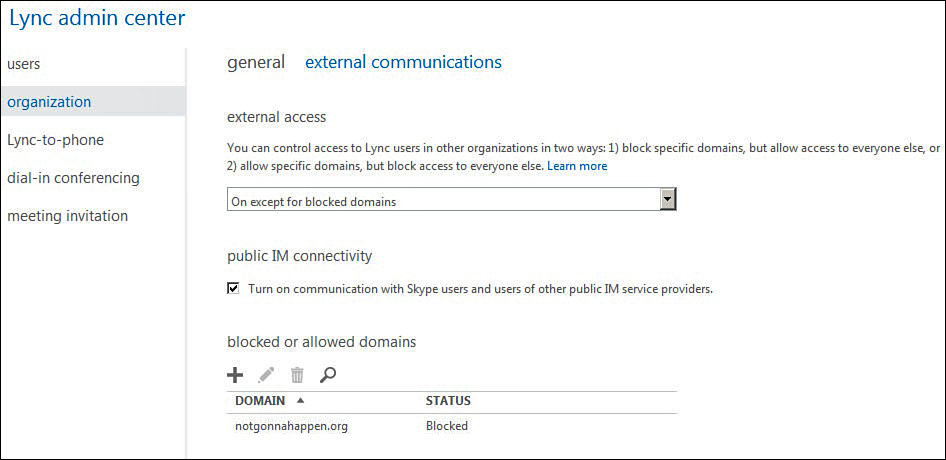
Figure 2. Federation and public IM settings in the online portal.
8. Repeat steps 6 and 7 to add any additional SIP domains that will be blocked or allowed as needed.
Tip
Turning on federation or public IM for a Lync
Online organization, along with the configuration of a SIP domain
whitelist or blacklist, can require up to a day to activate due to
replication requirements within the Microsoft data center
infrastructure. With that in mind, it is recommended to enable these
features and immediately configure the whitelist or blacklist at least
several days before the users need to begin communicating with external
organizations.
