4. External Data Search
The BCS comes with search
indexing connectors that enable SharePoint 2010 to index and provide
full-text searches of the external systems. In fact, SharePoint Server
search uses BCS search indexing connectors to index Exchange public
folders, Lotus Notes, and Documentuum, among others. In SharePoint 2010,
the BCS search improvements include the indexing of BLOBs, so that
users can now search for attachments; it also now supports incremental
crawls and item level security. However, importing a BDC Model that
defines an ECT does not make the external data automatically available
within Search. The metadata must have defined an IDEnumerator method, which is used in conjunction with the SpecificFinder
method to return data from the data source. Then you must configure
Enterprise Search to search the business data. The following sections
explain how you configure Enterprise Search to search the business data,
a process that consists of three steps.
Optionally, create a search scope, customized search pages, custom search queries, or all three.
4.1. Adding a Content Source
To include the content
from a data source in the Enterprise Search, you must create content
sources. For each content source, you have the choice of creating a
content source for all the data defined in the BDC, for each LOB system,
or for a combination of LOB systems. To create a content source for
business data, complete the following steps.
Open a browser and go to the SharePoint Central Administration website.
Under Application Management, click Manage Service Applications.
On the Service Applications page, click the name of Search Service Application (SSA) that you want to index the external system.
On
the Search Administration page, under Crawling, click Content Sources
in the left navigation pane to display the Manage Content Sources page.
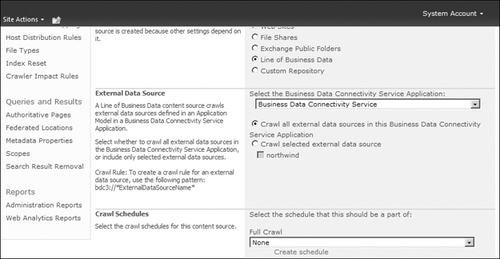
Click
New Content Source, type a name, and then in the Content Source Type
section, click Line Of Business Data. The Add Content Source page
refreshes and a drop-down list is populated with BCS applications and a
list of all external systems for the selected BCS application is
displayed, similar to the list shown in Figure 4.
You
can set the crawl schedules for the incremental and full crawls at
content source creation time or later. Incremental crawls are only
possible if a LastModifiedDate property is one of the return fields in a SpecificFinder method for an entity. Similarly, you can start a full crawl immediately.
Click OK, and then if you haven’t already done so, complete a full crawl.
Note:
SECURITY ALERT Ensure that the identity used to index the external system has the necessary permissions.
4.2. Mapping Crawled Properties
In SharePoint 2010, the
Enterprise Search feature is able to discover new properties, known as
“crawled properties.” To make a crawled property
available to a user, you need to make sure it is included in the search
index and mapped to a metadata property as detailed in the following
steps.
Wait
for a full crawl to complete on the new content source, and then on the
Search Administration page, under Queries and Results, click Metadata
Properties.
Click
Crawled Properties and then click Categories to display the Categories
page. If this is the first time you have crawled a business data content
source, the Number Of Properties column for the Business Data category
should not be zero if the crawl process was successful, your BDC Model
was correctly defined, and the search index identity had the correct
permissions.
Click the Business Data link in the Category Name column to display the Crawled Properties – Business Data page.
For each ECT that has an IDEnumerator method, there will be at least one property name for each TypeDescriptor defined in the SpecificFinder
method. Any property that has a Yes in the Mapped To Content column is
already included in the search index. The default configuration, which
you can amend, is to include only text properties in the search index.
To
include a property in the search index—for example, one of the non-text
properties—click the property name in the Property Name column. In the
Mappings To Managed Properties section of the Edit Crawled Property
page, select the Include Values For This Property In The Search Index
option and then click OK.
To map a crawled property,
you can choose an existing managed property or create a new one. It is
likely you will choose to create a new managed property as follows.
In
the left navigation pane, click Metadata Properties, and then on the
Metadata Property Mappings page, click New Managed Property. The New
Managed Property Web page is displayed.
In the Name And Type section, enter a name in the Property Name text box and select a type of information for the property.
In the Mappings To Crawled Properties section, click Add Mapping. The Crawled Property Selection dialog is displayed.
In
the Select A Category drop-down list, select Business Data. This dialog
box will show only properties that are of the specified type and
included in the index. If the number of properties available is greater
than the dialog box can display, you will see a yellow arrow icon, which
you can use to scroll through the properties, or alternatively, you can
use the Find feature.
Select the required property and then click OK. The dialog box closes, and the crawled property appears in the text box.
Select the Allow This Property To Be Used In Scopes option to make the property available for use in defining search scopes.
Click OK, and repeat this procedure for each crawled property you need to map to a metadata property.
In
the left navigation pane, click Content Sources. For the appropriate
content source you created, select Start Full Crawl from the drop-down
list.
After you have completed steps 1 and 2, you should be able to find data from the external data sources. The search results page provides links to the entity’s profile page.
4.3. Customizing the End-User Experience
If you want users to limit
the search for keywords to a specific business data source, you can
create a search scope with a rule that specifies the content source you
created. You could also create a new tab in the Search Center to display
the search results associated with this content source.
5. External Data and User Profiles
By default, SharePoint 2010 can import a list of domain users from the Active Directory Domain Services (AD DS), a Lightweight Directory Access Protocol (LDAP) server, IBM Tivoli Directory Server (ITDS), Novell eDirectory, Sun
Java System Directory Server, or external systems. To add a user
profile import based on the data from external systems, complete the
following process.
The use of the data from external systems with user profiles is a two-step process.
Import data from the external system into the profile database using the ECT defined in the BDC Model.
Map the profile properties to the external data.
To import data from an external system into the profile database, follow these steps.
Open a browser and go to the SharePoint Central Administration website.
Under Application Management, click Manage Service Applications.
On
the Service Applications page, click the name of the User Profile
service application where you want to import the external system data.
Under
Synchronization on the Modify Profile Service page, click Configure
Synchronization Connections to display the Synchronization Connections
page and then click Create New Connection.
On
the Add New Synchronization Connection page, enter a name for the
connection and select Business Data Connectivity from the Type drop-down
list. The page refreshes and you will see ECT Select and Check icons in
the Connections Settings section, as shown in Figure 5.
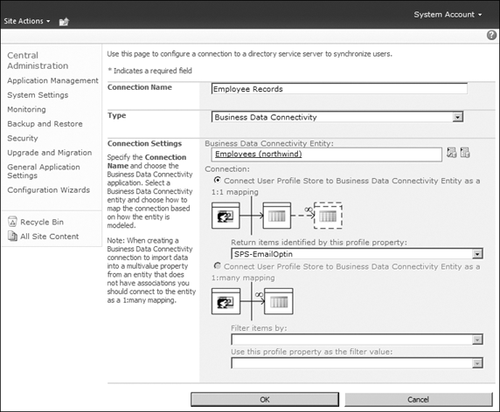
Click the Select icon to display the External Content Type Picker dialog box (as shown in Figure 18-22). Choose the appropriate external data source and click OK to close the dialog box.
Choose either the 1:1 mapping or 1:many mapping connection type.
Use the
mapping connection type to map external data source information
specific to one user, such as when a SAP system contains a user’s
personal details. If your data source returns one row of personal data
per user, then use the 1:1 mapping connection. In this situation, you
would select the user profile property, such as the AccountName from the
Return Items Identified By This Profile Property drop-down list. In the
metadata, this information has to map to an Identifier property for the
external content type, with a matching SpecificFinder
method. Both the user profile property and the identity type must
match—for example, they both must be text; one cannot be defined as an
integer and the other as a text string. If your data source contains
more than one row per user, then use the 1:many mapping connection. From
the Filter Items By drop-down list, select the property in the entity
that identifies the rows in the data source for a user, and then in the
second drop-down list, which is labeled Use This Profile Property As The
Filter Value, select the profile property whose value can be used as
the filter value.
