You’ve seen how we can package our customizations using features and
solutions. By using these methods, we can activate and deactivate
particular features to achieve our desired level of functionality. This
process works well if we’re adding functionality to an existing site,
but what happens if we want to create a new site that uses functionality
that’s encapsulated in a number of features? As we did in an earlier
example, we could start out with a blank site and enable the appropriate
features. However, SharePoint provides a better way to achieve this
result. We can create a custom site definition.
To understand how a custom site definition fits into
the overall picture, select New Site from the Site Actions menu on any
SharePoint site. Each of the items listed in the Create dialog is an
example of a site definition. Basically, a site definition is a template
that can be used to create new sites. By creating a custom site
definition, we can specify how a new site is provisioned, including
which features should be activated and which lists and libraries should
be created by default.
Note
Regarding site definitions versus site templates,
from SharePoint Designer, we can save a site as a site template. When
using this function, we’re actually creating a WSP package that contains
a list of customizations to whatever site definition the site was
created from. This type of site template can then be applied to other
sites that are derived from the same site definition. This functionality
differs from that of creating a custom site definition because site
definitions can be used only when creating new sites.
Confusingly, site definitions as stored on each
front-end server in the %SPROOT%TEMPLATE\SiteTemplates folder. In a
similar manner to features, each site definition has its own folder. The
site definition configuration is stored in a file named onet.xml within
the XML folder.
Site definitions have been part of SharePoint since
day 1, whereas the feature framework was introduced in Windows
SharePoint Services 3.0 to provide a higher degree of flexibility. As a
result of this, site definitions come with some serious baggage and can
be pretty complex. The recommended approach with SharePoint 2010 is to
factor as much configuration into features as possible. This helps to
keep site definition files maintainable while still allowing a high
degree of flexibility.
Tip
When creating site definitions, bear in mind that
future service packs for SharePoint may overwrite out-of-the-box files.
Always create a separate folder for any customized site definitions. As
you’ll see when using Visual Studio, this approach is adopted
automatically.
Creating Site Definitions Using Visual Studio
Let’s look at how we can create a new site definition using Visual Studio.
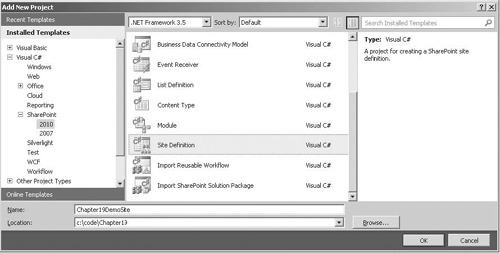
Choose File | Add | New Project.
In the Add New Project dialog, select Site Definition and name the new project Example19DemoSite, as shown:
A new project is added containing the following files:
onet.xml
Contains the site definition markup. Each onet.xml file can contain more
than one configuration, where a configuration is for all intents and
purposes a site definition.
webtemp-Example19DemoSite.xml
The SharePoint platform builds a list of available templates by
examining the %SPRoot%Template\1033\xml\ folder for XML files with names
beginning with webtemp. These files act as a table of contents for the site definitions that are stored in each onet.xml file.
default.aspx
As you’ll see when we look at the onet.xml file, the default.aspx file
is deployed to the root of a new site that’s created using our custom
site definition. Without this file, there would be no home page for the
site.
If we examine the onet.xml file that’s been added to our project automatically, we’ll find the following XML:
     <Project Title="Example19DemoSite" Revision="2"
              ListDir="" xmlns:ows="Microsoft SharePoint"
              xmlns="http://schemas.microsoft.com/sharepoint/">
       <NavBars>
       </NavBars>
       <Configurations>
         <Configuration ID="0" Name="Example19DemoSite">
            <Lists/>
            <SiteFeatures>
            </SiteFeatures>
            <WebFeatures>
            </WebFeatures>
            <Modules>
            <Module Name="DefaultBlank" />
         </Modules>
      </Configuration>
    </Configurations>
    <Modules>
      <Module Name="DefaultBlank" Url="" Path="">
        <File Url="default.aspx">
        </File>
      </Module>
    </Modules>
</Project>
Configurations
The most important element in the onet.xml file is
the Configuration element. Each file can contain more than one
Configuration element, and each element must have a unique ID. The
Configuration element effectively defines a distinct site definition.
Our file has a single site definition named Example19DemoSite, which
refers to a module named DefaultBlank.
Modules
Our onet.xml file also contains a Modules section
that is outside the Configurations section. These modules can be shared
between all configurations in the file. Modules are used to provision
files to a SharePoint site and can also be added as feature elements by
adding a Module item to a project. In our sample, the default.aspx file
is being provisioned to the root of the new site.
Site Features/Web Features
As mentioned, with SharePoint 2010, the recommended
approach to creating site definitions is to use features as much as
possible. We can specify which features are automatically activated when
a site is created by adding Feature nodes to the SiteFeatures and
WebFeatures elements. These elements represent features that should be
activated at the Site collection level and features that should be
activated at the site level.
Add the following XML to the WebFeatures node:
<WebFeatures>
  <!--Example19_Feature2-->
  <Feature ID="69d95a17-8c35-4bbb-9a79-4154fc55be6a" />
  <!--Example19_Feature1-->
  <Feature ID="5fcd733e-2cc9-4363-85fd-dfe7893cb195" />
</WebFeatures>
Features are referenced using their unique
identifier. To find the identifier for a particular feature, you can use
a few techniques. If the feature is a custom feature, the identifier
can be found in the Feature ID property that can be seen in the
Properties pane in the Feature Designer. If the feature is an
out-of-the-box or third-party feature that’s already installed on a
server, the following PowerShell command can provide a list:
get-spfeature|select DisplayName,Id
Our site definition will now automatically activate
our two features when a new site is created. Deploy the solution by
choosing Build | Deploy in Visual Studio.
After the deployment process has completed, navigate
to the sample site that we created earlier, and then select New Site
from the Site Actions menu. In the Create dialog, select Example19DemoSite from the SharePoint Customizations category. Name the
new site Demo and then click Create. A new site will be created, as
shown, that contains the lists defined by our features:

