Using Dial-Up Networking
Remote access
typically occurs through either a dial-up or a VPN connection. In this
lesson, the steps necessary to configure remote access addressing and
authentication are presented in the context of dial-up networking. Figure 1 illustrates this type of scenario.
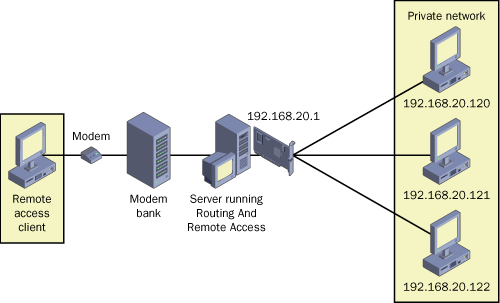
In
the scenario, the dial-up client is configured to connect through the
Point-to-Point Protocol (PPP) to a Windows Server 2003 computer running
Routing And Remote Access. This connection is typically established over
a public switched telephone network (PSTN) telephone line, but it can
also be established over an Integrated Services Digital Network (ISDN)
or X.25 network.
The remote access
server, also called the network access server (NAS), answers each
simultaneous call from dial-up clients by means of a separate modem. You
can install these modems in a modem bank, as shown in Figure 10-1, or you can install them in the remote access server itself.
Dial-up access requires
configuration both at the client and at the server. On the client side,
you must configure a dial-up connection to the remote access server
through the New Connection Wizard. To configure remote access on the
server side, you can use either the Routing And Remote Access Server
Setup Wizard or the server properties dialog box in the Routing And
Remote Access console.
Note
The
Routing And Remote Access Server Setup Wizard is available only when
Routing And Remote Access has not yet been configured on your server. To
open the Routing And Remote Access Server Setup Wizard, right-click the
server icon in the Routing And Remote Access console and then click
Configure And Enable Routing And Remote Access. |
Using Remote Access Client Addressing
Each remote computer
that connects to a remote access server is automatically provided with
an Internet Protocol (IP) address during the PPP connection
establishment process. The remote access server obtains the IP addresses
allocated to remote access clients either from an existing DHCP server
or from a static range of IP addresses.
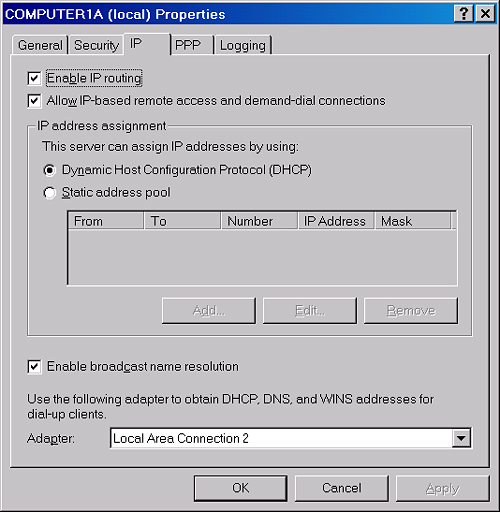
You control how IP
addresses are allocated in one of two places: the IP Address Assignment
page of the Routing And Remote Access Server Setup Wizard, as shown in Figure 2, or the IP Address Assignment area of the server’s IP properties in Routing And Remote Access, as shown in Figure 3.

DHCP
If
DHCP is already deployed on your network, you should configure the
remote access server to distribute addresses through the existing DHCP
server. If the DHCP server does not lie within broadcast range of the
remote access server, you must configure a DHCP relay agent on the
remote access server, or on the same network segment as the remote
access server.
When configured
to obtain addresses for distribution from a DHCP server, the remote
access server obtains a block of 10 addresses upon startup. The remote
access server then uses the first of these addresses for itself and
assigns subsequent addresses to TCP/ IP-based remote access clients as
they connect. When more than 10 IP addresses are needed at any given
time, the remote access server obtains more blocks of 10 addresses as
needed. If a DHCP server is not available when Routing And Remote Access
is started, the remote access client instead assigns itself an address
within the Automatic Private IP Addressing (APIPA) range from
169.254.0.1 through 169.254.255.254. This range normally does not allow
connectivity to the remote access network.
Tip
For
the exam, you need to be familiar with the way Routing And Remote
Access obtains and distributes IP addresses. Know also that remote
access malfunctions if Routing And Remote Access is unable to acquire 10
free leases from a DHCP server. A common sign of this malfunctioning is
the presence of an APIPA address on the remote access client. Finally,
remember that an APIPA address might also be a sign that you need to
configure a DHCP server or DHCP relay agent on the remote access
server’s network segment. |
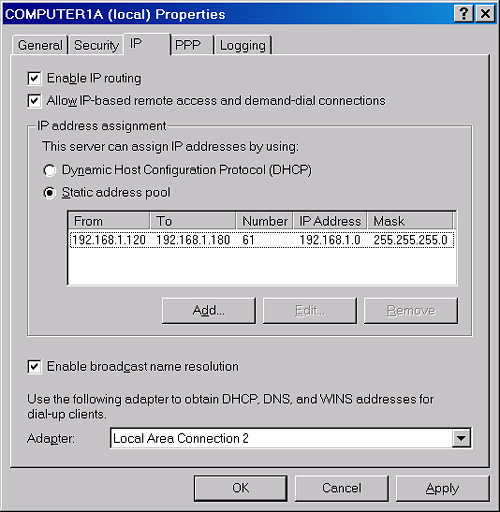
Static Address Pool
When no DHCP server has
been deployed on your network, you can configure the remote access
server to assign addresses through a static address pool, as shown in Figure 4.
Typically, the address pool is defined as a range that is logically
connected but non-overlapping with the range of addresses beyond the
remote access server. For example, if the internal address of the remote
access server is 192.168.1.1/24, you could safely define your address
pool as a section of the 192.168.1.0/24 range that does not include any
addresses assigned to computers on the internal network.
If
you define the static IP address pool as a distinct subnet (or set of
subnets) logically separate from the subnets to which the remote access
server is directly connected, you must configure the routers on your
network with information about the new subnet. This configuration is
identical to the configuration you would perform if you added a logical
subnet to the remote access server’s physical network segment.
Specifically, the routers on your network must forward packets destined
for the remote clients to the remote access server’s network segment.
