Logo
programming4us
programming4us
programming4us
programming4us
Home
programming4us
XP
programming4us
Windows Vista
programming4us
Windows 7
programming4us
Windows Azure
programming4us
Windows Server
programming4us
Windows Phone
 
Windows Vista

Specifying a Default Printer, Controlling Your Printing - Change the Default Printer, View the Queue, Stop the Presses

- Free product key for windows 10
- Free Product Key for Microsoft office 365
- Malwarebytes Premium 3.7.1 Serial Keys (LifeTime) 2019
7/28/2014 9:18:52 PM

1. Specifying a Default Printer

Some programs are set up to print only on the system’s default printer. Other programs are set up to print on the system default printer but allow you to target, or change to, a different printer. If several printers are available, you can designate any one of them as your default printer.

Change the Default Printer

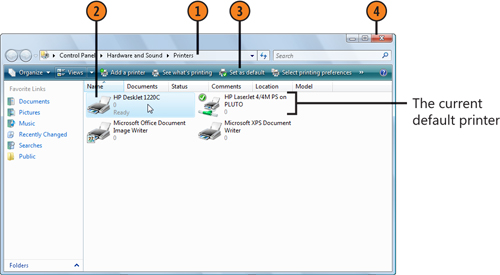
1. Click the Start button, type printer in the Search box, and choose the Printers folder.

2. Click the printer you want to use as the default printer to select it.

3. Click Set As Default.

4. Close the Printers folder when you’ve finished.
Caution

If you normally print documents using a printer that’s installed on your computer, make sure the device that’s designated as your default printer is not the Microsoft XPS Document Writer, or any other specialized printer. If one of these other devices is set as your default printer, documents that you want to print might seem to have disappeared.


Tip

If there’s a check mark next to the printer icon, the printer you’ve chosen is already designated as the default printer.


2. Controlling Your Printing

When you send your documents to be printed, each print job is queued, or lined up, in the order in which it’s received by the print server. You can see the progress of your print job in the queue and can temporarily suspend the printing of your document or remove it from the queue if you decide that you don’t want to print it. Note that after you’ve paused or canceled a print job, the printer might continue to print a page or two because those pages have already been stored in the printer.

View the Queue

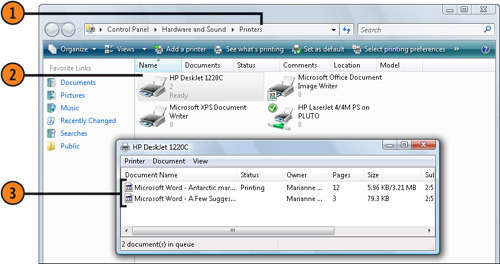
1. Click the Start button, type printer in the Search box, and choose the Printers folder.

2. Double-click the printer you’re using to open the print queue for that printer.

3. Note the names and details of the documents in the queue.
Stop the Presses

1. Right-click the name of your document.

2. Choose the action you want from the shortcut menu:

  • Pause to temporarily stop your document from printing

  • Resume to resume printing after the document printing has been paused (note that Resume appears on the menu only after you’ve chosen Pause)

  • Restart to restart printing the document from the beginning after the document printing has been paused

  • Cancel to delete the document from the print queue

Tip

To stop a printer from printing documents, regardless of whom they belong to, right-click the printer, point to Run As Administrator on the shortcut menu, choose Pause Printing from the submenu, and then confirm the action using an Administrator password.


Other -----------------
- Printing from a Program, Printing a Document - Print a Document Using the Default Printer, Print a Document Using a Specific Printer
- Understanding IPv6 (part 3) - Understanding Address Autoconfiguration, Understanding Name Resolution
- Understanding IPv6 (part 2) - Understanding ICMPv6 Messages, Understanding Neighbor Discovery
- Understanding IPv6 (part 1) - Understanding IPv6 Terminology , Understanding IPv6 Addressing
- How to Troubleshoot USB Problems : How to Identify USB Problems Using Performance Monitor, How to Examine USB Hubs
- How to Troubleshoot USB Problems : How to Solve USB Driver and Hardware Problems, Understanding USB Limitations
- How to Use System Restore, How to Troubleshoot Bluetooth Problems
- How to Troubleshoot Driver Problems (part 3) - How to Use the File Signature Verification, How to Use Device Manager to View and Change Resource Usage
- How to Troubleshoot Driver Problems (part 2) - How to Use the Driver Verifier
- How to Troubleshoot Driver Problems (part 1) - How to Find Updated Drivers, How to Roll Back Drivers
 
 
Top 10
- Microsoft Visio 2013 : Adding Structure to Your Diagrams - Finding containers and lists in Visio (part 2) - Wireframes,Legends
- Microsoft Visio 2013 : Adding Structure to Your Diagrams - Finding containers and lists in Visio (part 1) - Swimlanes
- Microsoft Visio 2013 : Adding Structure to Your Diagrams - Formatting and sizing lists
- Microsoft Visio 2013 : Adding Structure to Your Diagrams - Adding shapes to lists
- Microsoft Visio 2013 : Adding Structure to Your Diagrams - Sizing containers
- Microsoft Access 2010 : Control Properties and Why to Use Them (part 3) - The Other Properties of a Control
- Microsoft Access 2010 : Control Properties and Why to Use Them (part 2) - The Data Properties of a Control
- Microsoft Access 2010 : Control Properties and Why to Use Them (part 1) - The Format Properties of a Control
- Microsoft Access 2010 : Form Properties and Why Should You Use Them - Working with the Properties Window
- Microsoft Visio 2013 : Using the Organization Chart Wizard with new data
 
programming4us
Windows Vista
programming4us
Windows 7
programming4us
Windows Azure
programming4us
Windows Server