By now, you're starting to realize how many features
and functionalities the Windows Installer service can offer you. Here's a
more complete list of these features:
Restore the target system to its preinstallation state or rollback:
This is one of the nicest aspects of Windows Installer because it
tracks the state of a computer system before it begins a software
installation. If for some reason an installation fails, WIS returns the
system to the previous state, making sure that failed installations do
not destabilize systems. This is done through the creation of temporary
files during the installation. These files are only available during the
installation; once complete, you must use the uninstall command to
remove the application (/x).
Provide application resiliency:
This gives WIS the ability to check the health of an application and
repair or reinstall damaged pieces of the application. This requires
access to the original installation source (or a copy available at a
specified location) because the repair requires access to the original
installation files.
Clean uninstallations:
Because WIS tracks all of the components making up an application
during its installation, it can safely remove the application from a
system, even if the application shares components with other
applications on the same system. WIS also tracks which applications
share the components and keeps them if there are still applications that
require them on the system.
Control reboots during installation:
WIS gives you the ability to either call for or suppress reboots during
the installation of your software. For example, this feature lets you
install a required component, such as the Microsoft SQL Server Desktop
Engine (MSDE), reboot the computer if required, and continue with the
installation of your product.
Componentization
or separation of the components of an installation into discreet units
that are treated as whole components by the Windows Installer service.
Source list control:
Windows Installer lets you control the source locations for the
installation. Each time a package is updated, WIS updates the folder
from which it is updated and adds it to the source list if it isn't
already there. The next time it needs to repair an installation, it will
look to this folder for an installation source. For increased
resiliency, several source locations may be specified for any one MSI
package. Source list control is a very important part of WIS package
management.
Merge module inclusion:
You can include mini-packages into your own software installation. For
example, this is how you would include MSDE into your own package.
Command line options for installations: Because WIS uses a single command line tool for installations — the msiexec.exe
command — it allows you to use standard command line structures to
install products. In addition, the command line supports the
modification of MSI packages through transforms and/or patches, letting
you use one single interface for installation, patching, and
customization. The msiexec command
also includes several levels of logging, which make it quite practical
to use when you are having problems with an installation. Because WIS
installations are performed through the msiexec command, setup.exe
commands are no longer really needed, though they are often included in
applications to make the install more transparent to users. A WIS
installation that uses a setup.exe normally installs any required prerequisites in support of the installation and then simply calls msiexec with the proper switches.
Taking
the extensive command line support provided by Windows Installer even
further, you may also specify the value of any public properties right
at the command line: Public properties
act as variables that dictate the behavior of a Windows Installer Setup.
There are several common public properties that control everything from
how an application appears in the Add/Remove Programs applet to how a
required reboot should be handled. Further, authors may dictate their
own public properties to allow custom command line option support for
their Windows Installer setups.
Group Policy control:
Windows includes a series of Group Policy settings both at the user and
at the system level for the control and operation of the Windows
Installer service.
Installation on demand:
Because this function lets you choose whether a software component is
installed during the software installation, it speeds up installations.
With Installation on Demand, the feature or function that was not
installed originally can be installed when it is first used by the user.
This is another reason why original installation sources must be
maintained on the network. Be careful with this feature because many
users find it extremely annoying to see the Windows Installer service
launch when they are in the middle of using a product simply because the
feature wasn't installed originally.
Application advertisements:
This function is much like the Installation on Demand function, but
performs even faster because all it does is place the shortcut to the
application on the user's desktop. The application isn't actually
installed until either the user clicks the shortcut to use it the first
time or the user tries to open a document associated with the
application.
Administrative installations:
This allows you to perform a single network installation, which would
then let users install the software without access to the original CD
version. WIS provides one single standard format for these
administrative installations.
1. Understanding the Windows Installer architecture
The Windows Installer
package is everything that is required to perform the installation of a
software product. The first part of the package is the .MSI file. This
file includes all of the instructions for the installation. Along with
the instruction file, you also have CAB files, which are compressed
files that contain the software parts to be installed. These software
parts do not necessarily need to be compressed into CAB files; they can
simply be stored in a folder structure that is distributed with the .MSI
file. In addition, the software parts could also be contained in CAB
files that are stored within the .MSI file. It all depends on your
preference based on the size of the bits that make up the software
product. For example, a small program, such as WinZip Computing's WinZip
compression tool, could be stored within a single .MSI file. On the
other hand, a very large program such as Microsoft Office 2007 will
contain an .MSI file, several .CAB files, and separate components as
well, because the bits making up this installation take up several
hundred megabytes.
Within the .MSI file is the
installation database — a relational database that the Windows
Installer service uses to perform the installation. The information in
this database is hierarchical in nature and includes the following:
Product:
This is the highest layer of the hierarchy. It usually identifies what
needs to be installed, for example Microsoft Office 2007. The product is
identified by WIS through its product code, which is a globally unique
identifier (GUID).
Features:
A product is composed of features. Features are units of installation
that can be discretely selected during installation. For example, in
Microsoft Office 2007, Microsoft Word, Microsoft Excel, Microsoft
PowerPoint, and so on are all features, and users can select or deselect
them when installing Office. Features can also include subfeatures. For
example, in Microsoft Excel, the Help files are a subfeature. The same
applies to Excel Add-ins, Sample Files, and so on. Each item that can be
selected or deselected for installation is a feature or subfeature.
Features can be shared across applications. One good example is the
Spell Checker in Microsoft Office. It is shared between all Office
applications, but it is not automatically removed when a feature that
uses the shared feature is uninstalled. For example, if you want to
remove Excel from a system, but keep Word, Windows Installer would not
automatically remove the Spell Checker. In fact, WIS will not remove a
shared component until it knows that no other installed product requires
it. That's because it tracks which product uses which shared features.
Components:
Features are made up of components. A component is a collection of
files, registry keys, shortcuts, and other types of resources (for
example, an icon image) that make a feature work on a computer. As far
as Windows Installer is concerned, components are single units that are
identified with special GUIDs called the component code
within the installation database. Because they are considered as
single, cohesive units, components do not share files or any other
object. If two components on the same computer include the same file,
both will maintain a copy of that file on the system. Treating
application objects as components helps speed up the operation of
Windows Installer because it limits the number of items WIS needs to
keep track of. Components can be shared between applications, but if two
applications need to rely on the same component, both must include it
in its installation. When the second product is installed, Windows
Installer realizes that the component is already on the system and does
not re-install it.
Instead,
it adds a special counter called a refcount to the database to identify
how many products use the component. The refcount ensures that the
component is not removed until all the products that need it are removed
from the system. Of course, because the identification of a component
is based on its GUID, two applications sharing the same component must
be sure to make use of the same GUID to have the component properly
managed. A good example of how a component should be structured is
related to all elements that a product will want to store in the
HKEY_CURRENT_USER registry key. All of these elements should be
contained within the same component because this way, when a new user
tries to access the product, the resiliency features of WIS will
automatically identify that these elements are missing from the user's
profile and add them as a single group.
Key paths:
Key paths are associated with components. Each component has a key path
that the Windows Installer service associates with the component. Key
paths identify whether or not a component is fully installed. This is
through a special file or setting included in the key path. Windows
Installer uses the key path to determine the health of each component
within a product. If a key path is missing or incomplete, WIS can trace
it back to the feature it belongs to and reinstall the entire feature or
subfeature. This engine provides self-healing for WIS installations.
The time it takes to repair an application depends on the number and
size of the components within a given feature.
While some people
who author Windows Installer setups choose to create one feature per
component, it is not necessary to do so since a feature can be made up
of multiple components. In addition, the same component can be used by
multiple features. To ensure that self-repairs are not overly lengthy in
time, authors have to balance the number of components they include in
each feature with the number of features or subfeatures they include in
their products. For example, if all components were stored in one
feature, any self-repair operation would result in a reinstallation of
the entire application.
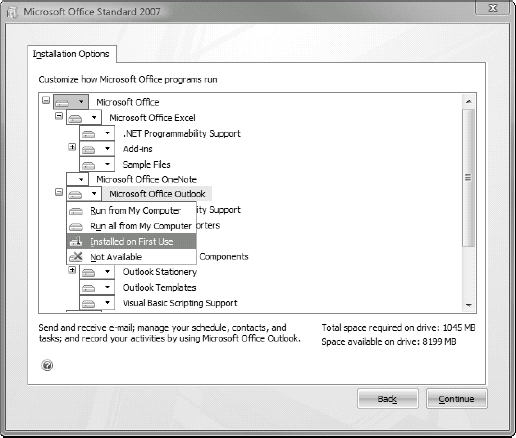
Figure 1
illustrates the installation dialog box for Microsoft Office 2007. As
you can see, Office 2007 is made up of multiple features and
subfeatures. Users can discretely select each feature and subfeature
during an interactive installation. In addition, they can determine how
the feature or subfeature will be installed.
As shown in Figure 2, four choices are available for how you may choose to install each feature or subfeature:
Run from My Computer: This option installs the feature, but not all of its subfeatures.
Run All from My Computer: This option installs the feature and all of its subfeatures.
Installed on First Use: This option installs the feature only if you choose to use it while working with the product.
Not Available: This option does not install the feature.

Run all from My Computer
is often the best option to select because you are guaranteed that
whatever you may need from this feature and its subfeatures is available
to you whenever you need it. Installed on First Use is sometimes used
in networks, but does result in annoying pop-ups of the Windows
Installer dialog box while users are attempting to work with the
software. When local drive space is an issue, this capability may make
sense but is generally not a good idea. In addition, this option
requires constant access to the installation source files. This is not
very useful for mobile users who may not be connected to the network
when they need the feature. For this feature to work for them, you would
need to store the setup files locally (which defeats the purpose of
saving drive space). While choosing Run All from My Computer may install
unnecessary features and components, by far the option gives the most
pleasant experience to the user. For this reason, it is often the best
feature to use. If you decide you prefer not to use this option, make
sure that whatever is not installed is set to Not Available. This
ensures that no installations need to take place while users are working
with a product.
Reviewing the Windows Installer database structure
As mentioned previously,
Windows Installer installations are based on the .MSI file that is
included with the product setup. This file is nothing more than a set of
installation instructions that are organized in tables within a
relational database. Each table is defined by the Windows Installer
Software Development Kit (SDK). This SDK includes Orca, an MSI database
editor that has limited functionality. In an organization that invests
in an Enterprise Software Packaging strategy, you will require much more
comprehensive tools to view, edit, and create MSI installation
databases.
The tables found in the
MSI database contain a series of information types within rows and
columns. For example, one commonly used table is the Launch Conditions
table. This table sets out the conditions under which an installation
may or may not be executed. A good example of this is when you create a
package for a product that is designed to run on workstations and not on
servers. In this case, you would put in a launch condition that
verifies the operating system onto which the package is being installed,
and if the OS query returned Windows Server 2008, 2003, or 2000, you
would display a message stating that this is an unsupported OS and abort
the installation process.
The tables that make up
the body of an MSI database are the sequence tables. Sequence tables
tell Windows Installer what to do during an installation and in which
order it should be done. A common sequence of events is the verification
of the Launch Conditions, and then if they are met, the copying of
installation files, the modification of the registry, and the removal of
temporary files, such as those used for rollback.
There are three types of
sequence tables, each tied to a specific Windows Installer service
feature. The first is the Admin table type. Admin tables are used for
administrative installations or installation of a product into a network
share to create a remote installation point for the product. The second
type of sequence table is the Advertisement. This table type is used to
advertise products and features. Advertised features and products are
not actually installed until the user activates it by trying to use it.
The final type is Installation and is the most commonly used sequence
table because it controls how a product is installed. The Installation
type can be used for either interactive or silent, background
installations.
Along with each
sequence table type, you have two associated subtables:
InstallUISequence and InstallExecuteSequence. The first,
InstallUISequence, is used for interactive installations and includes
all of the dialog boxes that are displayed to the user during the
interactive installation. The second, InstallExecuteSequence, lists the
actual steps to perform during the installation. The
InstallExecuteSequence table includes a column called Actions, which
includes a set of predefined actions that the Windows Installer service
can perform. Some of these actions include:
Check for execution requirements (Launch Conditions)
Search for previous versions of the product in order to upgrade it
Create folders
Create shortcuts
Install or delete files
Install or remove registry keys
Move or copy existing files to new locations
Install, remove, start, or stop Windows services
Install or uninstall Common Language Runtime (CLR) assemblies within the .NET Framework
Install or remove ODBC drivers and data sources
Register COM classes or COM+ applications
Modify environment variables
NOTE
When
running a Windows Installer package silently, the InstallUISequence is
not used. Therefore, if you are customizing an MSI setup that you intend
to deploy in a silent, automated manner it is important to place such
customizations in the InstallExecuteSequence table.
Windows Installer supports custom actions,
or actions you define yourself. In support of custom actions, Windows
Installer can execute VBScript or JScript code, run commands from the
command line, or call functions that may have been defined in a special
dynamic link library (DLL) that you programmed. Custom actions are very
powerful and add almost any installation action to the Windows Installer
service.
Finally, another
table that is commonly edited by administrators within MSI packages is
the Property table. Properties can be used to define installation
variables. They work much like environment variables do in Windows
itself. For example, the Property table helps you ensure that an
installed product is available to only a single user or to all users of a
computer. This is done through the ALLUSERS property which will tell
WIS to either install product settings on a per user per machine basis.
Note that property names are case sensitive so allusers does not mean
the same thing to WIS as ALLUSERS (public properties are always named in
uppercase letters). Properties can be applied during installation in
one of two ways. The first is through the msiexec.exe command, but this command only works with public
properties. The second is through another special WIS file type called a
transform. Transforms can be used to manipulate any property; in fact,
transforms can be used to manipulate any of the tables in an MSI
package.
Another useful property
is ROOTDRIVE. By default, WIS installs products into the drive with the
freest space. If your workstation drives are split into more than one
disk partition, for example, C: for system files and D: for data, and
the D: drive has more free space than the C: drive does, WIS will
automatically install programs on the D: drive. Specifying this public
property with an explicit value (for example, ROOTDRIVE=C:\) will ensure
that your packages are always installed on the C: drive.
The few tables mentioned
here are not comprehensive lists of all the tables available within a
Windows Installer database. There are quite a few tables within this
database structure. For example, other tables include:
Application design
Feature
Component
Feature components
Directory
File copy
File
Media
Registry entry
Installation procedure
User interface
Desktop integration
Installation validation
You will not need to
understand all tables unless you choose to author an MSI setup without
the aid of an authoring or repackaging tool.
Getting familiar with Windows Installer file types
All of
the installation options are available programmatically as well. This is
where the different file formats for the Windows Installer service come
into play. You're already familiar with the MSI file extension. This is
the file that contains the installation database and can also contain
compressed CAB files, application settings, and other resources that
make up the package required to install the product. Windows Installer
also uses other file formats to perform special operations during
installation.
The second most prevalent Windows Installer file type is the MST or transform
file. The transform is a secondary file that is tied to the MSI
database during execution to modify the behavior of the installation.
One strong reason to make use of transform files is to adhere to the
highly recommended practice of never modifying an MSI file received from
a manufacturer. These files follow a specific structure and include
specific content that will be required when it is time to upgrade or
even simply remove a file from the system. If you modify the internal
contents of an original MSI, you may break its upgrade or removal
capability.
Therefore, when you
want to customize the installation behavior of any given MSI, you need
to transform it by adding all of your custom changes into an MST. When
you run the msiexec.exe command to
install the product, you use the TRANSFORM public property to apply the
transform during installation. This maintains the integrity of the
original MSI file while allowing you to customize the installation to
your own needs.
Transforms can include most any type of customization but the most common are these:
Identify which features of a product should be installed.
Determine if and how users interact with the installation. Most often, there is little or no user interaction.
Identify
which answers need to be provided to the setup during installation.
This includes items such as installation location and product activation
keys.
Identify
which shortcuts should be created and where they should be placed. Get
rid of special Internet offerings and other annoying bits from
manufacturers' products.
Include additional files, such as corporate document templates.
Identify which registry settings are to be modified and how.
As you can see, transforms are a useful way to modify the original MSI.
The next most common Windows Installer file type is the MSP or patch
file. Patches are updates to the product that do not affect the
ProductCode attribute within the MSI database. It may increment the
ProductVersion for the MSI. When the ProductVersion is modified, the
patch is usually large enough to be considered a service pack or, in WIS
terms, a major update. When it does not affect the ProductVersion, the
patch is considered a minor update.
NOTE
If you modify the
source code for a deployed product, you will need to update or refresh
the deployed installation. The reason is that the source files for a
deployed installation may reside on a network share in support of
self-healing. If you modify these source files without updating the
deployed installations, self-healing will no longer work, especially if
the ProductVersion attribute has been modified by the patch. To
reinstall the product on all deployed systems you should run the
following command:
msiexec /fvomus name_of_the_package.msi REINSTALL=ALL
The switches used in the above command include the following functions:
f — fix or repair an application
v — run from the source and re-cache the local package
o — if file is missing or an older version is installed
m — rewrite all computer specific registry entries
u — rewrite all user specific registry entries
s — overwrite all existing shortcuts
As of version 3.1, you could actually use only /fv since all other switches are now the default repair behavior.
When you run
an installation through the Windows Installer service, you actually
create an installation database on the target computer. This
installation database is then used to support long-term program
viability features. Applying patches for software products that are
integrated to the Windows Installer service means updating this
installation database and modifying key components, often-dynamic link
libraries (DLLs) of the program.
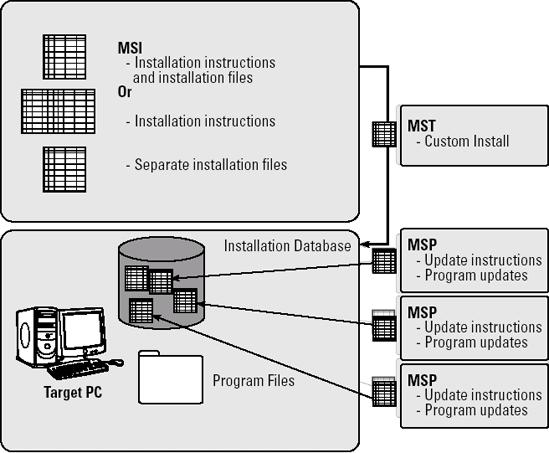
Although original MSI
files are often transformed through MST files to customize their
installation within corporate networks and adapt them to corporate
standards, the MST does not modify the original MSI. Patches, on the
other hand, modify the original installation database as well as key
program components (see Figure 3).
Therefore, when patches are made available, you need to apply them to
installed copies of the product to update the deployed installation
database as well as apply them to any administrative installation of the
software you may have performed. This will ensure that anyone
performing future installations or repair operations from this
administrative install point will install an updated version of the
product.
Yet another Windows Installer file type is the MSM or merge module.
The merge module is designed to allow you to include subproducts into
your installation. For example, several products require a database to
operate. To ensure that such a database is available, they will include a
copy of the freely distributable SQL Server 2005 Express Edition or the
Microsoft SQL Server Desktop Engine (MSDE).
These are the major
file types used with the Windows Installer service. For example, when
you just export the installer database out of an MSI file, you create an
IDT file (Installer Database Tables). During the preparation of
installer patches, manufacturers will work with PCP files. During the
creation and/or preparation of an MSI package, you may work with CUB or
package validation files.
Finally, when you
integrate a Windows Installer package with Group Policy to deploy it to a
user instead of a computer, Group Policy will create an AAS file that
is an advertisement script. This script is deployed to the user instead
of the actual MSI. The script supports the automatic installation of the
package after the user clicks on the product shortcut the script
creates or on a document that requires the product to open. The full
list of file extensions used with Windows Installer is in Table 1.
Table 1. File Types Associated with Windows Installer X
| File Extension | Purpose |
|---|
| MSI | Installation database and possible installation resources |
| MST | Installation transformation instructions |
| MSP | Patch information to be applied to original MSI |
| MSM | Merge module to be integrated into MSI |
| IDT | Exported Installer database file |
| PCP | Patch creation file used during patch preparation |
| CUB | MSI package validation file |
| AAS | Group Policy advertisement script |
| CAB | Compressed file containing installation resources for a product |
