Network places are useful, but they’re not as
convenient as they could be because you can’t reference them directly
(in, say, a script or command). UNC paths can be referenced directly,
but they’re a bit unwieldy to work with. To avoid these hassles, you can
map a shared network drive or folder to your own computer. Mapping assigns a drive letter to the resource so that it appears to be just another disk drive on your machine.
Note
Another good reason to map
a network folder to a local drive letter is to give certain programs
access to the network folder. Some older programs aren’t network-aware,
so if you try to save files to a network folder, the program might
display an error or tell you that the location is out of disk space.
In most cases, you can solve this problem by mapping the folder to a
drive letter, which fools the program into thinking it’s dealing with a
local folder.
To map a shared drive or folder, follow these steps:
1. | In
Windows Explorer or My Network Places, select Tools, Map Network Drive.
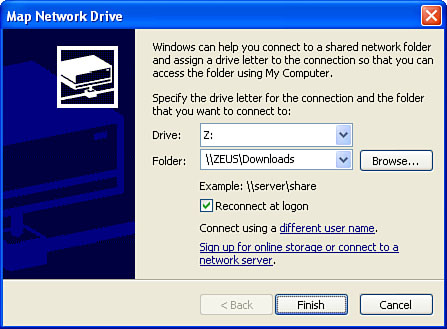
Windows XP displays the Map Network Drive dialog box, shown in Figure 1.

|
2. | The
Drive drop-down list displays the last available drive letter on your
system, but you can pull down the list and select any available letter.
Caution
If you use a removable
drive, such as a CompactFlash memory module, Windows XP assigns the
first available drive letter to that drive. This can cause problems if
you have a mapped network drive that uses a lower drive letter.
Therefore, it’s good practice to use higher drive letters (such as X, Y,
and Z) for your mapped resources.
|
3. | If you want Windows XP to map the resource each time you log on to the system, leave the Reconnect at Logon check box activated.
|
4. | If
you prefer to log on to the resource using a different account, click
the Different User Name link, type the username and password, and click
OK.
|
5. | Click Finish, Windows XP adds the new drive letter to your system and opens the shared resource in a new folder window.
|
Tip
For easier network
drive mapping, Windows XP enables you to add a Map Drive button to the
Windows Explorer toolbar. To do so, right-click the toolbar and then
click Customize. In the Available Toolbar Buttons list, double-click Map
Drive. Note that there’s also a Disconnect button that you can use to
easily disconnect mapped resources (as described in the next section).
You can also map a shared network folder to a local drive letter by using a Command Prompt session and the NET USE command. Here’s the basic syntax:
NET USE [drive] [share] [password] [/USER:user] [/PERSISTENT:[YES | NO]] | /DELETE]
| drive | The drive letter (following by a colon) of the local drive to which you want the shared folder mapped |
| share | The UNC path of the shared folder |
| password | The password required to connect to the shared folder |
| /USER:user | The username you want to use to connect to the shared folder |
| /PERSISTENT: | Add YES to reconnect the mapped network drive the next time you log on |
| /DELETE | Deletes the existing shared mapped to drive |
For example, the following command maps the shared folder \\ZEUS\Downloads to drive Z:
net use z: \\zeus\downloads \persistent:yes