A wireless gateway
is a type of wireless access point that connects to a broadband modem
to give all the computers on the network access to the Internet. This
section gives you general instructions for configuring a wireless
gateway.
Before beginning, make sure that your gateway is properly connected to your network:
1. | Turn off the gateway and the broadband modem.
|
2. | Run a network cable from the modem to the WAN port on the back of the gateway.
|
3. | Run another network cable from one of your computers to any LAN port on the back of the gateway.
|
4. | Turn on the gateway and modem.
|
Caution
Some
broadband providers are using “smart” modems that include routing and
firewall features. That’s fine, but these modems almost always have a
static IP address, and that address is usually either http://192.168.1.1
or http://192.168.0.1, which might conflict with your wireless
gateway’s IP address. If you have connection problems after you’ve added
the wireless gateway, an IP address conflict is the likely culprit.
Disconnect the broadband modem, access the gateway’s configuration
program, and change its IP address (to, say, http://192.168.1.2 or
http://192.168.0.2).
You’re now ready to
access the gateway’s configuration program using the computer that you
connected to the gateway in step 3. Here are the general steps to follow
(note that the exact procedure will vary depending on the manufacturer
of the gateway):
1. | On
the computer connected to the gateway, start Internet Explorer, type
the gateway address (usually either http://192.168.1.1 or
http://192.168.0.1) and press Enter.
|
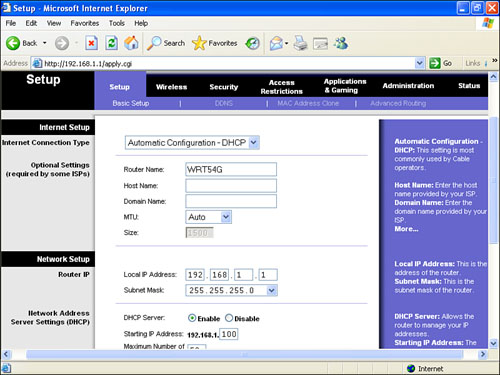
2. | If required, type the default username and password (supplied by the gateway manufacturer). The gateway’s setup page appears. Figure 1 shows a sample setup page.
|
3. | Specify the type of connection used by your ISP. There are three main types:
| Dynamic IP Address | Most ISPs use Dynamic Host Configuration ProtocolDHCP)
to assign IP addresses dynamically when you connect to their service.
If your ISP does this, configure the gateway to obtain the address
automatically. ( | | Static IP Address | If
your ISP provided you with a static IP address, configure the gateway
with that address. You must also enter the subnet mask, gateway address,
and one or more DNS addresses. Your ISP will have provided you with all
of this data. | | PPPoE | If your ISP requires a Point-to-Point Protocol over Ethernet (PPPoE) connection, type the username and password that your ISP provided to you. |
|
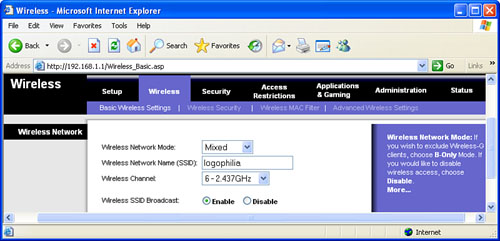
4. | Each wireless network has a public name—often called a Service Set Identifier (or SSID)—that
identifies the network to wireless devices. Your gateway comes with a
default name, but you should change the name to something that you will
remember and that uniquely identifies your network (see Figure 2).
|
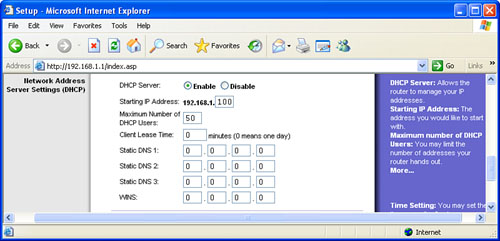
5. | Enable the gateway’s DHCP Server option, as shown in Figure 3.
Each computer on your network must also have an IP address. The easiest
way to do this is to enable the gateway to generate addresses
automatically using DHCP.
|
Note
Make sure that each
computer is set up to use DHCP. Select Start, All Programs,
Accessories, Communications, Network Connections. Right-click the Local
Area Connection or the Wireless Network Connection, and then click
Properties. In the connection’s property sheet, double-click Internet
Protocol and then make sure that the Obtain an IP address Automatically
option is activated.
