When working with Windows 2000 and Windows NT,
there was one cardinal rule for choosing a device to attach to your
Windows XP system: Check the hardware compatibility list! This was a
list of devices that were known to work with Windows. Like its operating
system ancestors, Windows XP also maintains a list of compatible
hardware, only now it’s called the Windows Catalog. You can get to this
website by entering the following address in your web browser: www.microsoft.com/windows/catalog/.
If you see your device
(and, in some cases, the correct device version) in the hardware list,
you can install it secure in the knowledge that it will work properly
with Windows XP. If you don’t see the device, all is not lost because
you still have two other options:
Check the box for
some indication that the device works with Windows XP or contains
drivers for Windows XP. Seeing the Designed for Windows XP logo on the
box is the best way to be sure that the device works with Windows XP.
Check the manufacturer’s
website to see whether an updated Windows XP driver or device setup
program is available.
Installing Plug and Play
Devices
The Holy
Grail of device configuration is a setup in which you need only to
insert or plug in a peripheral and turn it on (if necessary), and your
system configures the device automatically. In other words, the system
not only recognizes that a new device is attached to the machine, but it
also gleans the device’s default resource configuration and, if
required, resolves any conflicts that might have arisen with existing
devices. And, of course, it should be able to perform all this magic
without your ever having to flip a DIP switch, fiddle with a jumper, or
fuss with various IRQ, I/O port, and DMA combinations.
Plug and Play is an attempt
by members of the PC community to reach this Zen-like hardware state.
Did they succeed? Yes, Plug and Play works like a charm, but only if
your Windows XP system meets the following criteria:
It has a Plug
and Play BIOS— One of the first
things that happens inside your computer when you turn it on (or do a
hardware reboot) is the ROM BIOS (basic input/output system) code
performs a Power-On Self Test to check the system hardware. If you have a
system with a Plug and Play BIOS, the initial code also enumerates and
tests all the Plug and Play–compliant devices on the system. For each
device, the BIOS not only activates the device, but also gathers the
device’s resource configuration (IRQ, I/O ports, and so forth). When all
the Plug and Play devices have been isolated, the BIOS then checks for
resource conflicts and, if there are any, takes steps to resolve them.
It
uses Plug and Play devices— Plug and Play
devices are the extroverts of the hardware world. They’re only too happy
to chat with any old Plug and Play BIOS or operating system that
happens along. What do they chat about? The device essentially
identifies itself to the BIOS (or the operating system if the BIOS isn’t
Plug and Play–compliant)
by sending its configuration ID, which tells the BIOS what the device is and which
resources it uses. The BIOS then configures the system’s resources
accordingly.
Plug and Play is built in
to every device that connects via a USB or IEEE 1394 port, and it comes
with all PC Card devices and almost all interface cards that connect to
the PCI bus. Other devices that connect via the serial, parallel, or
PS/2 ports aren’t necessarily Plug and Play–compliant, but almost all of
these devices manufactured in the past few years are. Interface cards
that connect to the legacy ISA bus are not Plug and Play–compliant.
Before you install a Plug
and Play device, check to see whether the hardware came with a setup
program on a floppy disk, a CD, or as part of the downloaded package. If
it did, run that program and, if you’re given any setup options, be
sure to install at least the device driver. Having the driver loaded on
the system will help Windows XP install the device automatically.
Caution
Only members
of the Administrators group can install device drivers, so be sure to
log in as a member of that group before installing the device.
Alternatively, you can log in as another user and then enter your
Administrator username and password when prompted during the
installation.
How Windows reacts
when you install a Plug and Play device that is designed for Windows XP
depends on how you installed the device:
If you hot-swapped a device such as a PC Card or a printer, Windows XP
recognizes the device immediately and installs the driver for it.
If you turned your computer
off to install the device, Windows XP recognizes it the next time you
start the machine, and installs the appropriate driver.
Either way, an icon
appears in the system tray and a balloon tip titled Found New Hardware
pops up to tell you that your new hardware is installed and ready for
use.
If Windows XP did not find
a device driver for the new hardware, it automatically runs the Found
New Hardware Wizard. The wizard first asks whether it can connect to
Windows Update to search for the latest drivers.
If you bypass Windows
Update—if you allow the connection but Windows XP doesn’t find an
appropriate driver—the wizard gives you two choices to proceed:
| Install the Software
Automatically | Activate this option if you have a floppy disk or
CD that contains a Windows XP–compatible device driver for the
hardware. Insert the disk or CD and click Next. |
| | Windows
XP examines the system’s disk drives, locates the driver, and then
installs its. If the wizard finds more than one driver, it asks you to
choose the one you want from a list. |
| Install
from a List or Specific Location | Activate this option if
you’ve downloaded a driver from the Internet or if you have a disk or CD
that has a driver that isn’t compatible with Windows XP. Click Next. |
If you choose the
latter option and click Next, you see the dialog box shown in Figure 1.
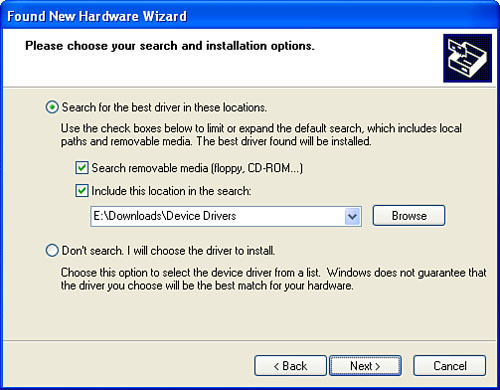
Again, you have two ways to proceed:
| Search for the Best
Driver in These Locations. | Activate this option if you’ve
downloaded the device driver from the Internet. If the driver is on a
floppy disk or CD, leave the Search Removable Media check box activated;
otherwise, deactivate it. If the driver is on your hard disk or a
network drive, activate the Include This Location in the Search check
box and then enter the full path of the folder that contains the driver.
Click Next. |
Caution
If the downloaded driver
is contained within a compressed file (such as a Zip file), be sure to
decompress the file before moving on to the next wizard step.
| Don’t
Search. I Will Choose the Driver to Install. | Activate
this option if you have a floppy disk or CD containing a device driver
that isn’t compatible with Windows XP. Note that you should also choose
this option if you want to use one of Windows XP’s built-in drivers that
you think might be a close enough match for the device. Click Next,
choose the appropriate hard ware type, and click Next again. In the
next wizard dialog box, you have two choices:
If you have a floppy
disk or CD, insert it, click Have Disk, type d:\,
where d
is the letter of the drive that holds the disk or CD, and click OK. If you want to pick an existing
Windows XP driver, activate the Show Compatible Hardware check box,
select the driver that closely matches your device, and then click Next.
|
Installing Legacy Devices
When it comes to
installing legacy devices (that is, devices that don’t support Plug and
Play), your best bet by far is to run the setup program that the
manufacturer supplies either on a floppy disk, a CD, or as part of the
driver download. If you’re asked, choose the Windows XP driver, if one
is available. If no Windows XP driver is available, the Windows 2000
driver will work in most cases. If the device only has drivers for
Windows NT, Windows 9x, or Windows Me, these almost certainly will not
work with Windows XP, so there’s no point in installing them. Go to the
manufacturer’s website and look for a Windows XP (or, at worst, a
Windows 2000) driver to download.
If you don’t have a setup
program for the device, Windows XP might still be able to support the
hardware using one of its legacy device drivers. To do this, you need to
run one of Windows XP’s hardware wizards. Some of these wizards are
device-specific, so you should use those where appropriate:
Joystick or other game device—
Launch Control Panel’s Game Controllers icon and then click Add.
Modem— Launch Control Panel’s Phone and Modem Options icon,
display the Modems tab, and click Add.
Printer— Select
Start, Printers and Faxes, and then click the Add a Printer link.
Scanner or digital camera— Launch Control Panel’s Scanners and Cameras
icon, and then click the Add an Imaging Device link.
For all other devices,
connect the device and then run the Add Hardware Wizard:
1. | Launch Control Panel’s Add Hardware icon.
|
2. | In the wizard’s initial dialog box, click Next. The
wizard searches for new Plug and Play hardware.
|
3. | When the wizard asks
whether the hardware is connected, activate the Yes, I Have Already
Connected the Hardware option and click Next. The wizard displays a list
of installed hardware.
|
4. | At the bottom of the list, select Add a New Hardware
Device and click Next.
|
5. | You now have two choices:
| Search
for and Install the Hardware Automatically | Activate this
option if you have a device that the wizard is capable of locating using
hardware detection. This route often works with modems, printers, video
cards, and network cards. Click Next to start the detection process. If
the detection failed, the wizard will let you know. In this case, click
Next and proceed with step 6. | | Install the Hardware
That I Manually Select from a List | Activate this option to
pick out the device by hand. Click Next. |
|
6. | Select the hardware category that applies to your
device. If you don’t see an appropriate category, select Show All
Devices. Click Next.
|
7. | Depending on the hardware category you selected, a new
wizard might appear. (For example, if you chose the Modems category, the
Install New Modem Wizard appears.) In this case, follow the wizard’s
dialog boxes. Otherwise, a dialog box appears with a list of
manufacturers and models. You have two choices:
Specify your
device by first selecting the device’s manufacturer in the Manufacturers
list and then selecting the name of the device in the Models list. If you have a manufacturer’s
floppy disk, CD, or downloaded file, click Have Disk, enter the
appropriate path and filename in the Install from Disk dialog box, and
click OK.
|
8. | Click
Next. Windows XP installs the device.
|
9. | Click Finish to complete the wizard.
|
Controlling Driver Signing
Options
Device drivers that
meet the Designed for Windows XP specifications have been tested for
compatibility with Microsoft and then given a digital signature. This
signature tells you that the driver works properly with Windows XP and
that it hasn’t been changed since it was tested. (For example, the
driver hasn’t been infected by a virus or Trojan horse program.) When
you’re installing a device, if Windows XP comes across a driver that has
not been digitally signed, it displays a dialog box similar to the one
shown in Figure 2.
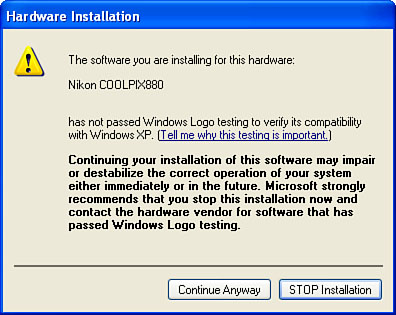
If you click STOP Installation, Windows XP
aborts the driver installation and you won’t be able to use the device.
This is the most prudent choice in this situation because an unsigned
driver can cause all kinds of havoc, including lock-ups, BSODs
(Blue Screens of Death), and other system instabilities. You should
check the manufacturer’s website for a Windows XP–compatible driver, or
upgrade to a newer model that’s supported by Windows XP.
Having said all
that, although not installing an unsigned driver is the prudent choice, it’s not the most convenient choice
because in most cases you probably want to use the device now rather
than later. The truth is that most of the time these unsigned drivers
cause no problems and work as advertised, so it’s probably safe to
continue with the installation. In any case, Windows XP always sets a
restore point prior to the installation of an unsigned driver, so you
can always restore your system to its previous state should anything go
wrong.
Note
Test your system
thoroughly after installing the driver: Use the device, open and use
your most common applications, and run some disk utilities. If anything
seems awry, use the restore point to roll back the system to its
previous configuration.
By default, Windows XP
gives you the option of either continuing or aborting the installation
of the unsigned driver. You can change this behavior to automatically
accept or reject all unsigned drivers by following these steps:
1. | Launch Control Panel’s System icon.
|
2. | Display the Hardware tab.
|
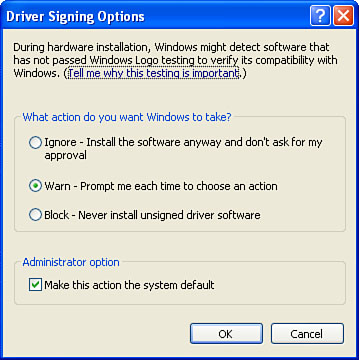
3. | Click Driver Signing. Windows XP displays the Driver
Signing Options dialog box, shown in Figure 3.
|
4. | Choose an
option in the What Action Do You Want Windows to Take? group:
| Ignore | Choose
this option if you want Windows XP to install all unsigned drivers. | | Warn | Choose
this option if you want Windows XP to warn you about an unsigned driver
by displaying the dialog box in Figure 2. | | Block | Choose
this option if you want Windows XP not to install any unsigned drivers. |
|
5. | If you want this action to apply to all the users of
the computer, leave the Make This Action the System Default check box
activated.
|
6. | Click OK.
|
Tip
There are some
device drivers that Windows XP knows will cause system instabilities.
Windows XP will simply refuse to load these problematic drivers, no
matter which action you choose in the Driver Signing Options dialog box.
In this case, you’ll see a dialog box similar to the one in Figure 2, except this one tells you that the driver will
not be installed and your only choice is to cancel the installation.
