1. What Is Silverlight?
Silverlight is
Microsoft's foray into the RIA arena. The idea of the RIA has been
gaining ground. More and more features closely associated with desktop
applications have been moving into browser-hosted applications
implemented through client-side scripting, AJAX, or browser plug-ins.
Silverlight enables rich, client-style features for PC clients running
the Windows operating system and Internet Explorer and Firefox, and
Macintosh clients using Safari.
Silverlight has gone
through several permutations over the last few years, moving from
Silverlight version 1.0 to 2 and now 3. Whereas Silverlight 1.0 and 2 are completely different from each other, Silverlight 3 builds upon the foundations of Silverlight 2.
Silverlight 1.0 was more
of an Extensible Application Markup Language (XAML) rendering engine
than anything else. Though you could interact with browser content and
handle events, it was all done through scripting. Silverlight 2 is
actually a subset of the .NET common language runtime (CLR) and
WPF-style rendering technology running on the client. When you develop
content using Silverlight 2 or 3, you program it using a syntax that is
compiled into Intermediate Language. It is compiled just in time (JIT)
and runs similarly to how typical desktop .NET applications run.
Silverlight offers many of the same development features as typical .NET
development. However, some features are missing because they either do
not fit the scope of Silverlight, or they don't make sense to implement
within what is basically a browser-based platform.
Here are some of the features available through Silverlight:
With Silverlight,
you can plant an island of rich, interactive content in a Web page.
Although much of a page might be composed of HTML rendered by a browser,
Silverlight content is run within a miniature CLR. The .NET programming
model remains largely intact, replete with the usual .NET event
handlers, .NET collections, and the .NET control and event model.
Silverlight includes a rich and ever-growing library of
controls. From a development perspective, these controls are much like
typical Windows controls or ASP.NET controls. That is, Button, ListBox, RadioButton, Label, and TextBox
controls are part of the control canon. They support many of the same
properties and events as the classic Windows and ASP.NET controls do.
For example, the Button control supports properties such as Foreground and Background as well as events like Click. ListBoxes include a source to which collections are bound as well as events like SelectionChanged.
Silverlight
supports rich graphics. Traditionally, the only way to get drawings up
to the browser has been to draw them in a design tool and ship them to
the client as JPG files or PNG files. Silverlight has a programmatic drawing API that you can use to render figures on the client computer. Because Silverlight
allows programmatic access to your drawings, the drawings become active
content that can be changed on the fly and that responds to
user-generated events.
Silverlight includes controls that provide media services, making it easy to embed video and audio in your Web pages.
Silverlight
integrates well with the HTML Document Object Model. You can access
HTML elements from within Silverlight code, and you can access
Silverlight code from JavaScript code.
Silverlight
is targeted to the .NET developer. Silverlight is actually a miniature
.NET runtime that downloads onto the client computer as an ActiveX
control (for Windows-based computers) or as a plug-in for the Safari
browser (for Macs). Although other Rich Internet Application tools have
been available for some time, they all require their own scripting
syntax to make the content interactive. .NET
developers can step right into Silverlight development because they can
program Silverlight using the .NET programming model.
Tool
support for Silverlight is unsurpassed. Microsoft Visual Studio 2010
fully supports Silverlight development from programming and debugging
points of view. Those with design skill can use Microsoft Expression
Blend to help develop the visual appearance of applications
independently of the programming and logic of the applications.
Microsoft Expression Design is a high-end vector graphics drawing tool,
and Microsoft Expression Encoder is for supporting media.
Silverlight takes many
architecture and design cues from WPF. In many ways, Silverlight is like
the younger sibling of WPF. As in WPF, the visual appearance of a
Silverlight UI is usually expressed using XAML, an XML dialect useful
for expressing object models (such as the one that represents the
Silverlight visual tree). The program logic is expressed using a .NET
language.
Next, dive right in and see how a Silverlight application works.
2. Creating a Silverlight Application
Before getting into the
details of Silverlight, consider how it fits in with the rest of the
project types available through Visual Studio. Creating a Silverlight
application is like creating other types of applications using Visual
Studio. Visual Studio includes a template that creates the Silverlight
content. Visual Studio also gives you the option to include one of the
following:
From there,
developing a Silverlight component follows much the same programming
model as the rest of .NET: You develop the Silverlight portion, and then
exercise it using the HTML page or the ASP.NET project. In fact, when
you start debugging, Visual Studio starts up the Web development server
and your browser of choice—just as it does with typical Web application
development. If you set any breakpoints in your Silverlight code, Visual
Studio will stop there so that you can watch your code execute.
This first exercise shows the
steps necessary for creating a simple Silverlight application. The
purpose here is just to get started. You'll see Silverlight's
capabilities in more detail soon.
Creating a Silverlight application
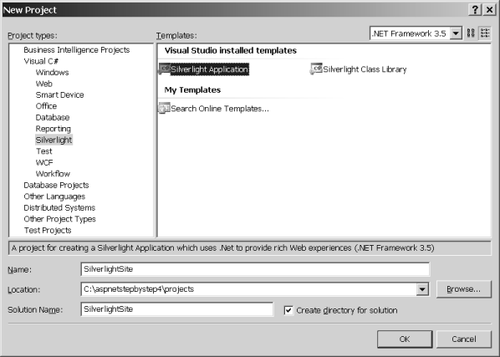
Begin
by starting Visual Studio. Select File, New, Project. Under Project
Type, select Silverlight Application. Name the project SilverlightSite:
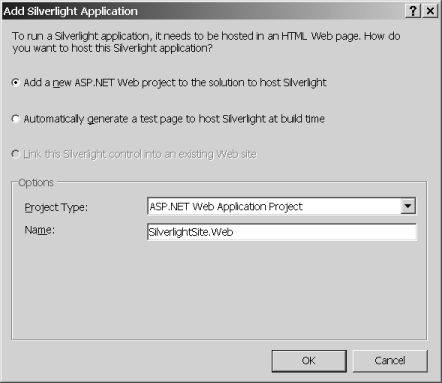
Visual Studio asks you whether you'd like to create a single HTML page for testing or an entire ASP.NET
site for testing. The default is to create an entire site, as shown in
the following graphic. Select this option, and click OK. If you have not
yet installed all the necessary Silverlight
development tools (the Silverlight SDK in this case), Visual Studio
reminds you to do so. In fact, Visual Studio will not let you proceed
until the SDK is downloaded.
Visual Studio generates a solution with two projects. The first project contains the Silverlight content. The second project is a Web Application project. Here is Solution Explorer after creating the Silverlight application:

The first node in the solution represents the project holding the Silverlight
content. Notice the normal Properties folder, which includes a version
of AssemblyInfo.cs with assembly-wide information. You also see the
familiar References folder, which contains references to other
assemblies. The assemblies to which this project is linked are actually
the Silverlight versions of the .NET system assemblies. There are also
MainPage.xaml and App.xaml nodes.
The second project in the solution is the ASP.NET
site that you can use to exercise the content. In many ways, it looks
like any typical ASP.NET site. There is a Default.aspx folder, an
App_Data folder, and the usual Properties and References folders. There
are a few new folders and files here, as well. First, there are two
files named SilverlightSiteTestPage—a
raw HTML version and an ASPX version. These illustrate alternate ways
to host the Silverlight content in your site. The Silverlight.js
file includes some script utilities you might find useful—most notably a
scripting function useful for instantiating the Silverlight content
dynamically from script. Finally, notice the ClientBin
directory—this is the folder into which the final Silverlight content
will be compiled so that the client browser can fetch it as the browser
loads the page.
Open the Page.xaml file and type the following tag so that the page renders a Button. Doing so places a Button
control in the Silverlight display area so that you can see the
Silverlight content when you run the application. Whatever string you
assign to the Content property becomes the text the Button displays:
<UserControl x:Class="SilverlightSite.MainPage"
  xmlns="http://schemas.microsoft.com/winfx/2006/xaml/presentation"
  xmlns:x="http://schemas.microsoft.com/winfx/2006/xaml"
  xmlns:d="http://schemas.microsoft.com/expression/blend/2008"
  xmlns:mc="http://schemas.openxmlformats.org/markup-compatibility/2006"
  mc:Ignorable="d"
  d:DesignHeight="300" d:DesignWidth="400">

  <Grid x:Name="LayoutRoot" Background="White">
    <Button Content="Hello World!"></Button>
  </Grid>
d</UserControl>
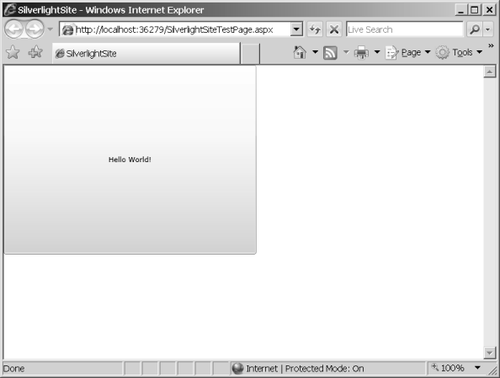
Build
the program and run it by pressing Ctrl+F5. Because you created the
solution to use an ASP.NET project as the test project, Visual Studio
starts the Web development browser and uses the ASP.NET test page.
(There's actually an ASP.NET server-side control that will host
Silverlight—you see that in just a minute.) Notice that without the Height and Width properties defined, the button takes up the entire area allotted to Silverlight.
To make the Silverlight content interactive,
add an event handler to the button. Before you add the handler, it's
usually best to name the control because Visual Studio uses the control
name to generate the handler method name. That makes it easier to track
the handlers later on. Add the Name attribute to the <Button> tag, followed by a Click handler. When you start typing the word Click, Visual Studio offers to write the event handler for you. This is what you see when you look at the code:
<UserControl x:Class="SilverlightSite.MainPage"
 xmlns="http://schemas.microsoft.com/winfx/2006/xaml/presentation"
 xmlns:x="http://schemas.microsoft.com/winfx/2006/xaml"
 xmlns:d="http://schemas.microsoft.com/expression/blend/2008"
 xmlns:mc="http://schemas.openxmlformats.org/markup-compatibility/2006"
 mc:Ignorable="d"
 d:DesignHeight="300" d:DesignWidth="400">
 <Grid x:Name="LayoutRoot" Background="White">
  <Button Content="Hello World!"
          x:Name="theButton"
          Click="theButton_Click"
          >
  </Button>
 </Grid>
</UserControl>
Now
add some code to handle the button click. Open the file
MainPage.xaml.cs and locate the new handler. If you allowed Visual
Studio to create the handler code for you, the handler method will be
named theButton_Click.
The handler takes two arguments (like most other .NET handlers). The
first parameter is the sender—in this case, a reference to the button
that was clicked. The second parameter is of the type RoutedEventArgs. The RoutedEventArgs is similar to the typical .NET EventArgs in that it contains information about the event. However, Silverlight manages its own message routing scheme (routed events), so the event information argument type is slightly enhanced.
Modify the Click handler to update the content of the button, increase the font size, and change the Foreground color to red. To do so, add the code you see here in bold type:
private void theButton_Click(object sender,
   RoutedEventArgs e)
{
 Button button = sender as Button;
 button.Content =
   "The button was clicked";
 button.FontSize = 22;
 button.Foreground =
  new SolidColorBrush(Colors.Red);
}
Run
the program to ensure that it works. Visual Studio opens a browser and
shows the ASP.NET test page. When you click the button, you should see
the font size increase and the font color change, and the button should
show new content.
