Obtaining Another Person’s Public Key
Before you can send an
encrypted message to another person, you must obtain his public key. How
you do this depends on whether you have a digitally signed message from
that person.
If you have a digitally signed message, open the message. Outlook Express adds the digital ID to the Address Book automatically:
If you have one or
more contacts whose email addresses match the address associated with
the digital ID, the digital ID is added to each contact. (To see it,
open the Address Book, open the contact, and then display the Digital
IDs tab.)
If there are no existing matches, a new contact is created.
Tip
If you don’t
want Outlook Express to add digital IDs automatically, select Tools,
Options, display the Security tab, and click Advanced. In the dialog box
that appears, deactivate the Add Senders’ Certificates to My Address
Book check box.
If you don’t have a
digitally signed message for the person you want to work with, you have
to visit a certifying authority’s website and find the person’s digital
ID. For example, you can go to the VeriSign site (www.verisign.com) to search for a digital ID and then download it to your computer. After that, follow these steps:
1. | Open the Address Book.
|
2. | Open the person’s contact info, or create a new contact.
|
3. | Type one or more email addresses, and fill in the other data as necessary.
|
4. | Display the Digital IDs tab.
|
5. | In the Select an E-Mail Address list, select the address that corresponds with the digital ID you downloaded.
|
6. | Click the Import button to display the Select Digital ID File to Import dialog box.
|
7. | Find and select the downloaded digital ID file, and then click Open.
|
8. | Click OK. |
Sending a Secure Message
After your digital ID has been installed, you can start sending out secure email messages. You have two options:
Digitally sign a message to prove that you’re the sender—
Start a new message and then either select the Tools, Digitally Sign
command, or click the Sign toolbar button. A small, red seal icon
appears to the right of the header fields.
Encrypt a message to avoid snooping and tampering—
In the New Message window, either activate the Tools, Encrypt command,
or click the Encrypt toolbar button. A blue lock icon appears to the
right of the header fields.
Tip
You can tell Outlook
Express to digitally sign and/or encrypt all your outgoing messages.
Select Tools, Options and display the Security tab. To encrypt all your
messages, activate the Encrypt Contents and Attachments for All Outgoing
Messages check box. To sign all your messages, activate the Digitally
Sign All Outgoing Messages check box.
Receiving a Secure Message
The technology and
mathematics underlying the digital ID are complex, but there’s nothing
complex about dealing with incoming secure messages. Outlook Express
handles everything behind the scenes, including the authentication of
the sender (if the message was digitally signed) and the decryption of
the message (if the message was encrypted). For the latter, a dialog box
tells you that your private key has been used to decrypt the message.
As you can see in Figure 1, the preview pane gives you a few visual indications that you’re dealing with a secure message:
The message text doesn’t appear in the preview pane.
The preview pane title is Security Help and the subtitle tells you the type of security used: Digitally Signed and/or Encrypted.
The preview pane text describes the security used in the message.
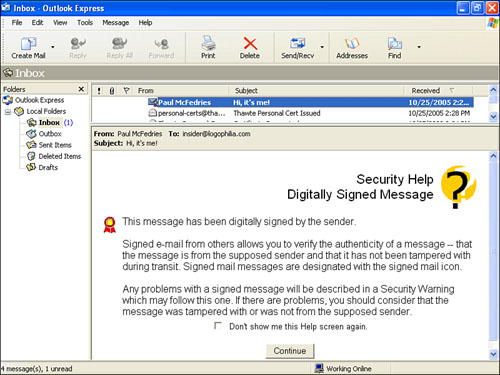
To read the message,
click the Continue button at the bottom. If you don’t want to see this
security preview in the future, activate the Don’t Show Me This Help
Screen Again check box.
Tip
If you change your mind
and decide you want to see the preview screen, you have to edit the
Registry. Open the Registry Editor and head for the key named HKCU\Identities. Open your 32-character identity key and then open the Software\Microsoft\Outlook Express\5.0\Dont Show Dialogs subkey. Open the Digital Signature Help setting and change its value to 0.
