1. Acquiring and Installing Network Hardware
Now that you know what you need to network two or
more computers, you need to purchase and install networking hardware.
There's little I can do to help you with that, except give you a couple
quick pointers:
If you're not too keen on opening the
computer case and installing things inside the computer, consider
getting hardware that connects to the computer via USB ports. Typically,
you just plug the devices in, and you're done.
If
you'll be adding a notebook to the network, you'll probably want a PC
Card NIC (not to be confused with a PCI card, which goes in a
motherboard slot inside the computer).
If you're new to all of this and just want to see
what some of this stuff looks like, here are some Web sites you can
visit. They're all network hardware manufacturers, not retailers:
In terms of actually purchasing the products, you can
find these products at any store that sells computer supplies,
including many of the large office supply chains such as Staples and
OfficeMax. Of course, you can buy the devices online at any Web site
that sells computer stuff. Shopping jaunts include Web sites such as www.amazon.com, www.cdw.com, www.cyberguys.com, www.officemax.com, www.staples.com, www.tigerdirect.com, and www.walmart.com, just to name a few.
After you've acquired the hardware, you need to
install it. I can't help you much there either. You'll have to follow
the manufacturer's instructions on that one, because there is no
one-rule-fits-all when it comes to installing hardware. As a general
rule of thumb, you'll probably want to:
Get the hub or router (if any) set up first.
Install the network interface cards second.
Connect all the cables last.
Once all the hardware is
connected and installed, you're ready to set up the network. That part
isn't so complicated because Windows does a great job of searching out
networks. You work through that next.
2. After the Hardware Setup
A couple of steps are involved in actually setting up
the networking hardware. First, make sure that the hardware you
purchased is installed based on the manufacturer's instructions. This
may include plugging in the device, then connecting the device to the
Internet, and finally plugging in the other computers to the device.
When this is complete, you can run the Set Up a Network Wizard to let
Windows finish the process.
Close any open programs and documents before you
start configuring your network. The type of network hardware you have
set up will determine what configuration you'll need to use. Here's
where to look, depending on your network configuration:
If you have an Ethernet network, and your
modem is inside of, or connected to, one computer in the network, you'll
use Internet Connection Sharing (ICS) to share a single Internet
account. See the section titled "Setting Up a Wired Network with an ICS
Host."
If you have a router or residential gateway that all computers in your network connect to, you will not
use Internet Connection Sharing. Each computer will have its own direct
access to your Internet account via the router.
If you have a wireless network.
If you want to set up a Bluetooth personal area network.
Be sure to turn off all computers before you install
the networking hardware. Then install all of the networking hardware and
turn on all of the computers. Chances are, Windows 7 will detect the
hardware and start setting things up automatically. If you see any
prompts asking what type of network you're installing, make sure you
specify that it's a private network
(not a public network). When asked about file sharing, make sure you
make choices that allow for file and printer sharing among computers in
the private network.
With those buzzwords and tips
in mind, let's move on to the specifics of things to do after you get
all the network hardware in place and all the computers turned on.
3. Setting Up a Wired Network with an ICS Host
The method for setting up a network described here
applies only for a network that's connected by cables (not a wireless
network).
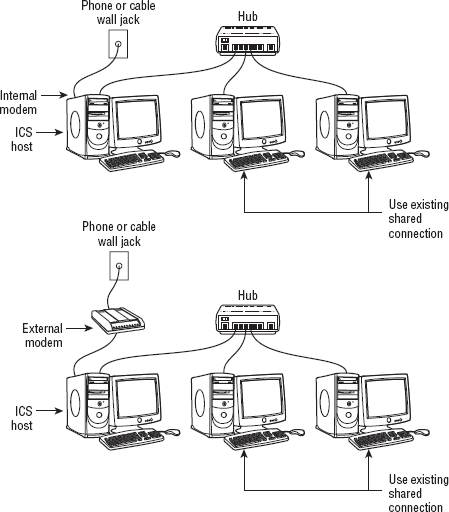
The scenario where these instructions do apply is illustrated in Figure 1.
Only one computer in the network is connected to the Internet. That
computer might have an internal modem that connects directly to a phone
or cable jack on the wall. Or, it might have an external modem that
connects to that one computer and a wall jack. That same computer uses a
separate cable to connect to the network hub.
In such a network, the computer that connects to the
wall jack (or modem and wall jack) is the only computer that can access
the Internet on its own. We call that computer the Internet Connection Sharing Host,
or ICS host for short. You must know, beforehand, which computer has
that Internet connection. If you don't, and try to guess your way
through it, your network won't work. To play it safe, you should sit
down at the computer, and make sure you can get online. Leave that
computer online as you configure the ICS host.
3.1. Setting up the ICS host
With all your hardware in place, and your ICS host
online, you're ready to start setting up the ICS host. Go to the
computer to which the modem is directly connected and log in to a user
account that has administrative privileges. Then open the Network and
Sharing Center using either of the following methods:
Click the Start button and choose Control Panel => Network and Internet => Network and Sharing Center.
Tap  , type net, and click Network and Sharing Center.
From the Network and Sharing Center follow these steps:
In the left column, choose the Change Adapter Settings link to view all of the available network connections on your computer.
Right-click the icon that represents the Internet connection and choose Properties.
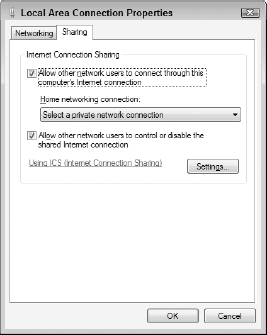
In the Properties window for that connection, click the Sharing tab as shown in Figure 2.
Select Allow Other Network Users to Connect through This Computer's Internet Connection and click OK.
That's it for the computer that's connected directly
to the Internet. You'll need to configure the network connection for
every computer in your network, as discussed next.
3.2. Setting up other computers
You need to configure the rest of the computers on
your network to use the ICS host connection to the Internet. But first,
make sure that you are still online, or can get online, from the ICS
host. You want a live Internet connection as you set up other computers
in the network. To connect the next system to the Internet, follow these
steps:
Open the Control Panel and click View Network Status and Tasks to open Network and Sharing Center.
Click Change Adapter Settings in the left pane.
Right-click the network connection and choose Properties.
On the Networking tab, double-click Internet Protocol Version 4.
Choose Obtain an IP Address Automatically and click OK, then click OK to close the network connection's property sheet.
Click Start => Internet Explorer.
Click Tools => Internet Options to bring up the Internet Options window.
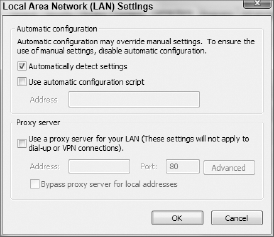
Click the Connections tab and click the LAN Settings button.
Clear check boxes as shown in Figure 3 (you can leave Automatically detect settings checked).
Click OK on all of the open windows.
Remember, you need to follow
the preceding steps for every computer you want connected to the
Internet. When you've finished, you should be able to get online from
every computer in the network.
