Logo
programming4us
programming4us
programming4us
programming4us
Home
programming4us
XP
programming4us
Windows Vista
programming4us
Windows 7
programming4us
Windows Azure
programming4us
Windows Server
programming4us
Windows Phone
 
programming4us
Windows 7

Microsoft Excel 2010 : Protecting and Securing a Workbook - Adding Security Encryption to a Workbook

- Free product key for windows 10
- Free Product Key for Microsoft office 365
- Malwarebytes Premium 3.7.1 Serial Keys (LifeTime) 2019
5/27/2014 1:02:34 AM
File encryption is additional security you can apply to a workbook. File encryption scrambles your password to protect your workbook from unauthorized people from breaking into the file. You don’t have to worry about the encryption, Excel handles everything. All you need to do is remember the password. If you forget it, you can’t open the file. Password protection takes effect the next time you open the workbook. To set password protection using file 
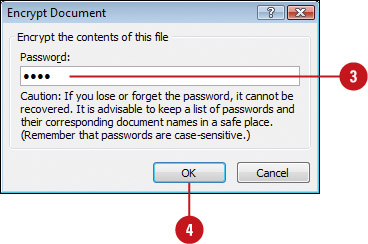
encryption, use the Encrypt with Password command on the Info screen, 
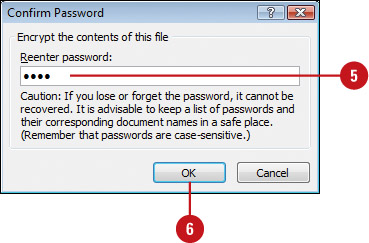
enter a password, write it down for safekeeping, and then reenter the password again.

Apply File Encryption

1. Click the File tab, and then click Info.

2. Click the Protect Workbook button, and then click Encrypt with Password.

3. Type a password.

4. Click OK.

5. Retype the password.

6. Click OK.

Did You Know?

You can remove file encryption. Click the File tab, click Info, click the Protect Workbook button, click Encrypt With Password, delete the file encryption password, and then click OK.

Other -----------------
- Microsoft Excel 2010 : Protecting and Securing a Workbook - Locking or Unlocking Worksheet Cells
- Microsoft Excel 2010 : Protecting and Securing a Workbook - Protecting a Worksheet - Apply a Password to a Worksheet
- Microsoft Excel 2010 : Protecting and Securing a Workbook - Inspecting Workbooks
- Working in the Background : WORKING WITH THE NETWORK LIST MANAGER
- Working in the Background : IMPLEMENTING APPLICATION RESTART AND RECOVERY
- Working in the Background : PROVIDING POWER MANAGEMENT (part 2) - Detecting a Change in Monitor State
- Working in the Background : PROVIDING POWER MANAGEMENT (part 1) - Getting the Power Management State
- Automating Windows 7 Installation : Customizing Images Using Deployment Image Servicing and Management (part 3) - Servicing the Operating System in an Image , Committing an Image
- Automating Windows 7 Installation : Customizing Images Using Deployment Image Servicing and Management (part 2) - Mounting an Image , Servicing Drivers in an Image
- Automating Windows 7 Installation : Customizing Images Using Deployment Image Servicing and Management (part 1) - Viewing Information about an Image with DISM
 
 
Top 10
- Microsoft Visio 2013 : Adding Structure to Your Diagrams - Finding containers and lists in Visio (part 2) - Wireframes,Legends
- Microsoft Visio 2013 : Adding Structure to Your Diagrams - Finding containers and lists in Visio (part 1) - Swimlanes
- Microsoft Visio 2013 : Adding Structure to Your Diagrams - Formatting and sizing lists
- Microsoft Visio 2013 : Adding Structure to Your Diagrams - Adding shapes to lists
- Microsoft Visio 2013 : Adding Structure to Your Diagrams - Sizing containers
- Microsoft Access 2010 : Control Properties and Why to Use Them (part 3) - The Other Properties of a Control
- Microsoft Access 2010 : Control Properties and Why to Use Them (part 2) - The Data Properties of a Control
- Microsoft Access 2010 : Control Properties and Why to Use Them (part 1) - The Format Properties of a Control
- Microsoft Access 2010 : Form Properties and Why Should You Use Them - Working with the Properties Window
- Microsoft Visio 2013 : Using the Organization Chart Wizard with new data
 
programming4us
Windows Vista
programming4us
Windows 7
programming4us
Windows Azure
programming4us
Windows Server