The set of columns within a view is called a table. For views that contain tables, you can choose from a list of tables to determine what data is displayed. On the View tab, in the Data group, click Table
to see the list of available tables for that view. If the existing
tables don’t meet your needs, you can create a new table that will be
available for use in all task views or all resource views.
There are two ways to create a new table. If you have customized a table
in a view by adding or removing columns and you want to save that table
as is, on the View tab, in the Data group, click Tables and then click Save Fields as a New Table. Type a name for the new table and then click OK.
To create a new table from scratch, follow these steps:
1. | On the View tab, in the Data group, click Tables and then click More Tables.
|
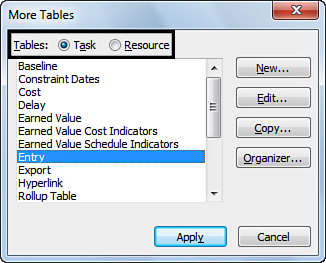
2. | Click Task or Resource, depending on what data you’re including in the new table, as shown in Figure 1.
|
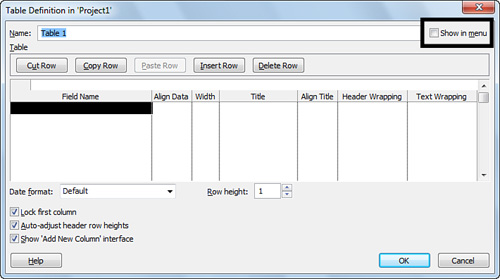
3. | Click New and then type a name for your new table in the Name box.
|
4. | Select the Show in menu check box, to the right of the Name box (as shown in Figure 2),
if you plan on using the new table frequently. If you select this check
box, the new table is included in the list that appears when you click Tables on the ribbon.
|
5. | Under Table, choose which fields you want to include in the table as columns by filling out the Field Name, Align Data, Width, Title, Align Title, Header Wrapping, and Text Wrapping columns.
|
You can use the Cut Row, Copy Row, Paste Row, Insert Row, and Delete Row buttons to edit the list of fields.
|
|
6. | If you’ve included any date fields in the new table, click the Date format list and choose how you want dates to appear in the table.
|
7. | Type a number in the Row height box to adjust row spacing.
|
8. | Select or clear the Lock first column check box to determine whether you want the first column in the table to be frozen during scrolling.
|
9. | Select or clear the Auto-adjust header row heights check box to let Project automatically increase or decrease the height of the header row, based on header text length.
|
10. | Select or clear the Show ‘Add New Column’ interface
check box to determine whether you want to include the ability to add
new columns to the table using the far-right column, labeled Add New Column.
|
11. | Click OK to create the new table.
|
If you selected the Show in menu check box to display the table, on the View tab, in the Data group, click Tables and then click the name of the new table.
If you did not select the Show in menu check box to display the table, on the View tab, in the Data group, click Tables and then click More Tables. Click Task or Resource, depending on which type of table you created. Click the name of the new table and then click Apply.
