8. Advanced Shell Commands
Several advanced shell
commands are beyond the scope of this article, but I want to mention
them. Shell commands generally allow you to enter the command completely
from the command prompt or enter the shell.
A shell command has several layers. As an example, the Net Shell (netsh) command is entered by typing netsh. Once launched, it will change the command prompt to netsh>.
You can then enter ? to see all the available commands. Type in interface and press Enter, and you're in a different layer of netsh identified as netsh interface>. Another request for help with the ? symbol will show a completely different set of commands that can be executed here.
When working with shell
commands, you'll often be trying to achieve a specific objective and
following detailed steps, such as through a Microsoft Knowledge Base
article. In other words, you probably won't ever master all of the shell
commands, but instead you will occasionally use them to perform
specific tasks.
You can also enter the full netsh
command from the command line without entering the actual shell
program. For example, the following command can be executed from the
command prompt, and it will set the IP address to 10.10.5.100 with a
subnet mask of 255.255.255.0 and a default gateway of 10.10.5.1.
Although the command spans two lines in this book, you should enter it
as a single line at the command prompt:
netsh interface ipv4 set address name="Local Area Connection" static
 10.10.5.100 255.255.255.0 10.10.5.1
|
I once needed to change the
address of the DNS server for about 50 non-DHCP clients in the network.
Yes, I could have accessed the NIC, then the IPv4 properties, and so on
for each system, but I knew that if I could just launch a batch file, it
would be much easier and quicker.
After some experimentation, I found this command (executed as a single line from the command prompt) would work:
netsh interface ipv4 set DNSServer "Local Area Connection"
 static 10.10.0.10
I created a batch file with this single command in it and then configured the batch file to run as a logon script. I asked the users to log off and then back on, and I was
done.
|
Some of the other common shell commands you may come across are these:
Wmic
This allows you to
perform advanced Windows Management Instrumentation (WMI) queries from
the command line. WMI is very rich and robust, and if you dig into
scripting more, you'll find you can do quite a bit with it. It's
intertwined with many products that use WMI queries to learn details
about systems remotely. WMIC allows you to execute WMI queries from the command line. As a simple example, the qfe command (short for Quick Fix Engineering) will retrieve a listing of all updates installed on the system and is executed using WMIC qfe. You'll see this in action in the batch file section.
NOTE
WMI is used both to
retrieve and set information on computers. As an example, you can create
scripts to set the power-setting values on computers remotely using the
Win32_PowerSetting class or remotely activate a specific power plan using the Win32_Plan.Activate() method.
NTDSUtil
The New Technology Directory Services Utility (NTDSUtil)
is often used to maintain Active Directory. You can use it to restore
Active Directory, change the directory services restore mode
administrator password, or seize single master operations roles held by
domain controllers. While Active Directory maintenance is often left to
domain administrators, you may come across it in your travels if your
desktops are in a domain.
9. Creating a Batch File
A batch file
is a listing of one or more command-prompt commands within a text file.
When the batch file is called or executed, the commands are executed.
The best way to understand this is to do it. While there are
sophisticated text editors you can use, Notepad will work.
Launch the command prompt. Type Notepad ListPatches.bat and press Enter. Notepad will launch, and because a file named ListPatches.bat doesn't exist, you'll be prompted to create it. Click Yes. Note that the file will be created in the same directory in which the Command Prompt window was launched. Type in the following text in Notepad: Echo Off
Echo Hello %username%. Today is %date%.
Press Ctrl+S to save the file, but don't close it.
Return to the command prompt, type ListPatches,
and press Enter. Notice that since the batch file is considered one of
the executable types, it is automatically located and executed. You'll
see a greeting with today's date. This is okay but not very useful. Access Notepad, and type in the following text after your first two lines: Wmic qfe > %computerName%patches.txt
This will create a list of updates currently installed on this system and store the updates in the file named computerNamepatches.txt, where the computer name will be different for each computer where it is executed. Press Ctrl+S to save the file. Return
to the command prompt, press the up arrow, and press Enter to execute
the batch file again. Notice that it almost seems as though it's the
same as before. A greeting appears, it pauses for a second or two, and
then the command prompt returns. Provide some user feedback by adding the following lines to the batch file: Echo A list of patches is stored in the %computername%patches.txt file.
Press Ctrl+S to save the file.
Access
the command prompt, press the up arrow to retrieve the last command,
and press Enter to view the difference. Notice that instead of %computername%, your actual computer name is used. You could also open the file for the user by adding this command to the batch file: Notepad %computername%patches.txt
If you add this to the batch file to test it, make sure you remove it before moving on. Last,
if you wanted to copy it to a network share (such as a central computer
that will hold files from multiple computers), you could use the NET USE
command. For this set of commands, I'm assuming I have a share named
Patches on a server named Srv1 that I can access in the network and I
have permissions to copy the file. I'm accessing it using the \\Srv1\Patches UNC path. You can use any server (or another Windows 7 box) and any share that has appropriate permissions. Net Use Z: /delete
Net use z: \\SRV1\Patches
Copy %computerName%Patches.txt Z:
net use Z: /delete
The
first command ensures that the Z: drive isn't already mapped to
something else. The next command maps the Z: drive to the UNC path using
the \\serverName\shareName format. The third line copies the file to the Z: drive using the Copy command, and the fourth line returns the environment to normal.
|
Now that the file is created,
it can be configured to execute automatically based on a schedule.
Windows 7 includes the built-in Task Scheduler that can be used to schedule tasks.
|
At my current job, I
teach several different courses. The various courses require different
student materials. Since I'm never sure what previous students might
have done, I always refresh the files before each class.
Walking around the room
with my USB and touching as many as 18 student computers could easily
take an hour or so. However, I've created scripts to load these
materials onto the systems for the different courses. I simply turn on
the student computers and launch my script from the instructor computer.
A few minutes later, I verify that the script ran successfully and I'm
done.
The script ensures that the process is always exactly the same for each student. It also saves me a lot of time and effort.
|
10. Scheduling a Batch File
Once a batch file is created, it can be scheduled to run at any time.
Launch Windows Explorer, and create a folder named Scripts in the C: drive. Copy the ListPatches.bat file created in the previous exercise to the C:\Scripts folder. Launch the Task Scheduler by clicking Start, typing Task
in the search box, and selecting Task Scheduler from the search
results. You can also access the Task Scheduler from the Administrative
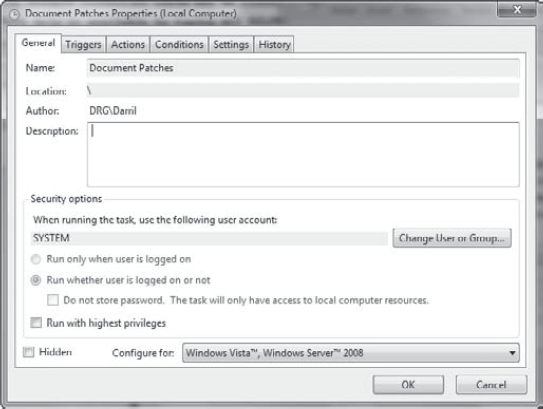
Tools menu. When Task Scheduler launches, select Create Basic Task from the Action pane on the right of the window. Name the task Document Patches and put in a description if desired. Click Next. On the Trigger page, select Weekly and click Next. Select Thursday and set the time to 3:00 PM to cause the script to run every Thursday afternoon at 3:00. Click Next. On the Action page, select Start A Program and click Next. Browse to C:\Scripts and select the ListPatches.bat file you copied to this location earlier. Click Next. Select the check box "Open the Properties dialog for this task when I click Finish" and then click Finish. The Properties page will appear with the General tab selected. Click the Change User Or Group button. Enter System
as the user and click OK. This will cause the script to run using the
System account instead of your account. Your display will look similar
to the following graphic. Click OK.
Test your task using the following steps: Select Task Scheduler Library within the Task Scheduler, and locate your task. Right-click your task and select Run. Notice that you won't get any feedback indicating success or failure of the task. Select the History tab of the task in the middle pane. It should show that the task completed with a time stamp. Browse to the Patches share. Verify that the file has been copied to this share.
|
Note that you can use this script
on as many computers as you like within your network to document the
patches that are currently installed. If you need to verify that a
certain patch has been installed on a certain computer, it's as simple
as accessing the share and opening the text file to get your answer.
If Task Scheduler isn't open, open it and access the Document Patches task you created in the previous exercise. Right-click the task and select Export. Browse to the C:\Scripts folder, and name the file DocumentPatches.xml. Create a batch file named CreateTask.bat in the C:\Scripts folder using Notepad. Enter the following text as a single line in Notepad: Schtasks /create /tn NewDocPatches /xml c:\Scripts\DocumentPatches.xml
This uses the command-line program Schtasks. The /create switch specifies that you are creating a task. The /tn switch is required to name the task, and although I named it NewDocPatches, you can give it any name desired. The /xml switch specifies that the task will be created from an XML file and the full path of the .xml file is used. Launch a Command Prompt window with administrator permissions (right-click Command Prompt and select Run As Administrator). Change the path to the C:\Scripts folder with the CD command: CD \Scripts
Type CreateTask and press Enter. Return
to Task Scheduler, and you'll see that this additional task has been
created on your system. Feel free to delete the task by right-clicking
it and selecting Delete.
|
11. Just a Glimpse
Remember, this article is not
intended to make you an expert on the command prompt. There's no way it
can. Entire books are written on the command prompt, and there's no way
this half of a chapter can hold the entire contents of a book.
Just as the angel (Don Cheadle) tells Nicholas Cage in Family Man, this is "just a glimpse." It provides you with a glimpse of the possibilities. What you do with this glimpse is up to you.
