Windows 7 provides a unique capability, in that you
can create, mount, and boot from a VHD file directly from the operating
system, rather than requiring a software overlay, such as VirtualBox or
ESX Server.
What this means is this:
When dealing with most virtualization solutions, such as VirtualBox or
VMWare, you need to install an underlying operating system (which
controls the physical assets of your computer), then add in the
virtualization software (VirtualBox, or the appropriate VMWare
software), and then create and run a virtual Windows 7 system inside
that. Think of it as a three-layer cake:
The bottom layer is the underlying operating system.
The middle layer is the virtualization software, which manages the VHD.
The top layer is your Windows 7 system.
Microsoft’s native hard
disk support for VHDs allows you to dispense with running a software
overlay, such as the aforementioned VirtualBox or ESX Server. In this
new model, your Windows 7 system manages its own virtualization, so
there is no need for an underlying operating system and no separate
virtualization software—all three layers of the cake are collapsed back
into one layer.
So how do you create a VHD and install Windows 7 to it?
Creating a VHD
The
simplest method is to use the Windows 7 installation DVD to create the
VHD and then install Windows 7 into that VHD. Follow these steps:
1. | Boot your system using the Windows 7 DVD.
|
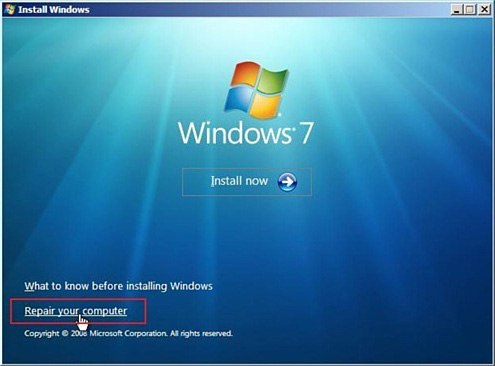
2. | Choose Repair Your Computer as shown in Figure 1.
|
3. | Click Next without selecting a particular destination.
|
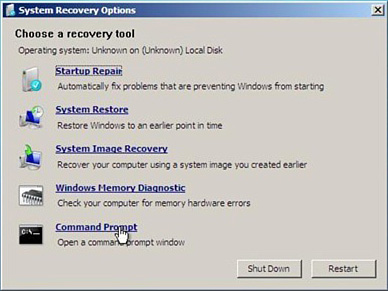
4. | Select Command Prompt (see Figure 2).
|
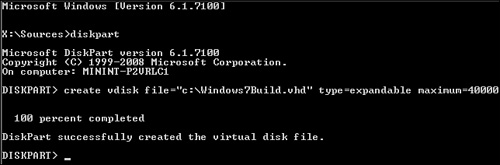
5. | Type diskpart and press Enter to start the Diskpart utility.
|
6. | Type create vdisk file="c:\Windows7Build.vhd" type=expandable maximum=40000 and press Enter, as shown in Figure 3.
Tip
You can create any VHD filename you want, as long as there are no spaces in the filename. Note that the maximum parameter is the maximum size of the virtual hard disk in megabytes. You can make it larger if that is appropriate.
|
7. | Type select vdisk file="c:\Windows7Build.vhd" and press Enter.
|
8. | Type attach vdisk and press Enter.
|
9. | Type exit
and press Enter to quit Windows Repair. DO NOT REBOOT. Instead, click
the [X] at the top right corner to close the Windows Repair window, and
return to the installer.
|
10. | Next,
you create a partition in the new hard disk that you have just created.
Start by clicking Install Now. When the License terms window appears,
click “I accept the license terms”; then click the Next button.
|
11. | Now
click the option to install a new copy of Windows. You will be asked
where you want to install the new copy of Windows. Choose the partition
containing the virtual hard disk you just created.
|
12. | Format
the new hard disk partition by selecting the partition and then
clicking the Next button. This also starts the installation process.
|
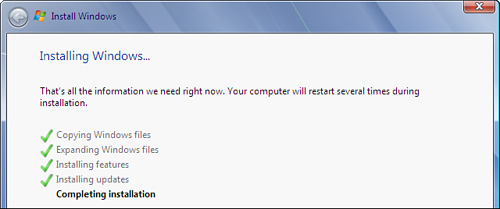
13. | Install Windows 7 to this new hard disk. Figure 4 shows the Windows 7 installation in progress.
|
14. | Reboot to launch Windows 7.
|
15. | After
your Windows 7 installation is running the way you want, back up the
VHD file. This provides a clean image of your system that can then be
readily reloaded to your computer if needed.
|
Note
We’ve also found a
number of other methods for creating VHDs and installing Windows 7
documented online by Windows developers around the world. Most of these
are variations on creating a Windows system image (a WIM file) and
converting it to a VHD, most often using the WIM2VHD utility available
at http://code.msdn.microsoft.com/wim2vhd. We found literally thousands of results when we searched on the terms “Windows 7 create VHD.”
