2. Authenticating private requests
In the previous section, you
developed a console application to return a list of the files that
reside in your public container (ChrisConverted). Now you’re going to
modify this code to return all the containers in your development
storage account. This sample is the direct REST API equivalent of the
storage client calls .
Because there’s only two containers in the development storage account (ChrisOriginals and ChrisConverted), we expect the following XML output from the console application:
<EnumerationResults AccountName="http://128.0.0.1:10000/devstoreaccount1/">
  <Containers>
    <Container>
      <Name>chrisconverted</Name>
      <Url>http://128.0.0.1:10000/devstoreaccount1/chrisconverted</Url>
      <LastModified>Sat, 27 Jun 2009 23:37:31 GMT</LastModified>
      <Etag>0x8CBC5975FB7A0D0</Etag>
    </Container>
    <Container>
      <Name>chrisoriginals</Name>
      <Url>http://128.0.0.1:10000/devstoreaccount1/chrisoriginals</Url>
      <LastModified>Sat, 27 Jun 2009 23:14:23 GMT</LastModified>
      <Etag>0x8CBC594247EFB60</Etag>
    </Container>
  </Containers>
  <NextMarker />
</EnumerationResults>
Listing 2
contains the code that we used to make this request via the REST API.
Before you can run this sample, you’ll need to reference the storage
client because you’re going to use some of its library calls to sign the
HTTP request with the shared access key. You’ll also need the following
using statement at the top of your class:
using Microsoft.WindowsAzure.StorageClient;
Listing 2. Listing the containers in the development storage account via REST
The code in listing 2 is similar to the code in listing 1
except that we’re using a different URI (because we’re listing
containers rather than BLOBs) and signing the request. The URI for
listing containers in the development storage account is http://127.0.0.1:10000/devstoreaccount1/?comp=list. This URI will return a list of the contents of the storage account (a list of containers).
Apart from the URI, the only
difference between the two listings is that you sign the HTTP web
request with your shared-key credentials. The process of signing the
request is quite complicated; it’s best to use the storage client code
as we’ve done in listing 2.
Use the same code that you wrote earlier to extract the configuration setting:
var account =
   CloudStorageAccount.FromConfigurationSetting("DataConnectionString");
Tip
CloudStorageAccount.FromConfigurationSetting will work with both Windows Azure ConfigurationSettings and regular .NET application settings.
Now sign the request using the request signing functionality built into the StorageClient library:
account.Credentials.SignRequest(hwr);
Using the SignRequest method also adds the x-ms-date header information to the request, so you don’t have to add it on your own. Be aware that if you add the x-ms-date header on your own and you sign the request with SignRequest, the header might not be populated correctly.
Even if you do plan to use
only the REST API, it’s still worth referencing the StorageClient
library just to use that bit of code.
Signing the Request
Although the request signing code is already implemented, let’s look at the overall process of signing a request.
If you were to look at the HTTP request that you generated in listing 2
(you could stick a breakpoint after the request has been signed), you
would see that the request contains an Authorization header. The
Authorization header for the request in listing 9.2 is
SharedKey devstoreaccount1:J5xkbSz7/7Xf8sCNY3RJIzyUEfnj1SJ3ccIBNpDzsq4=
The signature in the header (the long string after devstoreaccount1)
is generated by canonicalizing the request. The canonicalized request
is hashed using a SHA-256 algorithm and then encoded as the signature
using Base64 encoding.
Processing the Request
After the request is
received by the server, the server takes the incoming request and
performs the same canonicalization and hashing process with the shared
key. If the signature that’s generated matches the Authorization header,
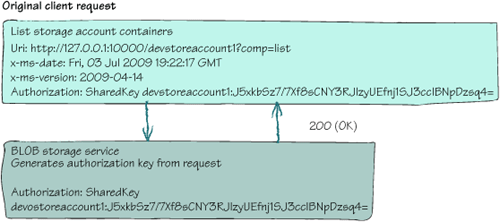
the server can perform the request. Figure 2
shows the validation process between the client and the BLOB storage
service. Notice that the authorization key generated by the server
matches the original client request.
If the signature
generated by the server is different from the Authorization header, then
the server won’t process the request and returns a 400 response code (Bad Request).
Being able to generate the same authorization key both client-side and
server-side means that users who don’t have the shared key are prevented
from performing unauthorized requests against the account. Because the
shared key is never sent between the client and the BLOB storage
service, the risk of the key being compromised is substantially reduced.
The authorization key is
generated from both the contents of the request and the shared key.
Generating the hash with both pieces of information means that the user
can’t tamper with the request to perform another operation. If, for
example, a hacker were
to intercept your previous request, then the generated Authorization
header server-side would change and the request would be denied. Figure 3 shows the validation process between the client and the BLOB storage service when the original request from figure 2 has been tampered with.
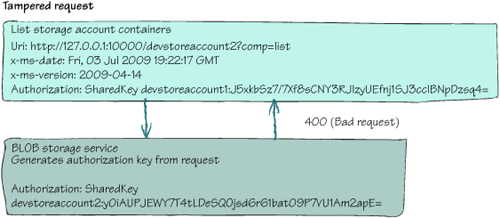
In figure 3, we’ve tampered with the original request from figure 2 to return any containers from devstoreaccount2.
Notice that the server generated a different authorization key from the
tampered request and therefore the server returns a 400 response code (Bad Request).
Now that you
understand how the REST API authentication process works, take a break
and have a quick beer. Just think, if you had to implement that code
yourself rather than Microsoft providing it, you’d probably prefer to
have a longer break and drown your sorrows.
